If you want crazy tasty rice to go with your curries, pilau rice is just the thing you need on the table tonight.
And it’s easy. Really easy. Like no-brainer easy. If you can boil water, you can make pilau rice.
OK – maybe it’s a little more complicated than boiling water. But not a lot. Seriously. Want to nail it every time? Read on.
Foolproof basmati rice
There are a lot of opinions on cooking rice. One mug. Two mugs. A finger deep above the surface. Up to your first knuckle.
Rinse. Don’t rinse. Soak. Don’t soak. Make it standing on one foot. But only facing east. Except Tuesdays. Tuesdays you face west.
I have a theory about that. If it works all these different ways it’s probably near bullet proof.
I don’t know that for a fact. But if everybody has a way to make rice. And they are all different. Then it’s probably pretty hard to screw up.
I have my way. And I know it works. So it’s what I go with. This has never failed me. And it’s precise. No feel. A formula. Scale it up or down. It just works.
1 cup of rice. 1 and 1/2 cups of water. A teaspoon of kosher salt. Bring to a simmer uncovered. Cover and reduce the heat to low. Set a timer for 20 minutes. Wait.
After 20 minutes turn off the heat. Reset the time for 5 minutes. When that second timer goes off you are good to go. It is just that easy.
Want 2 cups of rice? Use 3 cups of water. Two teaspoons of kosher salt. Everything else stays the same.
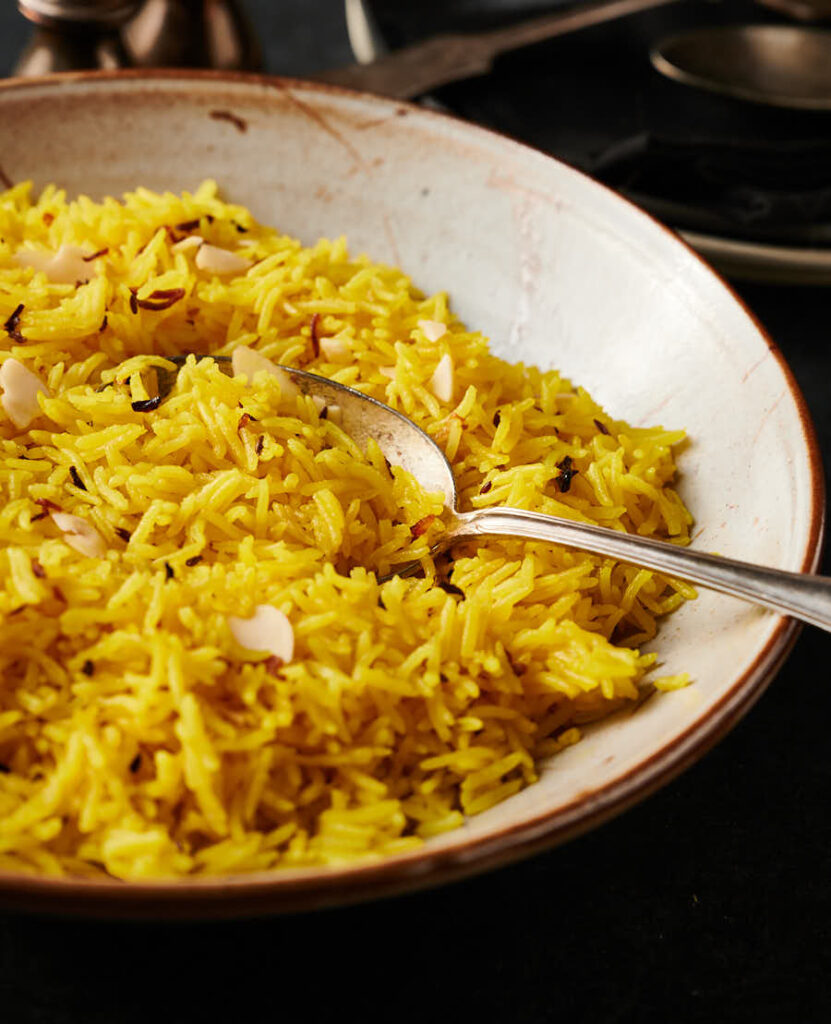
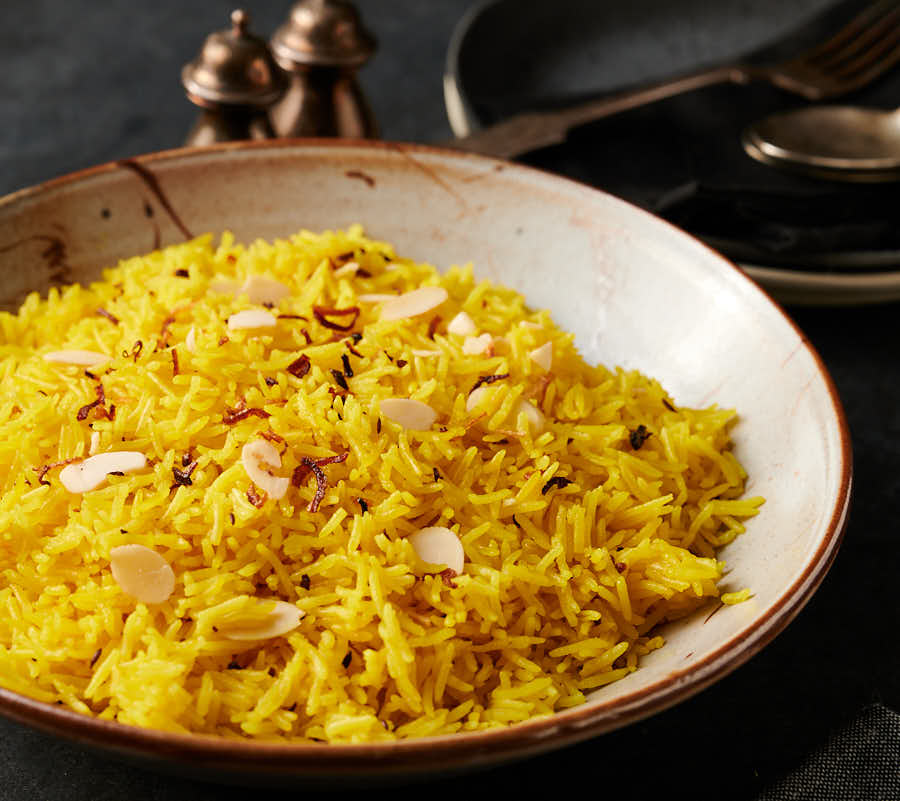
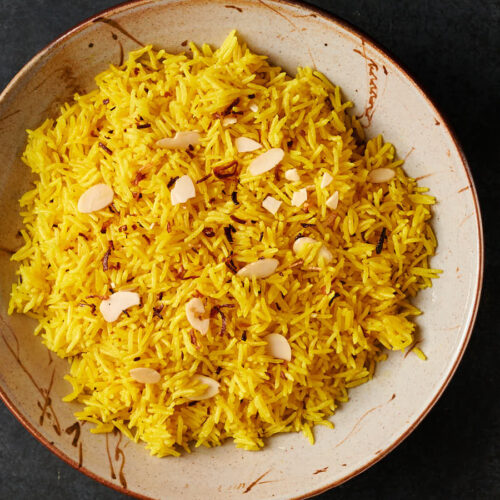
Pilau rice is just seasoned rice
There’s no mystery here. Rice. Water. Aromatic spices. Salt. And some ghee to make it a bit decadent. That’s it. You are just building on the foolproof basmati technique above.
You can dress it up if you want. Add peas. Top it with fried onions. Flaked almonds. Whatever you want.
But at the end of the day this is just rice. Really tasty rice. But just rice. There’s no secret. No magic. And it doesn’t need to be a big production.
I never thought I’d write this post. It actually never occurred to me that anyone would care.
But I get asked. A lot. So here it is. Happy to share.
Three simple things make pilau rice
When I make pilau rice I want three things. I want it yellow. Turmeric takes care of that.
I want the aroma to blow me away. That’s where the whole spices come in.
And I want it lush. Rich. I want every grain of rice wrapped in flavour infused buttery goodness. A little ghee takes care of that.
What I don’t want is to spend a lot of time and effort making it. Call me lazy but I don’t see the point. Nobody needs this to be more difficult than it needs to be.
If I want rice to be the star I make chicken biryani . I love a good biryani. But if it’s a supporting player, this technique does it for me. I serve pilau rice on the side. With other dishes.
Bloom your spices in ghee
The difference between pulau rice and Tuesday night white rice is one simple step. Bloom some whole spices in ghee. Before you cook you rice.
I grew up Indian. So I’m pretty happy with plain basmati rice. I think it’s the perfect counterpoint. Balanced. But I get that people want flash. And pulao rice brings a little bit of flash.
From an execution perspective rice pilau and white basmati rice are really close. So if you want rice pilau, it’s barely any extra work.
Melt some ghee. Toss in some whole spices. Fry briefly. Add the rice. Stir. Add the water. And just make rice. that’s it. Like I said. Easy.
You can make pilau rice as complicated as you want. Or you can just do this. And focus on the star of your Indian meal. Your call. I like it easy.
Easy Indian pilau rice
Ingredients
- 1 tbsp ghee
- 4 green cardamom
- 1 2" piece cassia bark
- 1/2 tsp cumin seed
- 1 tej patta Indian bay leaf (optional)
- 1 cup basmati rice
- 1 1/2 cups water
- 1 tsp kosher salt – a bit less if you are using regular sea salt
- 1/2 tsp turmeric
Instructions
- Pick a pot with a tight fitting lid. For 1 cup of rice a 2 quart saucepan is a good size.
- Heat the ghee over medium heat.
- Add the green cardamom, cassia bark and cumin seed. Little bubbles should form around the spices. Cook for around 30 seconds.
- Add the rice and stir. Add the water. For basmati using this technique the proportions are always 1 rice to 1 and 1/2 water. One tsp of kosher salt per cup of rice.
- Add the turmeric and Indian bay leaf (tej patta). Bring to a lively simmer.
- Reduce the heat to low and cover. Set a timer for 20 minutes. Do something else for a while.
- When the timer goes off (20 minutes after you covered the pot), turn of the heat. Do not uncover. Move the pot off the burner.
- Set a timer for 5 minutes. Keep doing something else. After five minutes remove the lid and gently fluff the rice. Inhale that aroma!
Notes
Nutrition
Easy Indian pilau rice
Ingredients
- 1 tbsp ghee
- 4 green cardamom
- 1 2" piece cassia bark
- 1/2 tsp cumin seed
- 1 tej patta Indian bay leaf (optional)
- 1 cup basmati rice
- 1 1/2 cups water
- 1 tsp kosher salt - a bit less if you are using regular sea salt
- 1/2 tsp turmeric
Instructions
- Pick a pot with a tight fitting lid. For 1 cup of rice a 2 quart saucepan is a good size.
- Heat the ghee over medium heat.
- Add the green cardamom, cassia bark and cumin seed. Little bubbles should form around the spices. Cook for around 30 seconds.
- Add the rice and stir. Add the water. For basmati using this technique the proportions are always 1 rice to 1 and 1/2 water. One tsp of kosher salt per cup of rice.
- Add the turmeric and Indian bay leaf (tej patta). Bring to a lively simmer.
- Reduce the heat to low and cover. Set a timer for 20 minutes. Do something else for a while.
- When the timer goes off (20 minutes after you covered the pot), turn of the heat. Do not uncover. Move the pot off the burner.
- Set a timer for 5 minutes. Keep doing something else. After five minutes remove the lid and gently fluff the rice. Inhale that aroma!
Notes
Nutrition
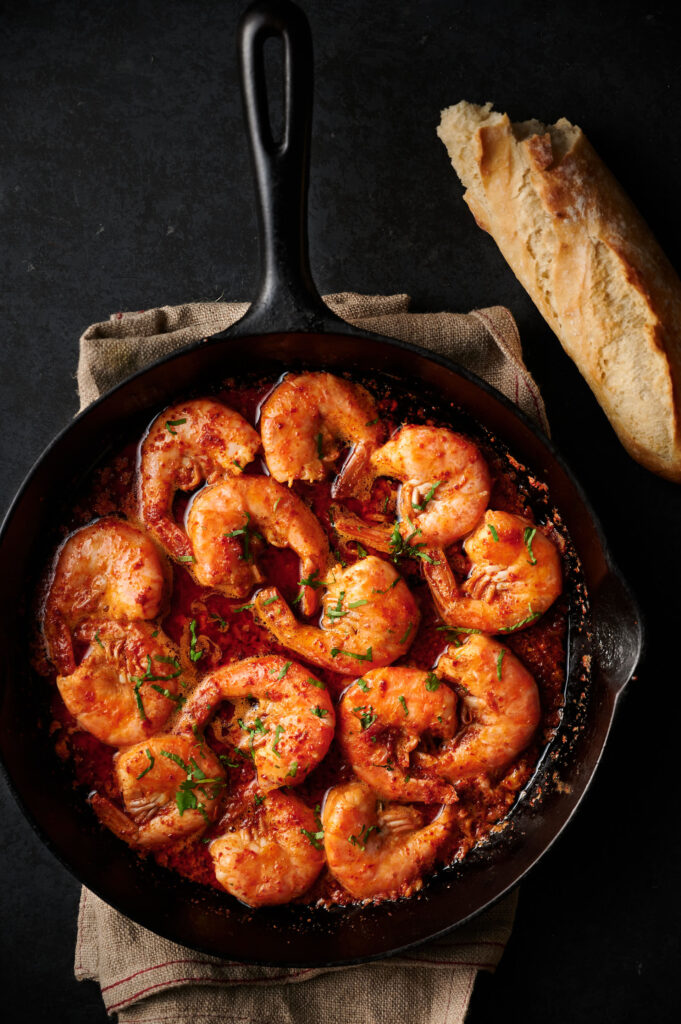
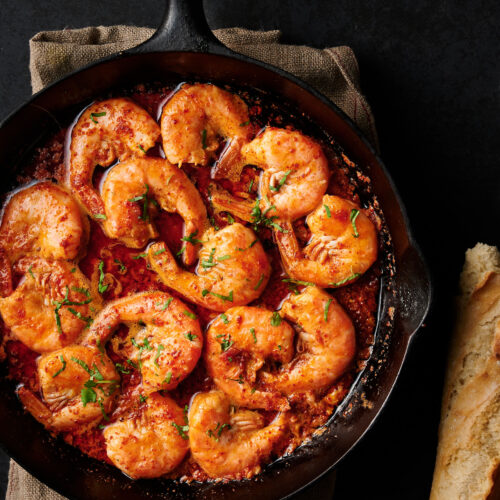
Korean bbq shrimp. Think cajun bbq shrimp but with big Korean flavours. Classic Louisiana meets Asia in a mess of buttery goodness.
I’ve been a fan of cajun bbq shrimp for most of my life. It was my favourite ways to eat shrimp. Until now.
Now it’s tied with Korean BBQ shrimp. I knew Korean BBQ shrimp was going to be good. Just wasn’t quite ready for how good.
I had all sorts of words running through my head when I tasted it for the first time. Words like ridiculous. Unbelievable. Stupid delicious. Crazy talk. I know. But still…
Butter and spice and everything nice
There’s really not a lot to this recipe. Which is why it amazes me. Although I really shouldn’t be surprised.
It’s shrimp. And butter. Garlic. Lots of garlic. And gochugaru. Those wonderful Korean chili flakes. Fish sauce. Lemon. And cilantro.
How could that not be good? It’s everything good in one pan. And then you serve it up with good, crusty bread to sop up the sauce. That’s just seriously good living.
It’s rich. Don’t plan on having this for dinner. Unless you are trying hard to gain weight. And you can handle a ton of butter.
It’s meant as an appetizer. One with serious flash. Perfect for when you want to show off. When you want to wow your friends. And it’s easy. I mean really easy. I won’t tell if you don’t.
Korean BBQ shrimp isn’t a thing. It’s not even Korean. Fusion maybe. Although I really don’t like that term. Korean inspired is more accurate.
This is one hundred percent glebekitchen. And I’m pretty pleased with myself. Can you tell?
No grill required for this Korean BBQ shrimp
I’m not sure why cajun BBQ shrimp are called BBQ. There’s no BBQ. No grill. There isn’t even BBQ sauce.
Legend has it a New Orleans restaurant came up with the dish in the 1950s. Because it was kind of red they decided to call it BBQ shrimp. Doesn’t make a lot of sense to me. But that’s the story.
So I’m calling this Korean BBQ shrimp. Not because it has anything to do with barbecue. Or grilling. But because it’s a whole lot of butter and spice. Just like the original.
Don’t overcook your shrimp
There’s only one way I can think of to screw this dish up. Overcooked shrimp.
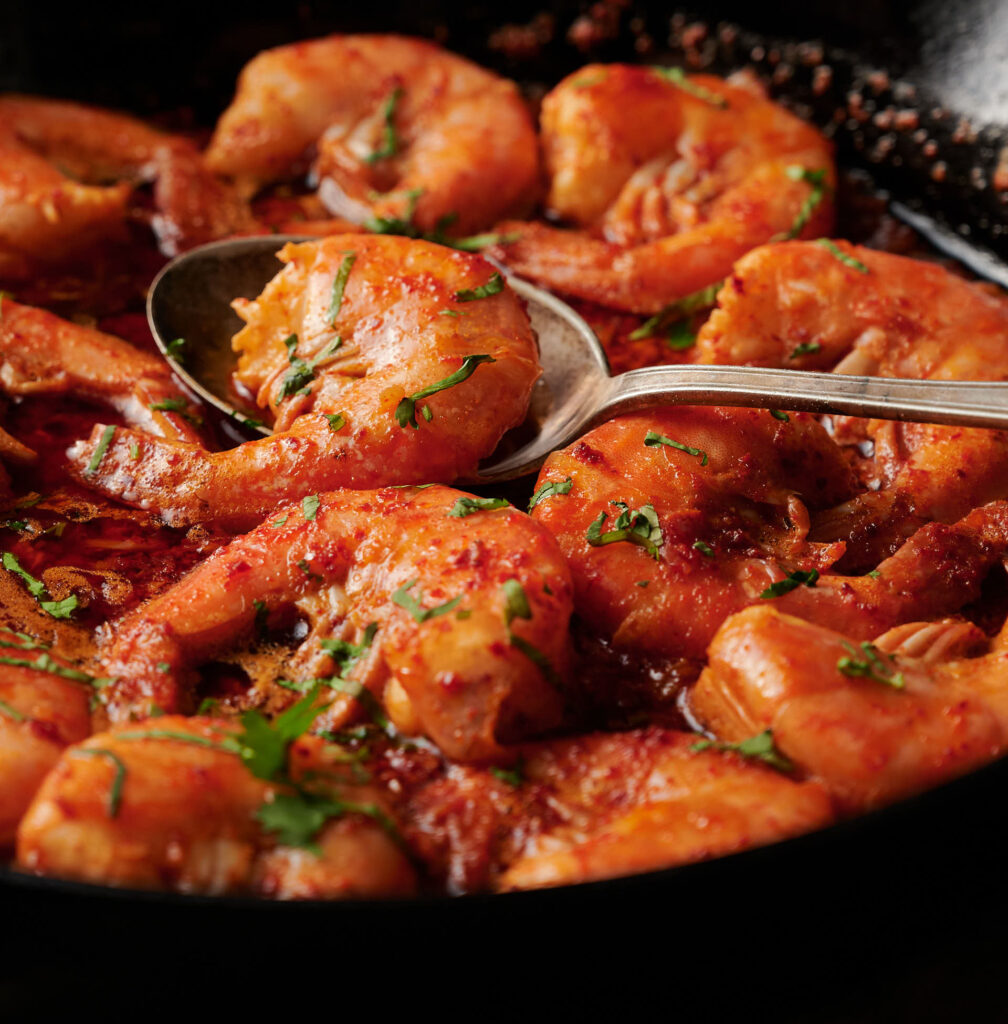
If you cook the shrimp to death this isn’t going to be good. You want juicy. You always want juicy. When was the last time you heard someone say “I wish these shrimp were dry and rubbery.”
There’s enough butter to cover up mistakes here. That’s true. But why not go for gold. Perfect shrimp. In a perfect sauce.
Be gentle. As soon as the shrimp are pink you are good to go. It’s easy to overcook shrimp. So watch them closely.
And leave the shrimp in the shell. Shells add flavour. Not a ton. But a little something. This is a messy dish. Have fun with it.
Korean BBQ shrimp in a little over 10 minutes
This is whip it up while your friends are having drinks food. 10 minutes. Maybe 15 on the outside.
Melt a stick of butter in a pan big enough to hold the shrimp in a single layer.
Add the garlic, gochugaru, fish sauce and lemon. Let it simmer gently for a few minutes.
Toss in the shrimp. In one layer. That’s important. One layer. Poach them in the sauce for about 3 minutes.
Flip the shrimp. Poach for another 3 minutes. Garnish with cilantro and serve with crusty bread.
That’s it. Crazy delicious Korean BBQ shrimp in no time flat. Try it. If you like shrimp and you like Korean flavours you are going to love Korean BBQ shrimp.
And so will your friends. Make this for them. They’ll think you’re an absolute kitchen rockstar. This could be the tastiest thing you’ve never heard of.
korean bbq shrimp
Ingredients
- 12 shrimp 16-20 per pound
- 1/2 cup unsalted butter
- 2 cloves garlic crushed
- 1 1/2 tsp fish sauce
- 1 1/2 tbsp gochugaru – korean chili flakes (not powder)
- 1/4 lemon juiced
- cilantro to garnish
Instructions
- Melt the butter over medium low heat in a skillet large enough to hold the shrimp in a single layer. If you aren’t doubling the recipe you don’t need a very large pan.
- Add the garlic and gochugaru. Cook gently for about 2 minutes. You don’t want the garlic to take on any colour here. Think garlic butter.
- Add the fish sauce and lemon juice. Keep cooking over low heat for 2-3 minutes. You want a gentle simmer.
- Add the shrimp and continue cooking over low to medium low heat. GIve them 3 minutes. Again, gentle simmer. Little bubbles.
- Flip the shrimp. If they are uniformly pink you are good. If you still see a bit of grey turn the heat up a smidge.
- Cook the shrimp for another 3 minutes. If they were still a little grey when you turned them flip them and cook a minute more. You want just pink. Don’t overcook your shrimp. Please don’t overcook your shrimp.
- Garnish with a little cilantro and serve with crusty bread to sop up the spicy garlic butter.
