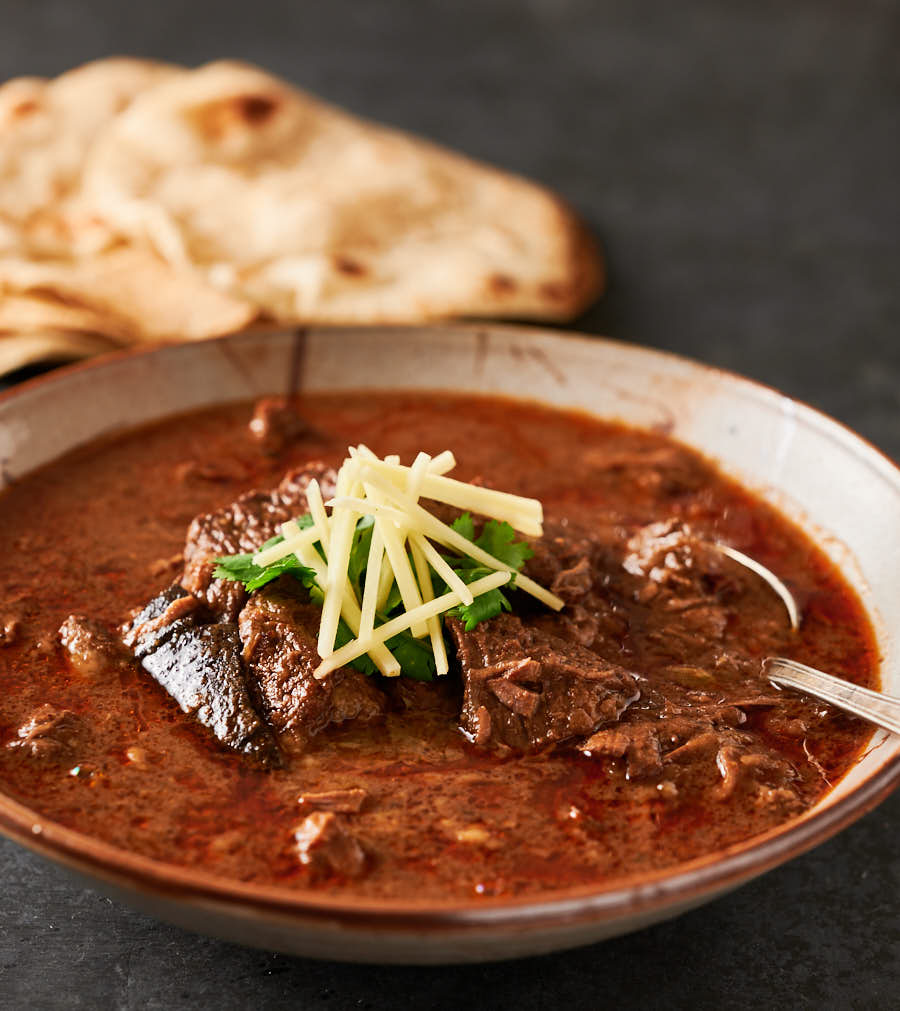
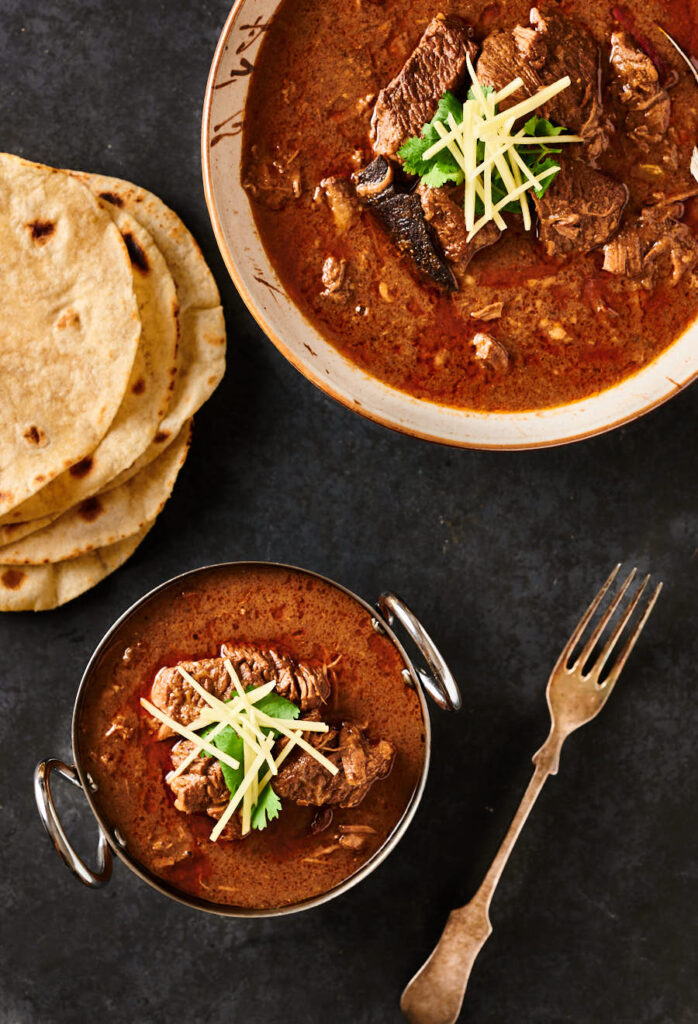
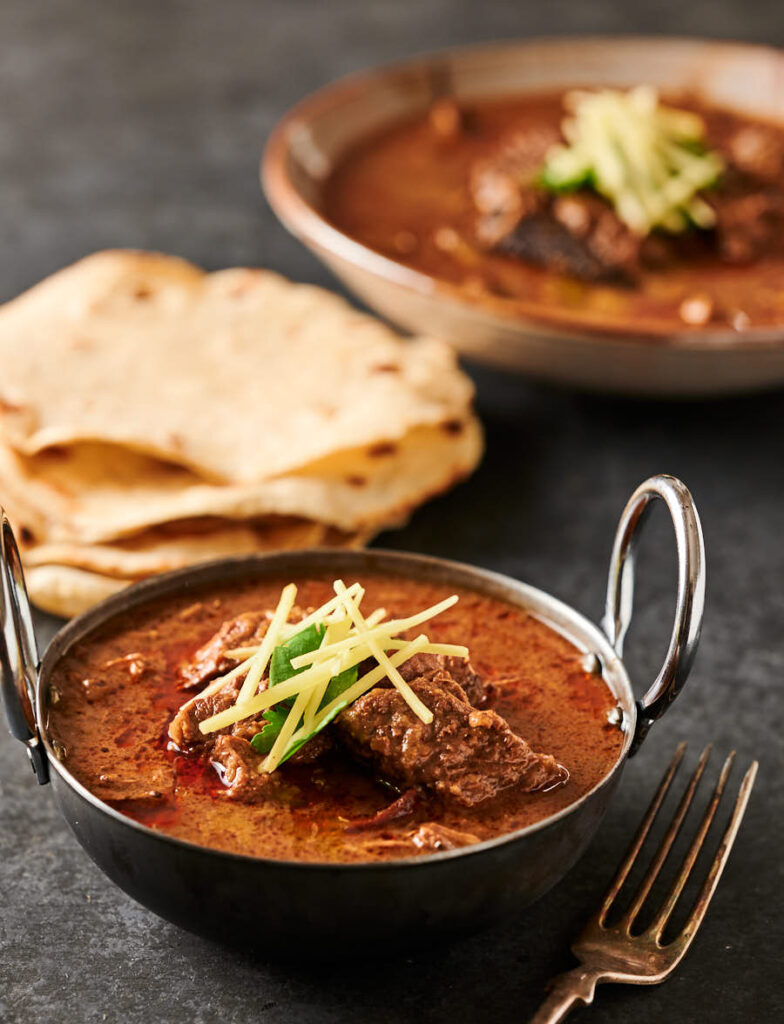
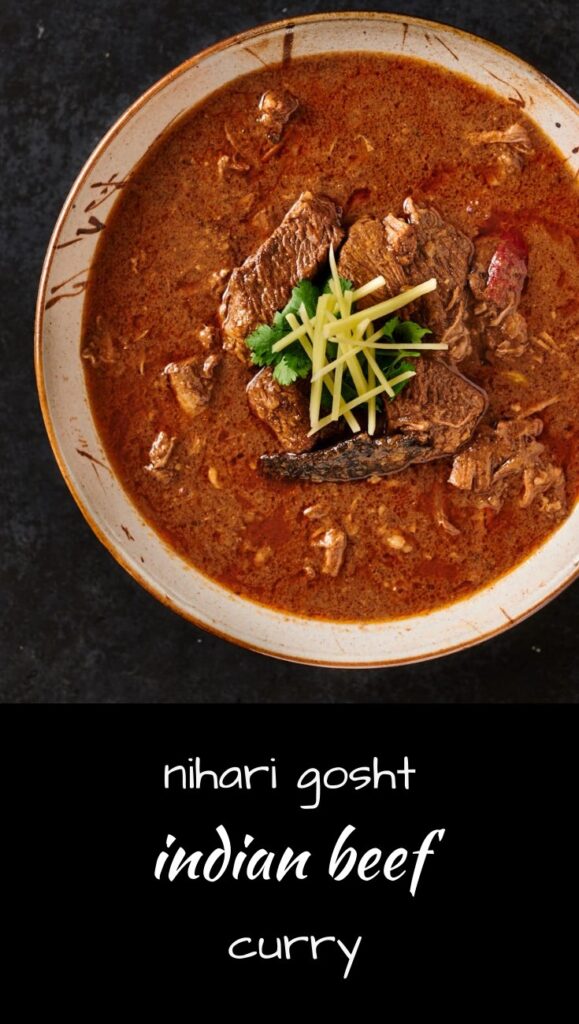
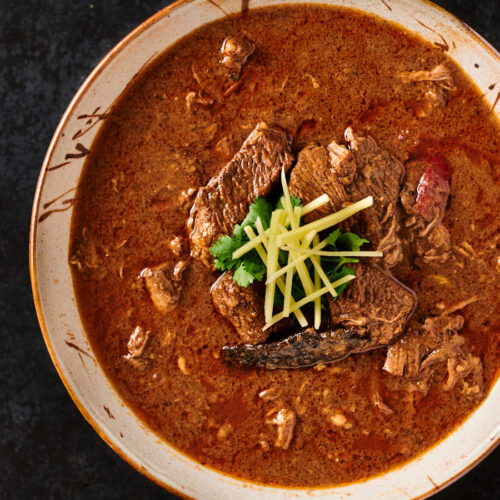
Nihari gosht is seriously tasty beef stew Indian style. Beef in spicy gravy. Big bold Indian flavours. Seriously beefy. It’s a classic for a reason.
Nihari dates back to the 18th century. And it’s still wildly popular in India and Pakistan. Tradition says it’s a beef curry. But you can make it with lamb. Or goat. I’ve even seen it done with chicken.
I like it best with beef. Some will say it has to be beef. Beef shin. Beef on the bone. But you can make it with oxtails. Or chunks of chuck.
That’s what I usually do. Add some marrow bones. That’s really good. Or oxtails. Oxtails push it right over the top. Crazy good. Bones really do make stew better.
Nihari is breakfast food
Seriously. It’s breakfast food. Once upon a time anyway. And what a breakfast it makes. A bit of beef. That crazy gravy. And a chapati or some naan. My kind of breakfast.
History says this was a dish they would start at night. So it would be ready first thing in the morning. That’s how they rolled. Awesome.
If curry for breakfast isn’t your thing then have it for dinner. I’m guessing that’s how most people eat it.
I like savoury for breakfast so I’m happy either way. As long as I get some nihari I’m good.

Nihari masala makes this dish
Don’t let the long list of ingredients in the nihari masala throw you. I know there are a lot. A bit daunting even. But each one adds a little something. Complex flavours. But that’s what makes nihari what it is.
Think garam masala. This is just like that but a different blend. There are all sorts of masalas in Indian cooking. This is just another one of those. Not a big deal really.
Roll up your sleeves and get it done. It doesn’t take that long. And you’ll have an arsenal of Indian spices at the end of it.
If you really don’t feel like making nihari masala you can buy it. All the big spice mix companies make it. Check with your Indian grocer. It will still be good. Just a bit less special.
Fry your spices
I always do this. And so should you. Frying spices is part of the magic. They call it blooming. I call it mandatory.
Because I cannot stand the jarring edges you wind up with if you don’t fry your spices. Seriously. Not. Good. Am I being unsubtle enough here? Just please fry your spices.
There’s a fair bit of spice in this nihari. The other problem you run into if you don’t fry your spices is texture. You get this background grittiness. Maybe I’m over-sensitive. But why risk it? Just fry your spices and don’t worry about it.
Bones make for great nihari
Bones make better food. I really believe that. And Cook’s Illustrated has proven it. So if you can get bones into this dish just do it.
I think that’s key for any homestyle curry. Or stew for that matter. It goes across borders. Stew is always better with bones.
If you are serving guests remove the bones before you plate. Unless those guests are good friends. Then serve them bones. Let them enjoy the marrow. Messy. Tasty. Fun.
If you can’t get bones I’ll let you in on a trick I use sometimes. It’s unorthodox but I like it. Stock. Veal stock in fact. That’s my secret for pretty much every beef stew I make.
Because it adds the gelatin you get from bones. The flavour. The mouth feel. Crazy but it works. Every Indian reading this now thinks I’m crazy. But I’m only half Indian. The other half is French.
Make a roux to thicken the stew
That’s the French in me as well. Roux. And then an Indian equivalent of a béchamel. Actually technically it is a velouté because it’s not milk but let’s not sweat the small stuff.
What it’s not is just a slurry of flour and water. Again against conventional thinking. But I don’t like raw flour any more than I like raw spices.
When you pull the nihari from the oven you’ll see a bunch of red fat floating on top. That colour is an indication that the fat is loaded with all the fat soluble spice flavours.
It would kill me to throw that away. That’s throwing away flavour. But I don’t want my stew swimming in fat either. Don’t get me wrong. I like some. Just not too much.
So I use the fat to make the roux. It’s just exactly like making gravy. Spicy, magical gravy.
Beef in spicy gravy. Not the best marketing in the world. But think about it. Beef. In spicy gravy. Who doesn’t want that?
Comfort food meets Indian spice. It’s no wonder this dish is popular. It hits all the comfort food tick boxes. Indian style. There is nothing here not to love. Make it and see for yourself.
nihari gosht – indian beef stew
Ingredients
nihari masala
- 1 tsp fennel seed
- 1 tsp cumin seed
- 1 tsp pomegranate seed also known as anardana
- 5 whole cloves
- 4 whole black cardamom
- 1 tsp black peppercorns
- 2 indian bay leaves also known as tej patta
- 4 inches cinnamon bark
- 1 star anise
- 1 blade mace
- 2 tsp kashmiri chili powder
- 2 tsp coriander powder
- 1/2 tsp ginger powder
- 1/4 tsp nutmeg powder
nihari gosht
- 2 1/2 lbs beef chuck stew plus some marrow bones if you can get them
- 1 large onion thinly sliced
- 8 tbsp vegetable oil or 4 tbsp oil and 4 tbsp ghee
- 1 black cardamom
- 5 green cardamom
- 1 2 inch piece cinnamon bark
- 1-2 whole kashmiri chilies
- all the nihari masala
- 2 tsp kosher salt
- 3 tbsp yoghurt
- 6 cups water – maybe more. Depends how much evaporation you get while cooking. Not more than 8 cups in all.
- 3 tbsp whole wheat flour
- 1 inch fresh ginger julienned as fine as you can
Instructions
Make the nihari masala
- Heat a small skillet over medium low heat. Add the cinnamon bark, star anise, and black cardamom. Toast until just starting to get fragrant. You will smell cinnamon.
- Add the fennel seed, black peppercorn, cumin seed, and cloves. Toast another 30 seconds or so.
- Let cool. Transfer the whole spices along with the mace, pomegranate seed and Indian bay leaves to a spice grinder. You will need to break up the bay leaves to get them to fit. Grind to a powder.
- Add the kashmiri chili powder, coriander powder, ginger powder and nutmeg powder and stir to combine. This is your nihari masala.
make the nihari gosht
- Pre-heat your oven to 325F.
- Heat 6 tbsp of the oil in a dutch oven large enough to hold all the ingredients (or 4 tbsp ghee and 2 tbsp oil) over medium low heat.
- Add the sliced onion and cook, stirring regularly, until the onion starts to brown. You may need to adjust your heat up a bit.
- Once the onion has started to brown turn the heat back to medium low if necessary. Add the whole spices and cook for about 30 seconds.
- Now add the nihari masala and salt and stir to combine. You want the spices coated in fat. If it looks dry add a bit more oil or ghee. Cook, stirring constantly, for about about a minute. Watch carefully. You don’t want your spices to burn.
- Add the beef and stir to combine. Cook the beef, stirring occasionally, until you no longer see any red. Be careful. You still don’t want your spices to burn. If the spices start to stick you may need to add the remaining oil/ghee to make this work. I usually do.
- Add half the yoghurt. Stir to combine and cook for about a minute. Add the rest of the yoghurt and repeat.
- Add the water and the marrow bones if you can get them. Bring to a simmer. Cover the pot with a sheet of aluminium foil and then the lid. This acts similar to a flour dum. Another French trick.
- Place in the 325F oven and cook. Give it a stir every hour. Cook until tender. This should take 2 to 2 1/2 hours. There’s no hard and fast rule. It’s done when it’s tender. That depends on how close your oven is to mine. It depends on the size of the beef. And it depends on the beef. So nobody can tell you for sure. It’s done when it’s done I’m afraid.
- When the beef is tender remove the dutch oven from the oven. Set on the stove. Give it a few minutes to stop simmering. There should be a good layer of bright red fat floating on the surface. That stuff is gold.
- Skim off as much fat as you want to remove. Remember that fat has all sorts of wonderful flavours in it so don’t go overboard. A little fat is good. If you are going to remove the bones now is the time to do it. But please don’t think bones are a bad thing. Leaving them in is good too. Up to you.
- Transfer 4 tablespoons of the fat to a small saucepan over medium low heat. Add 3 tablepoons of whole wheat flour. Stir to get all the flour coated in the fat. Cook the fat flour mixture for about 90 seconds, stirring constantly.
- Add about a tablespoon of liquid from the nihari pot and stir to combine. It will turn into this thick paste. Don’t panic. Do it again. And again. And again. After the 4th time add a bit more at a time. Maybe 2 tablespoons or so. Stir until it all comes together. Do that again. And again.
- Now add around a 1/2 cup. Stir to combine. Finally add around a cup. Stir until it’s a nice even texture. It should have the consistency of a fairly thick gravy at this point. Add this mixture into the nihari and stir to combine. Bring to a gentle simmer. If it seems a bit thicker than you would like add a bit of water. Up to a cup or so.
- Taste at this point and adjust salt. It will need a bit more but not alot so be careful and creep up on it.
- Add most of the julienned ginger. Keep a bit back for garnish.
- To serve, spoon into bowls and garnish with a cilantro and a little bit of julienned ginger. Serve with an Indian flatbread. I like chapatis with nihari but naan works as well. Parathas are always good but the combination of parathas with nihari is pretty rich. If you are going for absolutely decadent that’s a good way to do it.
Notes
Nutrition
nihari gosht - indian beef stew
Ingredients
nihari masala
- 1 tsp fennel seed
- 1 tsp cumin seed
- 1 tsp pomegranate seed also known as anardana
- 5 whole cloves
- 4 whole black cardamom
- 1 tsp black peppercorns
- 2 indian bay leaves also known as tej patta
- 4 inches cinnamon bark
- 1 star anise
- 1 blade mace
- 2 tsp kashmiri chili powder
- 2 tsp coriander powder
- 1/2 tsp ginger powder
- 1/4 tsp nutmeg powder
nihari gosht
- 2 1/2 lbs beef chuck stew plus some marrow bones if you can get them
- 1 large onion thinly sliced
- 8 tbsp vegetable oil or 4 tbsp oil and 4 tbsp ghee
- 1 black cardamom
- 5 green cardamom
- 1 2 inch piece cinnamon bark
- 1-2 whole kashmiri chilies
- all the nihari masala
- 2 tsp kosher salt
- 3 tbsp yoghurt
- 6 cups water - maybe more. Depends how much evaporation you get while cooking. Not more than 8 cups in all.
- 3 tbsp whole wheat flour
- 1 inch fresh ginger julienned as fine as you can
Instructions
Make the nihari masala
- Heat a small skillet over medium low heat. Add the cinnamon bark, star anise, and black cardamom. Toast until just starting to get fragrant. You will smell cinnamon.
- Add the fennel seed, black peppercorn, cumin seed, and cloves. Toast another 30 seconds or so.
- Let cool. Transfer the whole spices along with the mace, pomegranate seed and Indian bay leaves to a spice grinder. You will need to break up the bay leaves to get them to fit. Grind to a powder.
- Add the kashmiri chili powder, coriander powder, ginger powder and nutmeg powder and stir to combine. This is your nihari masala.
make the nihari gosht
- Pre-heat your oven to 325F.
- Heat 6 tbsp of the oil in a dutch oven large enough to hold all the ingredients (or 4 tbsp ghee and 2 tbsp oil) over medium low heat.
- Add the sliced onion and cook, stirring regularly, until the onion starts to brown. You may need to adjust your heat up a bit.
- Once the onion has started to brown turn the heat back to medium low if necessary. Add the whole spices and cook for about 30 seconds.
- Now add the nihari masala and salt and stir to combine. You want the spices coated in fat. If it looks dry add a bit more oil or ghee. Cook, stirring constantly, for about about a minute. Watch carefully. You don’t want your spices to burn.
- Add the beef and stir to combine. Cook the beef, stirring occasionally, until you no longer see any red. Be careful. You still don’t want your spices to burn. If the spices start to stick you may need to add the remaining oil/ghee to make this work. I usually do.
- Add half the yoghurt. Stir to combine and cook for about a minute. Add the rest of the yoghurt and repeat.
- Add the water and the marrow bones if you can get them. Bring to a simmer. Cover the pot with a sheet of aluminium foil and then the lid. This acts similar to a flour dum. Another French trick.
- Place in the 325F oven and cook. Give it a stir every hour. Cook until tender. This should take 2 to 2 1/2 hours. There’s no hard and fast rule. It’s done when it’s tender. That depends on how close your oven is to mine. It depends on the size of the beef. And it depends on the beef. So nobody can tell you for sure. It’s done when it’s done I’m afraid.
- When the beef is tender remove the dutch oven from the oven. Set on the stove. Give it a few minutes to stop simmering. There should be a good layer of bright red fat floating on the surface. That stuff is gold.
- Skim off as much fat as you want to remove. Remember that fat has all sorts of wonderful flavours in it so don’t go overboard. A little fat is good. If you are going to remove the bones now is the time to do it. But please don’t think bones are a bad thing. Leaving them in is good too. Up to you.
- Transfer 4 tablespoons of the fat to a small saucepan over medium low heat. Add 3 tablepoons of whole wheat flour. Stir to get all the flour coated in the fat. Cook the fat flour mixture for about 90 seconds, stirring constantly.
- Add about a tablespoon of liquid from the nihari pot and stir to combine. It will turn into this thick paste. Don’t panic. Do it again. And again. And again. After the 4th time add a bit more at a time. Maybe 2 tablespoons or so. Stir until it all comes together. Do that again. And again.
- Now add around a 1/2 cup. Stir to combine. Finally add around a cup. Stir until it’s a nice even texture. It should have the consistency of a fairly thick gravy at this point. Add this mixture into the nihari and stir to combine. Bring to a gentle simmer. If it seems a bit thicker than you would like add a bit of water. Up to a cup or so.
- Taste at this point and adjust salt. It will need a bit more but not alot so be careful and creep up on it.
- Add most of the julienned ginger. Keep a bit back for garnish.
- To serve, spoon into bowls and garnish with a cilantro and a little bit of julienned ginger. Serve with an Indian flatbread. I like chapatis with nihari but naan works as well. Parathas are always good but the combination of parathas with nihari is pretty rich. If you are going for absolutely decadent that’s a good way to do it.
Notes
Nutrition
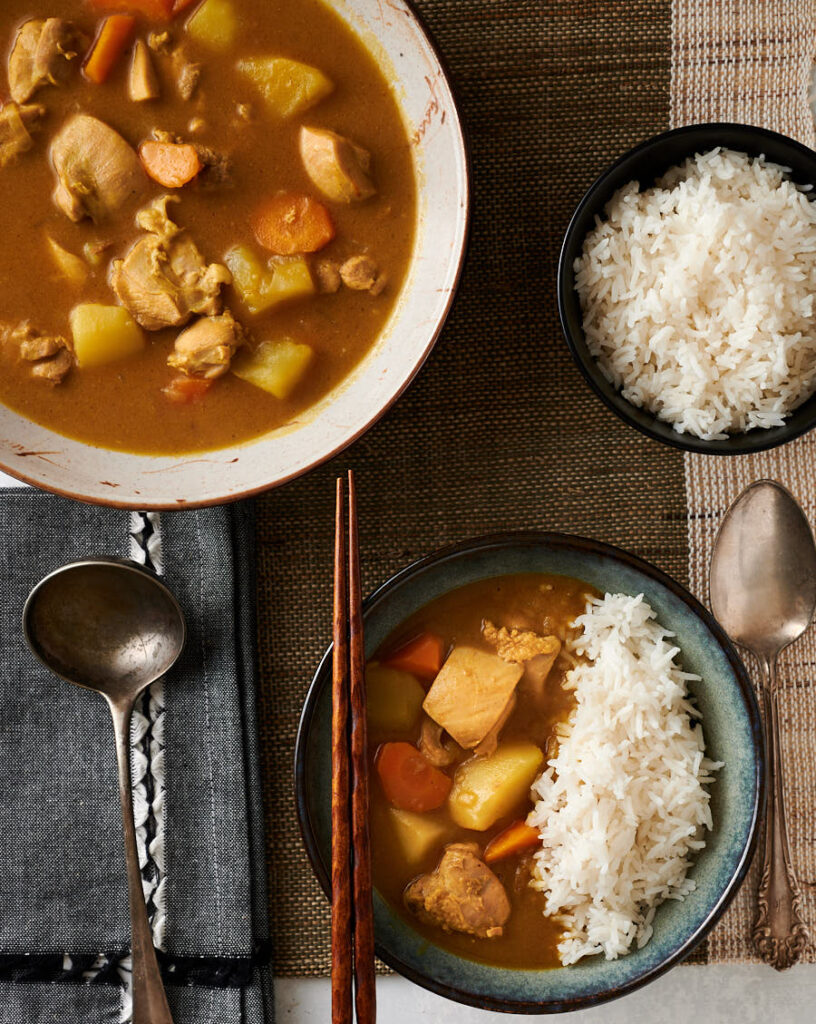
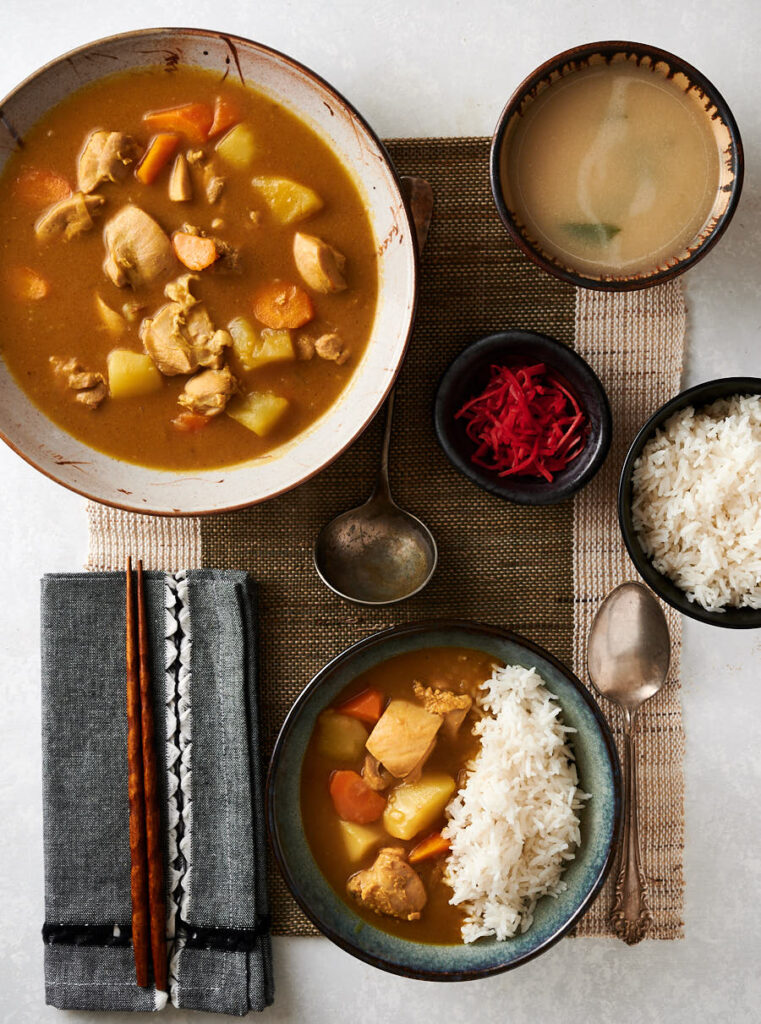
Japanese chicken curry is not like curry from anywhere else. It takes Indian flavours and makes it uniquely Japanese. Familiar. But not the same. Delicious.
It has Indian ingredients. But somehow they come together in a different way. I don’t know why but I’ve loved it since the first time I tried it.
Japanese curry rice
I love evolution of dishes across cultures. It happens over and over. And Japanese chicken curry is no different.
There are a few different versions of Japanese curry. Curry bread is this crazy deep fried bread stuffed with Japanese curry.
It’s on the go food. Train station food. Convenience store food. At least in Japan.
Curry udon is a big bowl of delicious. Fresh udon noodles swimming in curry. Truly Japanese. Truly awesome.
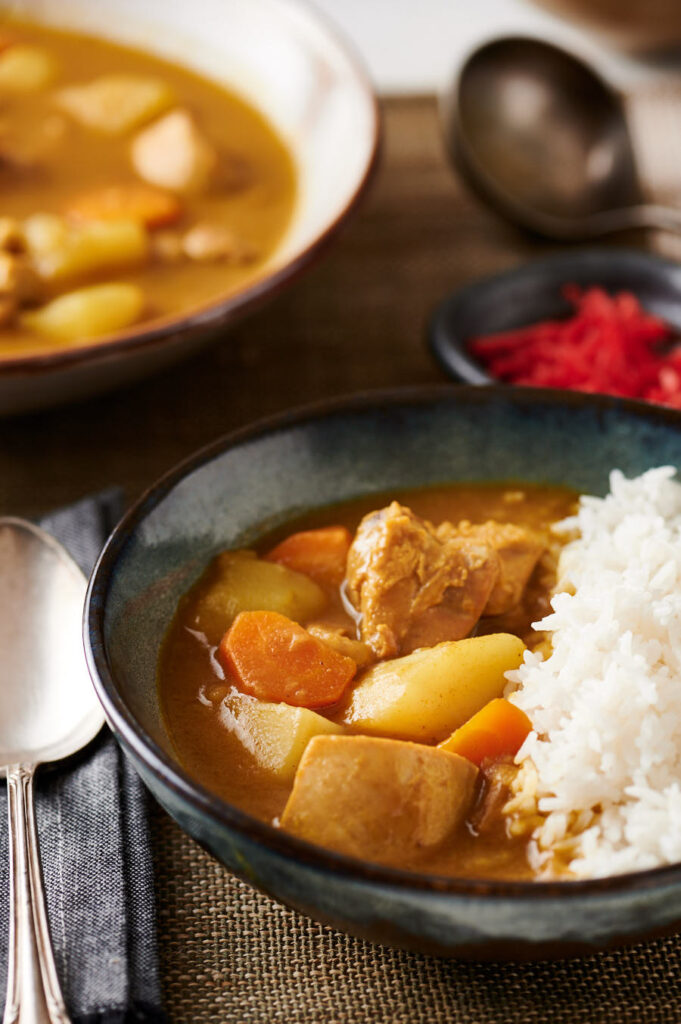
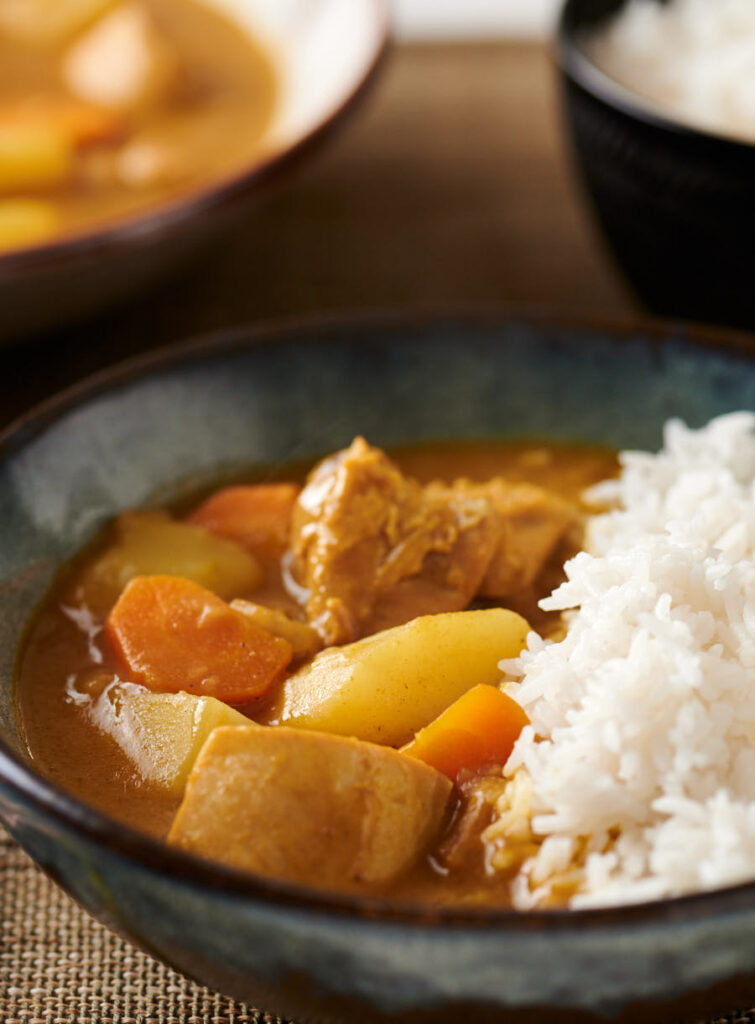
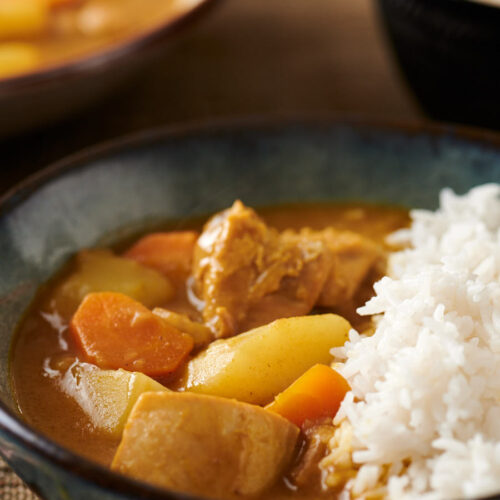
And then there’s Japanese curry rice. Which is just what it sounds like. Rice and curry. Sounds Indian. But it’s not.
It’s my favourite of the bunch. Although curry udon is a really close second. Who am I kidding? They are all really good.
Japanese chicken curry – big in Japan
You don’t see it much at Japanese restaurants outside of Japan. At least where I live. Sushi. Teppanyaki. Ramen. Even shabu shabu when I’m lucky. Those are big.
But Japanese curry is still relatively unknown. Which is a shame. It’s really good. You should try it.
There’s a story behind Japanese curry. It came to Japan while the British occupied India. The romantic version has members of the British navy introducing it to their fellow Japanese sailors.
I imagine the British curry was pretty close to what they ate in India at the time. And some bright Japanese navy cook took it and ran with it.
Made it thicker. Well suited for a chopstick culture. Smoother flavours. A hint of fruit. A bit sweet. Perfect with sticky rice. Perfect for the Japanese palate.
From the navy it spread to the army. Then to school cafeterias. And from there to the heart of Japanese culture. I love stories like that.
You can make Japanese chicken curry with curry cubes
That’s a thing. Curry cubes. And it’s big business. It takes the roux in this Japanese chicken curry recipe and serves it up pre-fab. Super easy. Fast food really.
And those cubes are pretty good. I like them. Use them in curry ramen . I know Japanese that swear by them.
Judging by the variety and quantity on the shelves of Asian markets it’s popular. Lots of people making Japanese curry rice using cubes. Be sure of that.
But they all taste almost exactly the same. So there’s no room to tweak them to suit your tastes. Or to mix it up a bit.
Making Japanese chicken curry from scratch isn’t a lot harder. Not really that much work.
But you should make it from scratch
The cubes take out one step. And one pot. So they are easier. But that step isn’t all that hard. You make a curry veloute. Which is just a fancy way of saying gravy.
You make a roux and add some liquid. Stir a bit. Then mix it into the curry. That’s the effort you save with the cubes. And you get bragging rights. Curry rice from scratch.
There’s a bit of technique here. I like to bloom the spices. Same as when I cook Indian.
And I want the raw taste cooked out of the flour. So I make a veloute. Like a béchamel but with the broth from the curry instead of milk.
And doing it from scratch will let you tweak the roux to your taste. Want it hotter. Add some chili powder. Cooking for kids? Maybe roll back on the curry powder.
Want it thicker? More flour and butter. Runnier. Back off the flour. Up to you. Dial it in for your tastes. Just like that cook on the first battleship to serve Japanese curry rice.
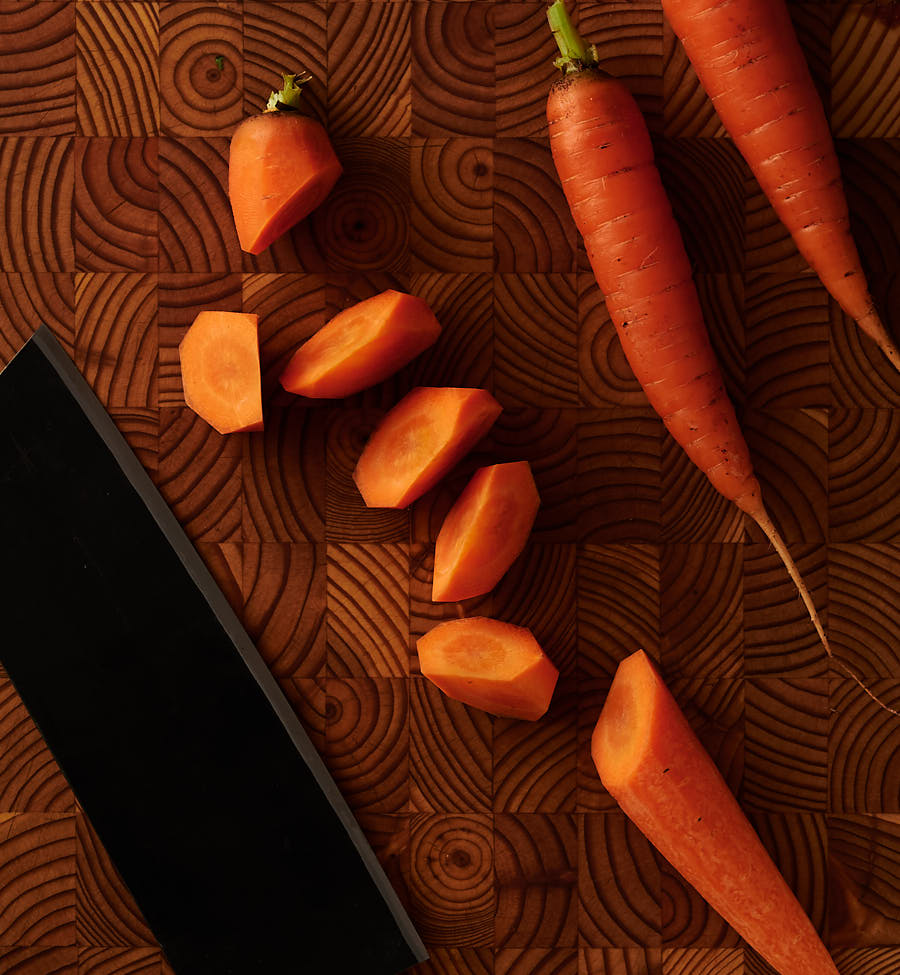
Chopping vegetables for Japanese chicken curry – rangiri style
You don’t have to do this. I’m sure you chop carrots with the best of them. But it’s a nice touch. And it’s fun. Something to learn.
It’s called rangiri. It’s a technique to cut cylindrical vegetables like carrots evenly. And it’s really easy. So why not?
Cut the ends off a carrot. Put it down on the board. Cut a piece off the large end with your knife at a 45 degree angle to the carrot. You should be looking at a carrot the cut end coming to a point.
Rotate the carrot 1/4 turn. With your knife still at the same 45 degree angle cut off the next piece. Keep repeating turn and cut. Turn and cut. Turn and cut.
Now look at the pieces on your cutting board. They should look like the picture. If they don’t I’ve failed in my description. Sorry. Leave me a note telling me I suck and search for rangiri on youtube.
Tonkatsu sauce for the “secret ingredient”
There are two “secret” ingredients for Japanese curry. Honey and apple. I’ll go one further. Japanese Worcestershire sauce is the third.
Japanese Worcestershire is hard to find. But tonkatsu sauce is not. It’s a variant of Japanese Worcestershire. So it adds that flavour. And it’s sweet. And it has apple in it.
See where I’m going? Three for one. It’s my “secret” ingredient.
Try Japanese chicken curry
I want you to try this. If you have never had Japanese curry you need to taste it for yourself.
I don’t care if you use the cubes. I don’t care if you ignore this recipe altogether. This is a mission to get people to try something new. Something delicious.
Make Japanese chicken curry. Somehow. Using somebody’s recipe. Just make it. I’m betting if you like Indian you are going to like Japanese curry rice too. I do. Familiar. But different. And tasty.
Japanese chicken curry
Ingredients
- 1 lb chicken thighs boneless, skinless and cut into bite size pieces
- 1 large onion about 8 oz sliced
- 8 oz carrots cut rangiri style (see above) if you want
- 12 oz waxy potatoes cut into bite size chunks
- 6 tbsp butter total
- 2 cloves garlic crushed
- 1/2 inch piece of fresh ginger grated
- 4 cups chicken stock low or no sodium or really plain homemade (just chicken and water – no fancy aromatics)
- 3 tbsp Japanese curry powder I use S&B brand
- 1 tsp garam masala
- 4 tbsp flour
- 2 tsp salt plus more to taste
- 1-2 tbsp tonkotsu sauce I like bull dog brand if you can find it. There are other brands that are easier to find if you can’t. They will work too.
Instructions
- Prep your vegetables. Slice the onion into 1/8 inch slices. Cut the onion in half from the stem to the root. Peel. Cut the stem end off. Now cut slices moving towards the stem end. You are cutting onion half moons.
- Cut up the carrots, potatoes and chicken. You want bite size pieces.
- Heat a pot large enough to hold all the ingredients over medium low heat. Add 2 tablespoons of butter. Let melt and then add the onions and the salt. Cook the onions for about 5 minutes stirring occasionally. You are going for soft and translucent. You don’t want to let the onions brown.
- Add the carrots, garlic and ginger (or 1 tbsp of garlic ginger paste if you stock it) and cook another 2 minutes.
- Add the stock. Stir and bring to a simmer. Let cook 10 minutes. Set a timer. Makes things easy.
- Add the potatoes. Cook another 15 minutes. Use your timer. Check the potatoes. They should be close to done. Depends on how big the pieces were. If they aren’t starting to soften cook them until they do.
- Add the chicken. Cook 10 minutes.
- While the chicken cooks make the curry roux.
- Heat the remaining 4 tablespoons of butter in a small sauce pan over medium low heat. Add the curry powder and garam masala and cook for about 30-45 seconds. Add the flour and stir to combine. You want all the flour coated with fat. If it’s really dry add a bit of vegetable oil.
- Cook the flour/spice mixture over medium low heat for about 2 minutes. This is your roux.
- Now add a couple tablespoons of broth from the simmering curry. Stir to combine. It will make an ungodly looking mess. Goop. Don’t worry. Add another couple tablespoons of broth and stir. Repeat that a couple more times.
- Now add around 1/2 cup of broth and stir to combine. Add another 1/2 cup or so and stir. You sould be getting to the point where you have a really thick but smooth paste. Curry paste. It’s better than it sounds. It’s actually a variant of veloute which is a variant on bechamel. There’s some cooking theory in this recipe…
- 10-12 minutes have gone by. Check the chicken. It should be done or at least close. Depends on how lively your simmer is though. Use an instant read thermometer. Safety first. You want it read around 155-160F at this point. The thighs are cooked at 170F but you can go a little higher. That’s the nice thing about dark meat. It is forgiving.
- Add the curry veloute (fancy way to say the curry paste) to the curry. Stir to combine. Bring to a simmer. The chicken should be done. Check it. If it’s not cook it for another few minutes.
- Taste. At this point the flavour profile will be similar to the cubes. Adjust salt. Now add one tablespoon of tonkotsu sauce. Taste again. This will add a hint of sweetness as well as that secret Japanese curry flavour. If you like it stop now. If you want more fruit and sugar add another tablespoon. I like it between one and two tablespoons. If you want big fruit taste add another tablespoon. I’ve never gone beyond that so I don’t know if more is better. Three is too sweet for my taste.
Nutrition