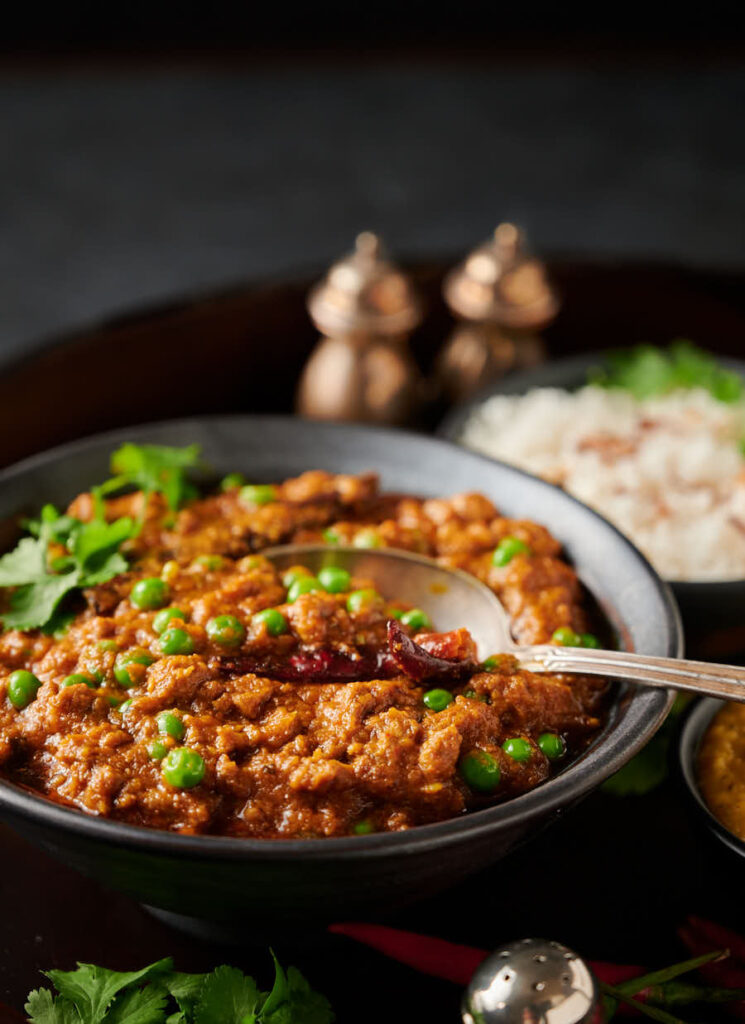
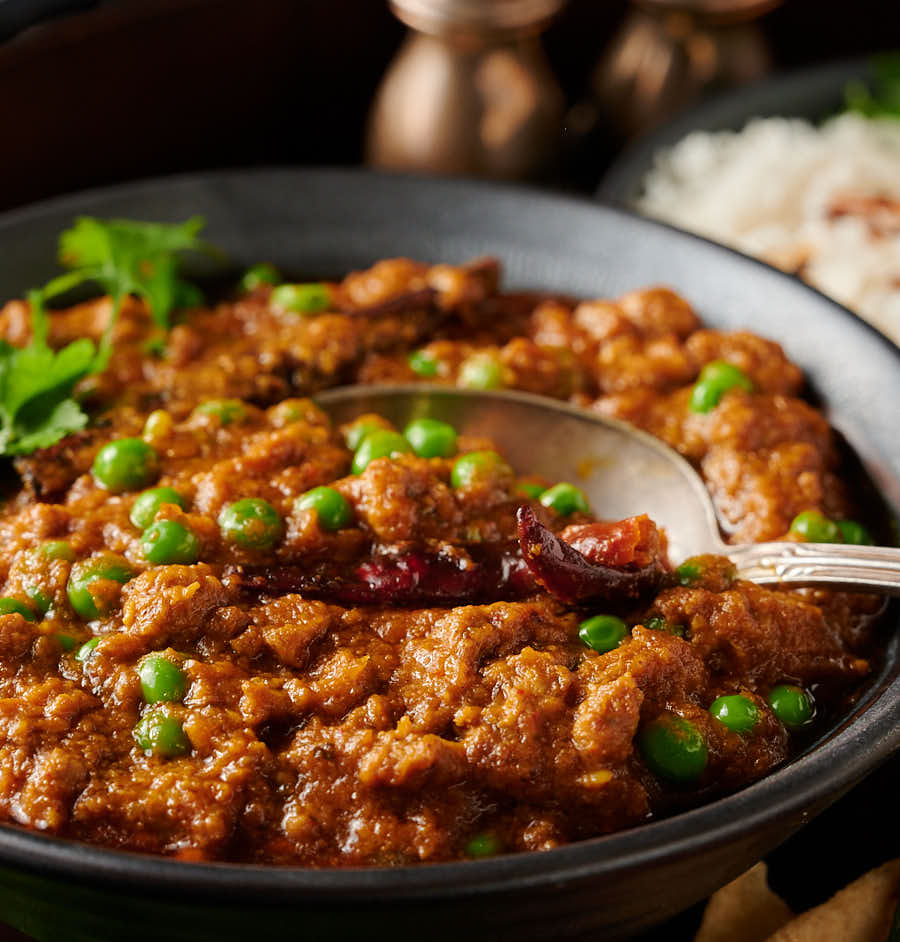
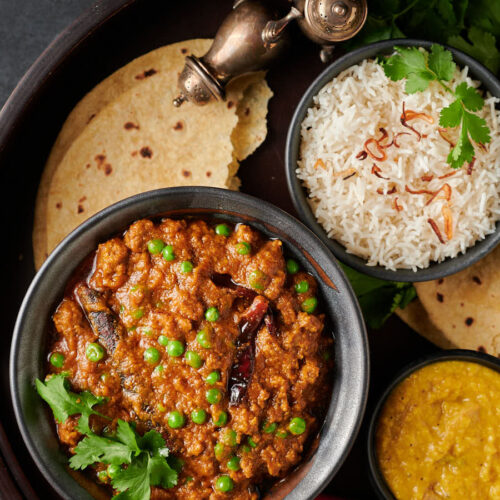
Lamb keema matar. Never heard of it? That’s a shame. Because it’s crazy delicious.
Lamb. Spices. A rich sauce. And a serving of vegetables built in. Peas in fact. May sound strange. But it works. Really, really well.
And you can make it in 30 minutes. From a standing start. That’s just good living. I think anyway.
Lamb keema matar is a dish you should be making
Everybody’s heard of chicken tikka masala. Butter chicken. Lamb saag. These are the safe choices. Tasty.
Really tasty. But maybe a little conventional. Uninspired. If that’s your thing then stop reading now.
But if you want to stretch a little? Put a toe outside your comfort zone? Give your tastebuds a treat? Then you really should try lamb keema matar.
It’s a glebekitchen house favourite. Has been for years. It’s the one that gets requested the most. Along with restaurant chicken biryani . You should try that too.
Keema means ground meat in Hindi. Matar is peas. Keema matar. Ground lamb with peas. In a lush restaurant gravy.
And if you really hate peas just leave them out. this one is pretty amazing without them. Keema curry. That’s a thing too.
Restaurant results without the fuss
Ever wonder why your curries never turn out like the ones that you get at your favourite local? There’s a reason. A good one.
Almost every recipe on the internet uses traditional Indian techniques. Restaurants don’t. Simple as that. They have a different approach.
Restaurants use an onion gravy as the foundation of their dishes. That’s the trick. Why you can’t get your curries to taste like theirs.
They call it base gravy. Or curry gravy. They make huge pots of it. There’s a whole section full of recipes doing it just like the restaurants. Exactly like the restaurants.
Takes time though. A lot of prep. A few techniques to master.
If you want to go deep you can read about Indian restaurant curry at home . It’s a whole new world.
Or you can make this. It comes very close. Without the work. Curry gravy in 10 minutes. That’s what makes this weeknight cooking.
Up to you. Make curries twice a week? Every week? Full blown restaurant technique is for you.
Tight on time? Only make a couple curries a month? The 30 minute approach is probably a better bet.
Cook the lamb then make the keema matar
That’s a counter-intuitive statement. If you’ve been cooking Indian for a while you know. There’s a lot of braising going on in an Indian kitchen. A lot.
Restaurant style is different. They cook to order. Can’t sit around waiting for the lamb to cook with customers waiting.
“Ready to order?”
“Yes, thank you. I’ll have the lamb curry please”.
“Excellent choice. That will be 95 minutes. Would you like a cocktail in the meantime?”
Pre-cooked proteins. That’s how Indian restaurants roll.
This is a busy 30 minutes
This isn’t the simplest of curries. There’s a lot of moving parts. I can do it in 30 minutes. On a good day. And I don’t have to stop to check the recipe.
So maybe budget 40 minutes. This isn’t a race. Better to burn an extra 10 minutes and have fun. Nobody needs stress in the kitchen.
Or think about prepping the keema the night before. That works too. Makes this recipe a breeze. An easy 30 minutes. 22 minute lamb keema matar even.
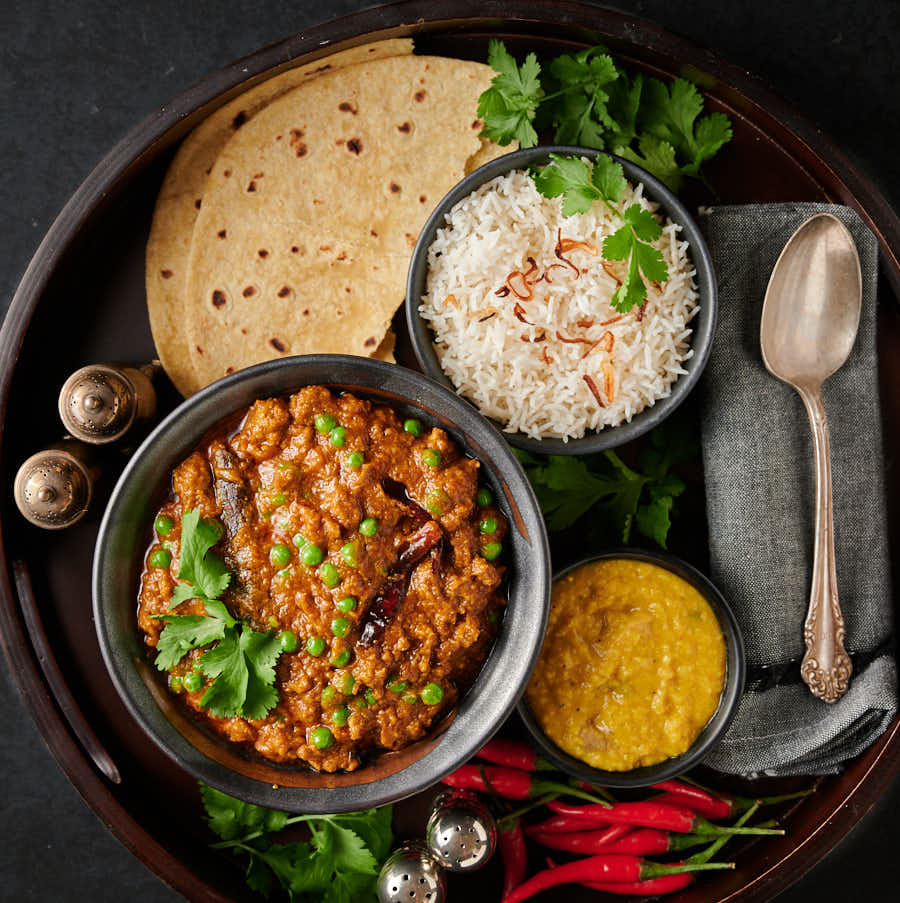
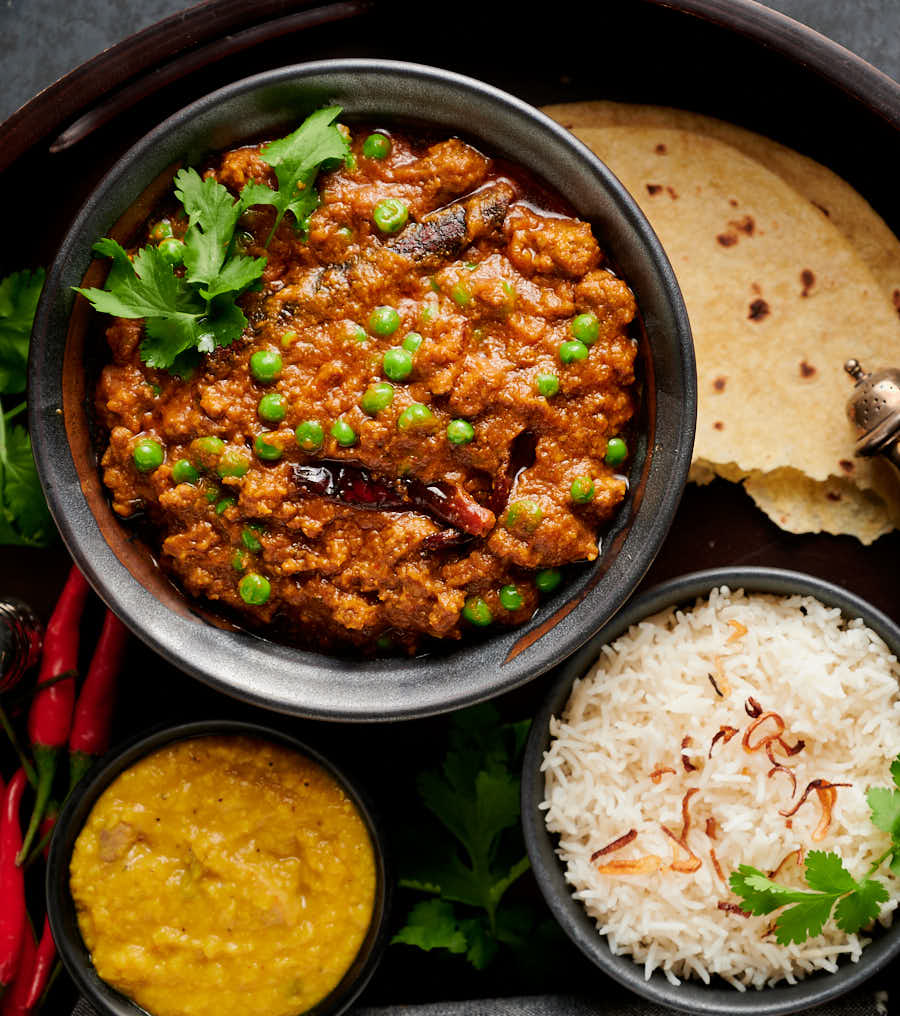
Want really easy? Prep the onion paste ahead of time. That makes it a 15 minute dish. Perfect for a dinner party.
A couple curries. A fancy pilau rice if you feel like showing off. Maybe a nice green salad to start. That’s an easy night in the kitchen. Easy and impressive. Who doesn’t want that?
Try keema matar
30 minute keema matar. Lamb with peas. Fast. Delicious. Restaurant results. It just works.
If you’ve made it this far I’m guessing you are ready to broaden your horizons. Try this dish. You may wind up liking it as much as I do. That wouldn’t be a bad thing at all…
lamb keema matar
Ingredients
The onion paste
- 2 cups onions – coarsely chopped
- 2 tbsp neutral oil – think canola, safflower, vegetable…
- 1 cup water
The keema
- 12 oz ground lamb
- 2 tbsp neutral oil
- 1 black cardamom – black is not the same as green. Just leave it out if you can’t get it.
- 1 Indian bay leaf – called tej patta (optional but tasty if you can get it)
- 2 inch cassia bark – cinnamon bark
- 2 tsp garlic ginger paste – you can buy it but it is so much better if you make it yourself
- 1/2 tsp kasoori methi – aka fenugreek leaves
- 2 tsp madras curry powder
- 1/2 tsp kosher salt – use about half this much if you are using table salt
- 2 tsp tomato paste – diluted in about two tablespoons of water
- 2/3 cup water
spice mix
- 1 tsp cumin
- 2 tsp coriander powder
- 1 tsp turmeric powder
- 1 tsp mild kashmiri chili powder
- 1 tsp kasoor methi – dried fenugreek leaves
- 1 tsp kosher salt – use a bit less if you are using table salt
keema matar
- 12 oz lamb keema – the full amount of the recipe link below. You can take out the whole spices or not. Up to you.
- 4 tbsp the lamb fat thrown by the keema – make it up to 4 tbsp with neutral oil if you don’t have enough from the lamb
- 2 tbsp garlic ginger paste – see notes
- the spice mix from above
- 2 tbsp tomato paste plus enough water to dilute it to the consistency of tomato sauce
- the onion paste from above
- 1 tsp tamarind paste homemade or store bought
- 1 cup peas
Instructions
Make the onion paste
- Place the onions in a microwave safe dish and cover with cling wrap. Do yourself a favour. Punch a couple holes in the wrap to let the steam escape. Microwave at 70 percent until the onions are soft and translucent. This takes about 10 minutes in an 1100 watt microwave oven.
- Remove the onions from the microwave. Be careful. They will be hot. Let them cool slightly.
- Place the onions, 2 tbsp vegetable oil and 1 cup of warm water in a blender and puree until smooth. This is your onion paste.
Make the keema
- Start your keema as soon as the onions go into the microwave.
- Pre-heat your skillet over medium heat.
- Add the oil. Once it starts to shimmer add the bay, cardamom if using and cassia bark. Cook until little bubbles form around the spices – about 30 seconds.
- Add the garlic ginger paste. Cook until the sizzling stops. This should take less than a minute.
- Reduce heat to medium low and stir in the kasoor methi, madras curry powder and salt. You want the spices and oil to be fully combined. Homogenous is a good way of thinking about it. Cook for around 30 seconds.
- Turn the heat back up to medium. Add the diluted tomato paste. Stir to combine. Again homogenous is a good word. Cook for about 30 seconds.
- Add the lamb. Break it up and cook until it no longer looks raw then add the water.
- Continue to cook until the water has evaporated. This should take about 10 minutes.
- While the lamb cooks use the time to finish making the the onion paste. Do your prep. Cook your peas. Measure out your spices. Dilute the tomato paste.
- When all the water has evaporated remove the lamb from the pan and set aside. Keep the lamb fat in the pan. Lamb fat is delicious. Seriously.
Make keema matar
- Cook the peas. If they are frozen microwave until warm. If they are fresh shelled peas, drop them into boiling salted water and cook until they turn bright green (probably a couple minutes if they are fresh). Check one. If you like them more done keep cooking until you get what you like.
- In a small bowl, combine the cumin, coriander, turmeric, Kashmiri chili powder, kasoor methi and salt. This is your spice mix.
- Heat the lamb fat you saved from the keema in a large skillet. If you don’t have 4 tbsp add a bit of neutral oil.
- Add the garlic ginger paste. Cook, stirring, until the garlic ginger paste stops spluttering. You’ll see what I mean when you do it.
- Turn the heat to medium low. Add the spice mix. Stir continuously until it starts to smell really good (about 30 seconds). This is called blooming the spices. It’s a key Indian cooking technique. Watch it carefully. If it looks like it’s sticking or burning lift the pan from the heat. If the spices burn you need to start over. No way around that.
- Add the diluted tomato paste and stir to combine. Turn the heat up to medium. Cook for 1 minute.
- Add half the onion paste and turn the heat up to medium high. Stir to combine. Cook for about a minute. Add the rest of the onion paste and stir again. Cook, stirring occasionally for about 4 minutes. Don’t worry if it looks dry. You can add a bit of water at the end.
- Turn the heat down to medium low. Stir in the tamarind paste. Cover and simmer for another 5 minutes. Add the pre-cooked keema. Simmer to heat the keema through. Add the peas. When the peas are warmed through you are good to go.
- If the curry is a bit thick add a bit of water or chicken stock and stir. Taste for salt and adjust as needed.
- Garnish with a of cilantro if desired.
Notes
Nutrition
lamb keema matar
Ingredients
The onion paste
- 2 cups onions - coarsely chopped
- 2 tbsp neutral oil - think canola, safflower, vegetable…
- 1 cup water
The keema
- 12 oz ground lamb
- 2 tbsp neutral oil
- 1 black cardamom - black is not the same as green. Just leave it out if you can’t get it.
- 1 Indian bay leaf - called tej patta (optional but tasty if you can get it)
- 2 inch cassia bark - cinnamon bark
- 2 tsp garlic ginger paste - you can buy it but it is so much better if you make it yourself
- 1/2 tsp kasoori methi - aka fenugreek leaves
- 2 tsp madras curry powder
- 1/2 tsp kosher salt - use about half this much if you are using table salt
- 2 tsp tomato paste - diluted in about two tablespoons of water
- 2/3 cup water
spice mix
- 1 tsp cumin
- 2 tsp coriander powder
- 1 tsp turmeric powder
- 1 tsp mild kashmiri chili powder
- 1 tsp kasoor methi - dried fenugreek leaves
- 1 tsp kosher salt - use a bit less if you are using table salt
keema matar
- 12 oz lamb keema - the full amount of the recipe link below. You can take out the whole spices or not. Up to you.
- 4 tbsp the lamb fat thrown by the keema - make it up to 4 tbsp with neutral oil if you don’t have enough from the lamb
- 2 tbsp garlic ginger paste - see notes
- the spice mix from above
- 2 tbsp tomato paste plus enough water to dilute it to the consistency of tomato sauce
- the onion paste from above
- 1 tsp tamarind paste homemade or store bought
- 1 cup peas
Instructions
Make the onion paste
- Place the onions in a microwave safe dish and cover with cling wrap. Do yourself a favour. Punch a couple holes in the wrap to let the steam escape. Microwave at 70 percent until the onions are soft and translucent. This takes about 10 minutes in an 1100 watt microwave oven.
- Remove the onions from the microwave. Be careful. They will be hot. Let them cool slightly.
- Place the onions, 2 tbsp vegetable oil and 1 cup of warm water in a blender and puree until smooth. This is your onion paste.
Make the keema
- Start your keema as soon as the onions go into the microwave.
- Pre-heat your skillet over medium heat.
- Add the oil. Once it starts to shimmer add the bay, cardamom if using and cassia bark. Cook until little bubbles form around the spices – about 30 seconds.
- Add the garlic ginger paste. Cook until the sizzling stops. This should take less than a minute.
- Reduce heat to medium low and stir in the kasoor methi, madras curry powder and salt. You want the spices and oil to be fully combined. Homogenous is a good way of thinking about it. Cook for around 30 seconds.
- Turn the heat back up to medium. Add the diluted tomato paste. Stir to combine. Again homogenous is a good word. Cook for about 30 seconds.
- Add the lamb. Break it up and cook until it no longer looks raw then add the water.
- Continue to cook until the water has evaporated. This should take about 10 minutes.
- While the lamb cooks use the time to finish making the the onion paste. Do your prep. Cook your peas. Measure out your spices. Dilute the tomato paste.
- When all the water has evaporated remove the lamb from the pan and set aside. Keep the lamb fat in the pan. Lamb fat is delicious. Seriously.
Make keema matar
- Cook the peas. If they are frozen microwave until warm. If they are fresh shelled peas, drop them into boiling salted water and cook until they turn bright green (probably a couple minutes if they are fresh). Check one. If you like them more done keep cooking until you get what you like.
- In a small bowl, combine the cumin, coriander, turmeric, Kashmiri chili powder, kasoor methi and salt. This is your spice mix.
- Heat the lamb fat you saved from the keema in a large skillet. If you don’t have 4 tbsp add a bit of neutral oil.
- Add the garlic ginger paste. Cook, stirring, until the garlic ginger paste stops spluttering. You’ll see what I mean when you do it.
- Turn the heat to medium low. Add the spice mix. Stir continuously until it starts to smell really good (about 30 seconds). This is called blooming the spices. It’s a key Indian cooking technique. Watch it carefully. If it looks like it’s sticking or burning lift the pan from the heat. If the spices burn you need to start over. No way around that.
- Add the diluted tomato paste and stir to combine. Turn the heat up to medium. Cook for 1 minute.
- Add half the onion paste and turn the heat up to medium high. Stir to combine. Cook for about a minute. Add the rest of the onion paste and stir again. Cook, stirring occasionally for about 4 minutes. Don’t worry if it looks dry. You can add a bit of water at the end.
- Turn the heat down to medium low. Stir in the tamarind paste. Cover and simmer for another 5 minutes. Add the pre-cooked keema. Simmer to heat the keema through. Add the peas. When the peas are warmed through you are good to go.
- If the curry is a bit thick add a bit of water or chicken stock and stir. Taste for salt and adjust as needed.
- Garnish with a of cilantro if desired.
Notes
Nutrition
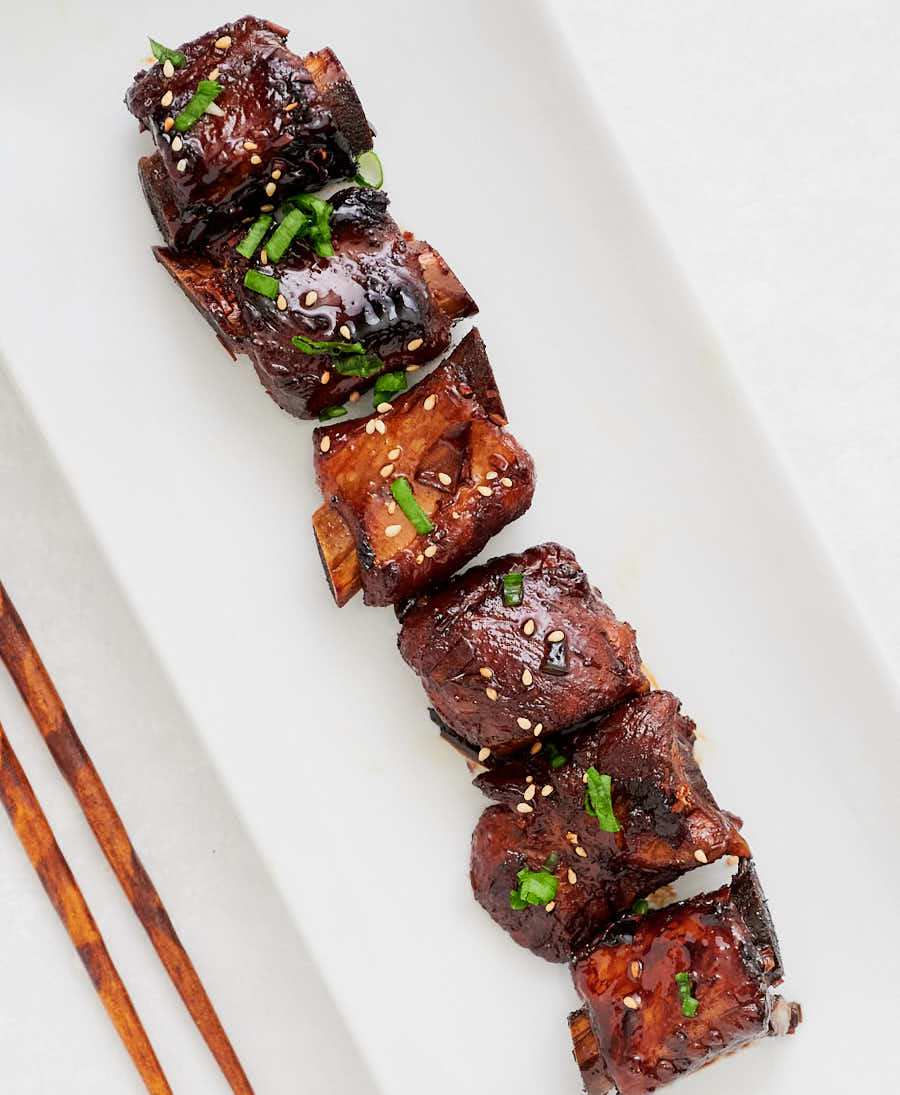
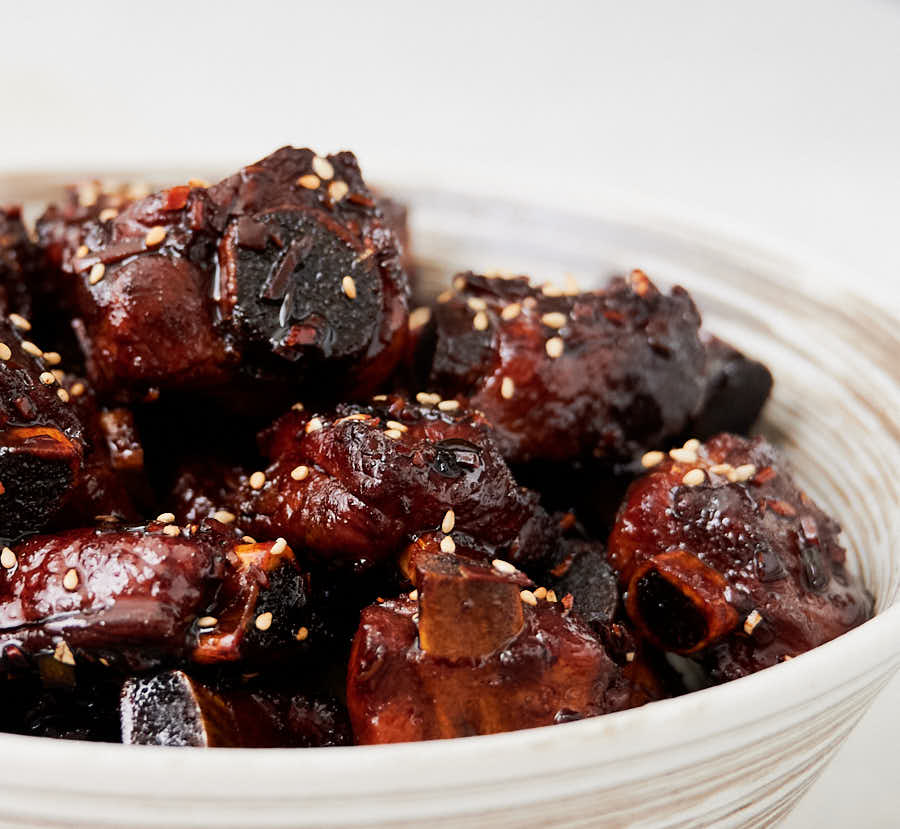
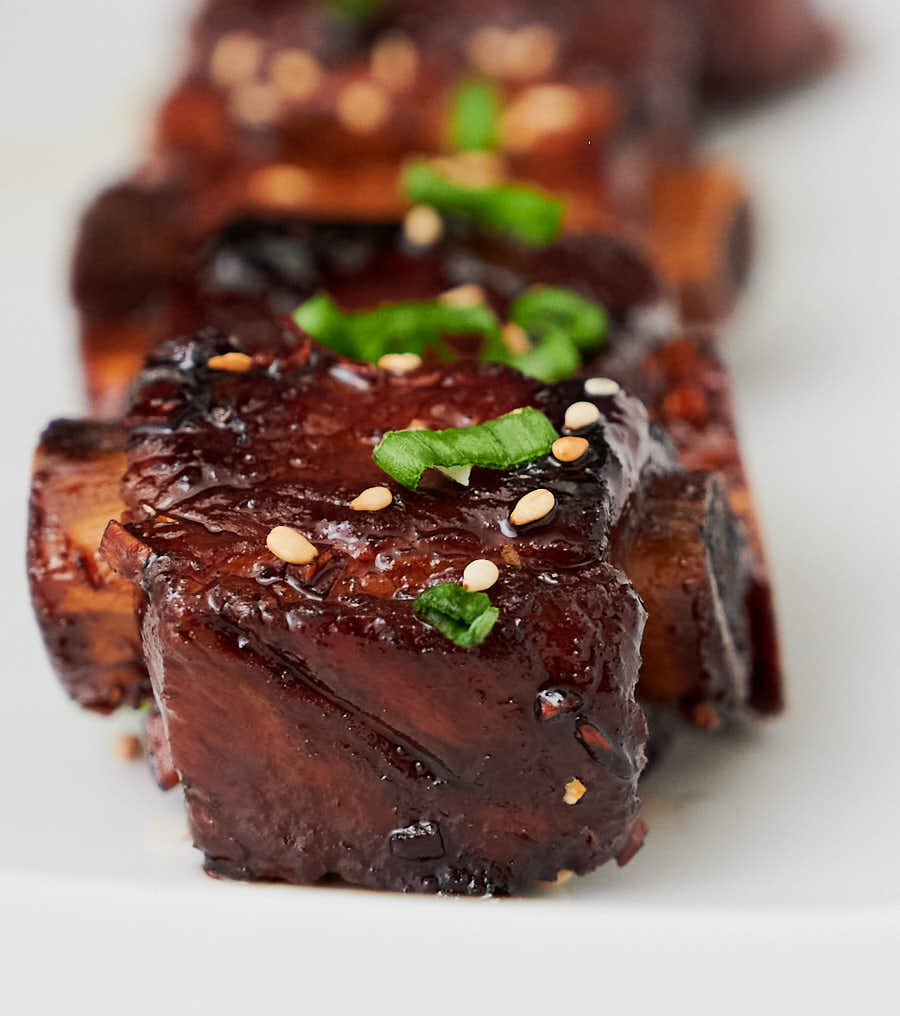
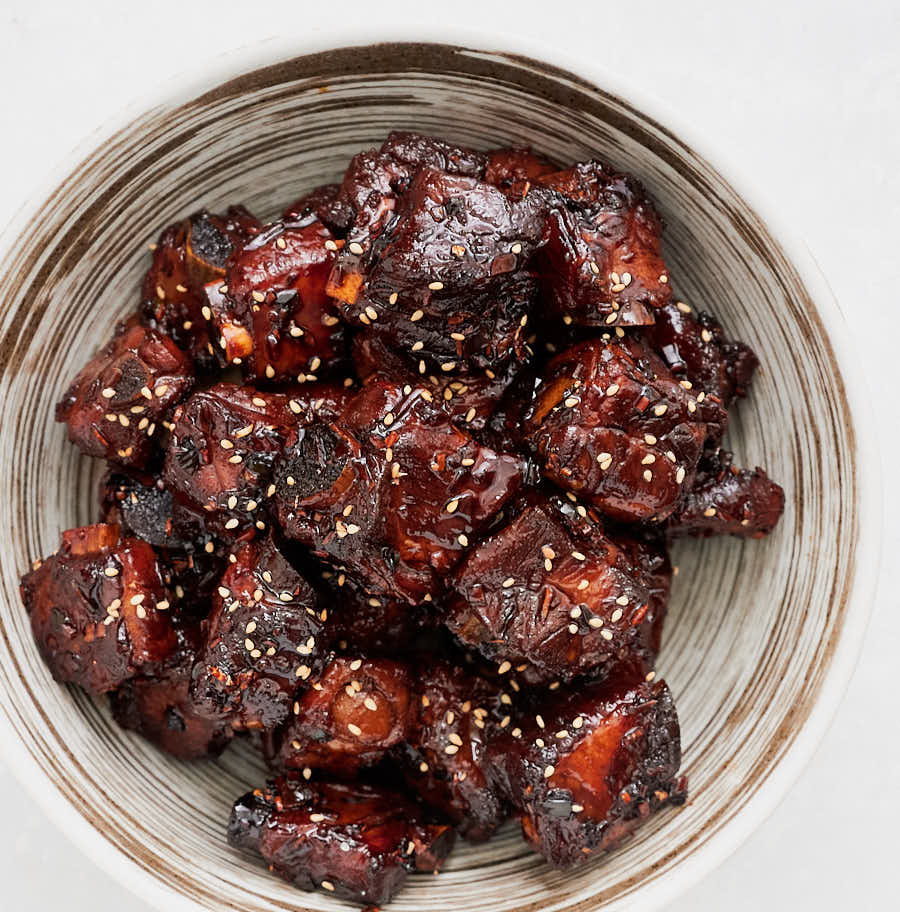
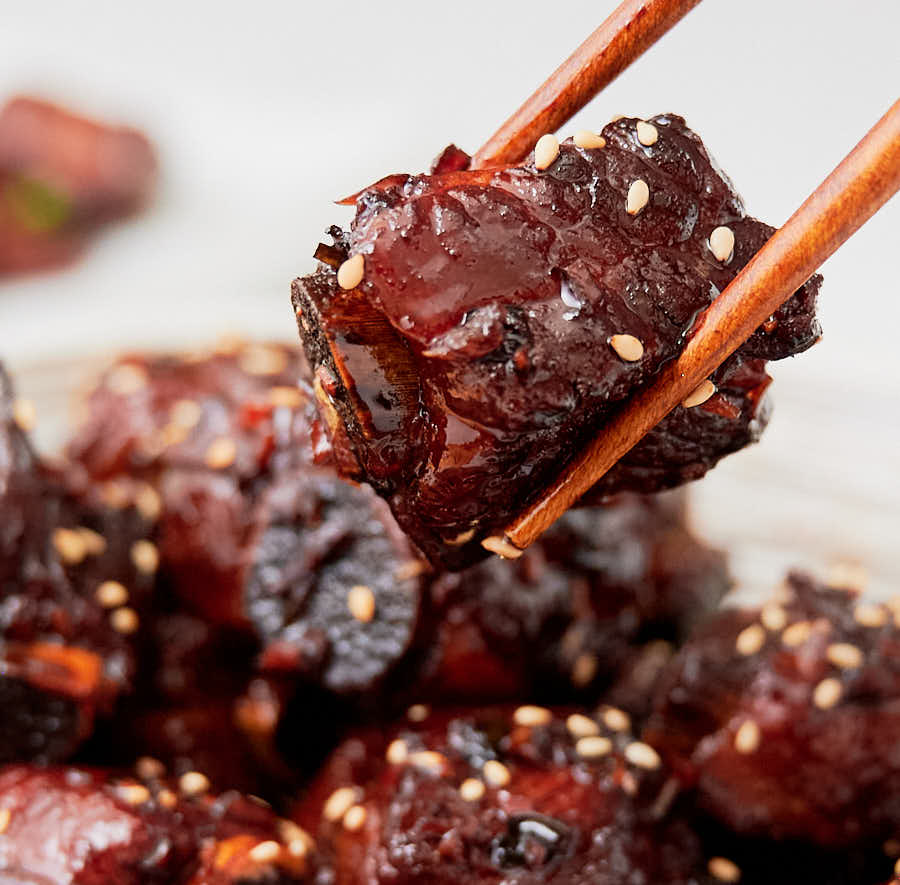
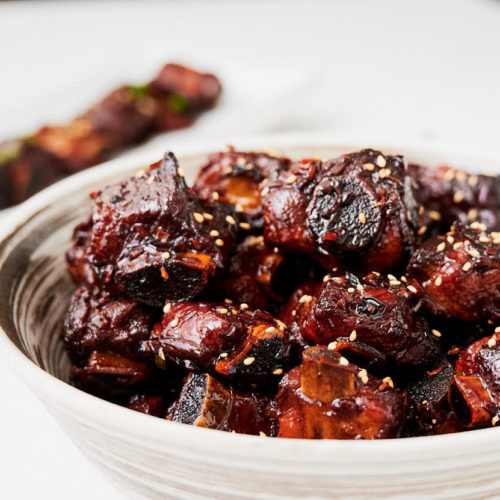
Shanghai sweet and sour spare ribs. Tang Cu Pan Gu. That’s Mandarin for seriously tasty.
Tender pork ribs. A sticky garlic black vinegar sauce. Sweet and sour in perfect balance. Complex. Tangy. Addictively delicious. I can’t stop eating them.
This may not be what your takeaway is making. Not yet anyway. But it is what they should be making.
The sour in sweet and sour spare ribs comes from black vinegar
You’ve probably never heard of black vinegar. It sounds scary. But it’s not. It’s vinegar. Not that different from other vinegars.
It’s sour. Has vinegar in the name so that shouldn’t be a surprise. But it’s more than just sour. It has a lot going on. Hints of anise. Malt. Umami.
It’s China’s answer to balsamic vinegar. Craft vinegar. That doesn’t mean balsamic is interchangeable though. Don’t make that mistake. No matter what the internet says.
Definitely worth getting your hands on a bottle. It’s not just for Shanghai sweet and sour spare ribs. You’ll find other uses for it.
Sweet and sour spare ribs are mostly about technique
This is a rib recipe. Ribs are slow food. And this starts off as a slow food type recipe.
Before you even pull out your wok you need to braise the ribs. That’s technique number one. One everyone needs to know.
Not just a regular braise. Not quite. I’m borrowing from my tonkotsu ramen broth. Blanching. Toss the ribs in a pot. Enough water to cover the ribs. Bring it to a lively boil for a minute or two.
You’ll see a mess of gunk form at the surface. I don’t like gunk. Nobody likes gunk. That’s why it’s called gunk. If it was good they’d call it crema.
So down the drain it goes. Wipe out the pot. Give the ribs a quick rinse under cold water and return to the pot.
Add water to cover the ribs again. A few flavourings this time. Shaoxing wine. Soy. Star Anise. A gentle simmer. And time. Time to get the ribs tender.
Tender can be a guess. Stick a fork in the ribs. Take your best guess. But I like a more disciplined approach. Internal temperature is how I do it.
These ribs are ready at around an internal temperature of 195F. 198F is probably OK too. But 185F is probably not. That’s the magic of cooking wit science.
Easy. Repeatable. Foolproof. An instant read thermometer is secondon my list of favourite kitchen tools. Right after sharp knives.
A good set of restaurant tongs are third on my list if you’re wondering.
Don’t dump the broth
The liquid left over after you braise the ribs? That’s pork stock. Tasty, tasty pork stock. With great Asian background flavours.
Do not pour that down the drain. It’s tasty stuff. And tasty stuff makes for tasty dishes. Like an Asian inspired pork noodle soup.
Yes. Pork noodle soup. That’s not a thing. Not yet. But it could be. Should be even. It’s delicious. I’ll be replacing this text with a link to one as soon as I publish it.
Shanghai sweet and spare sour ribs go fast in the wok
Hopefully you have a good sized wok. Or a big skillet and nerves of steel. This part goes fast. Braising is slow. Wok cooking is fast.
Heat the oil. Add the rock sugar. And wait for it to melt. That’s the sweet in sweet and sour ribs. It’s also why I think a wok is key for this recipe. Narrow at the bottom.
Melting sugar in oil isn’t something I do a lot. But it’s a super handy trick. And by the time the sugar melts it magically turns a lovely caramel colour.
Ribs go in next. This is where having a wok spatula is a wonderful thing. Best $15 I’ve ever spent. And I got a super fancy one.
Leave the wok on the stove. Use the spatula to move things around. Unless you have big wok mojo. In which case go nuts.
You want the ribs well coated with the candy oil. That’s the goal. When everything starts to look shiny and delicous you know you’re done.
Choice of soy matters
If you’ve never done a soy tasting you should put it on your bucket list. In the super easy section. But still. The subtleties are amazing. And they’re not all that subtle.
Thai is not the same as Indonesian is not the same Japanese is not the same as Chinese. And there are variations from each country. It’s a bit of a rabbit hole.
So it shouldn’t be a huge surprise that Chinese soy is right for Chinese. But it doesn’t stop there.
There’s all purpose soy. That’s probably what you have in your fridge. Jack of all trades. But not really. I don’t think anyway.
It can stand in for light soy. Pretty close I find. So I don’t really understand why you wouldn’t just stick with light. And leave the all purpose at the store.
And there’s Chinese dark soy. Any time you see a dark, shiny Chinese dish it’s a safe bet there’s dark soy in the mix.
Have a look at the pictures. Shanghai sweet and sour spare ribs is all about the dark soy. If you don’t have it you need to go shopping. It’s magical stuff.
You need to try these sweet and sour spare ribs
Tang Cu Pan Gu. Shanghai sweet and sour spare ribs. Doesn’t matter what you call them. What you need to do is make these.
There’s a lot going on. The fattiness of the ribs. Balanced by the acid in the black vinegar. Sticky sweet but not cloying. A bit salty. Like a good barbecue sauce.
Garlic, chili and sesame oil for complexity. Dark soy to bring it home. Deceptively simple. Seriously delicious. Shanghai sweet and sour ribs. I’m a fan.
Shanghai sweet and sour spareribs
Ingredients
Pre-cooked spareribs
- 1.5 lbs spare ribs cut into individual ribs and into one inch pieces. Your grocer or butcher should be able to help.
- 3 tbsp all purpose soy
- 2 tbsp shaoxing wine
- 1 star anise
- enough water to cover
The sweet and sour ribs
- the pre-cooked ribs from above
- 2 tbsp neutral oil – something with a high smoke point like canola or safflower. Not olive oil. Please not olive oil.
- 2 Ounces rock sugar – by weight. About 1/4 cup
- 1 tbsp minced ginger
- 2 tbsp minced garlic
- 1 tbsp minced fresh green chili – seeded finger hot or jalapeño work nicely
- 2 tbsp dark soy
- 1 tbsp black vinegar – available at Chinese groceries
- 1 tsp sesame oil
- 1/2 tsp ajinomoto aka MSG (optional but not really optional)
- 1 tbsp shaoxing wine
Instructions
Braise the ribs
- Blanching meat when making stocks is a great trick I am borrowing from making Tonkotsu broth. Grab a pot large enough to hold the ribs, cover with water and bring to a boil over medium heat. Let them boil a couple of minutes.
- You should be looking at a big raft of gunk at this point. Strain the ribs, discarding the liquid and give them a good rinse under cold water. Why cold? Because the ribs are hot and you are going to have to handle them.
- Depending on how gunked up the ribs are you may have to rinse each rib individually. The pork broth you are going to make here is great for noodle soups. You will want to keep it.
- Combine the 3 tbsp all purpose soy sauce, 2 tbsp shaoxing wine, the star anise, water and the now blanched ribs in the same pot (rinsed of any gunk from the previous step). I prefer a pot over a wok here but that’s just me. Do what you know.
- Bring to a simmer, cover and cook until the ribs are just tender. If you have an instant read thermometer 195-200F is your target. This should take between 1 and 2 hours. Depends on just how meaty your ribs are.
- Remove the ribs from the liquid. Strain the liquid and store in the fridge. When cooled, skim the fat from the surface. You now have some great stock for an Asian noodle soup.
- If you get into these ribs you can make big batches and freeze them. That way you can make these ribs any night of the week.
Make the ribs
- Do your prep. This is going to go fast. Chop your garlic, ginger and chilies. Combine the soy, black vinegar and sesame oil in a small bowl. Measure out your shaoxing wine.
- Preheat your wok. I’d say 12 inches is about the minimum diameter you want here.
- Add the oil and rock sugar. Stir until the sugar melts and you turns light caramel colour. This should take three or four minutes.
- Add the ribs and toss until they are well coated with the caramel. You’ll be able to clearly see what is coated and what is not.
- Add the garlic, ginger and chilies. Cook, tossing the ingredients in the pan for about 30 seconds. You want to keep things moving here to make sure you don’t burn the garlic.
- Turn the heat up. Add the soy/vinegar/sesame oil mixture. Pour it down the sides of the wok. It isn’t easy getting wok hei at home. Everything helps. Add the MSG if using.
- Cook for about a minute. You want things to reduce a bit. Then add the shaoxing wine. Cook another minute or so.
- Serve garnished with sesame seeds if you like.
