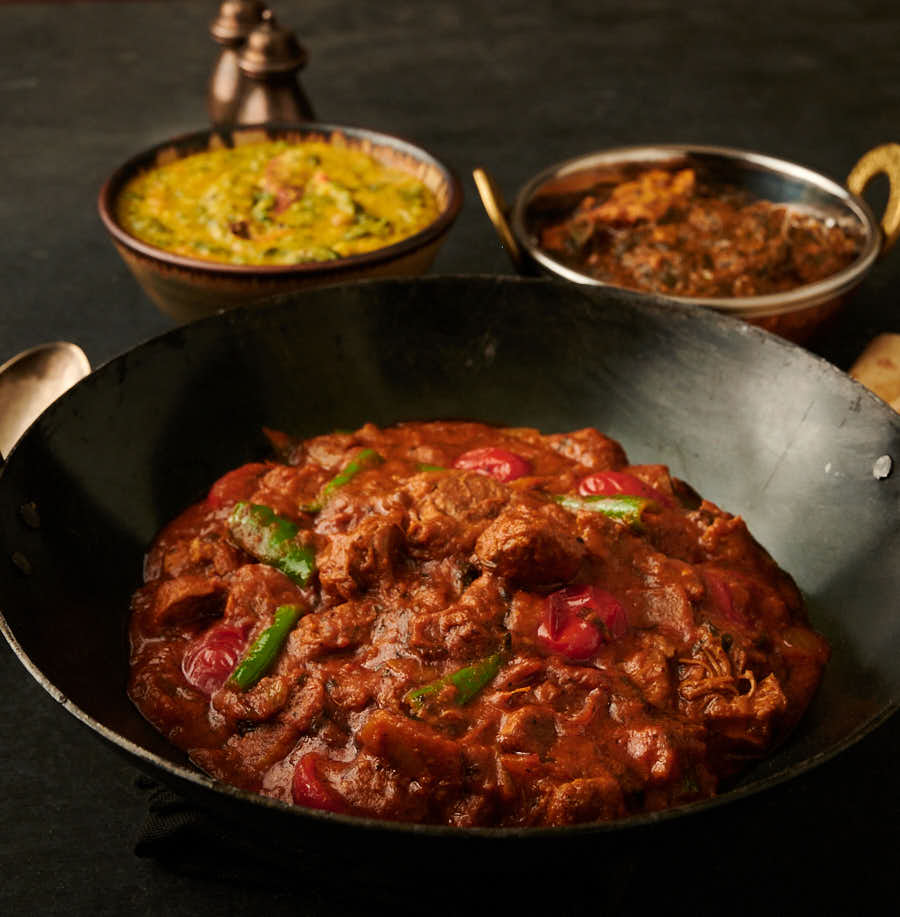
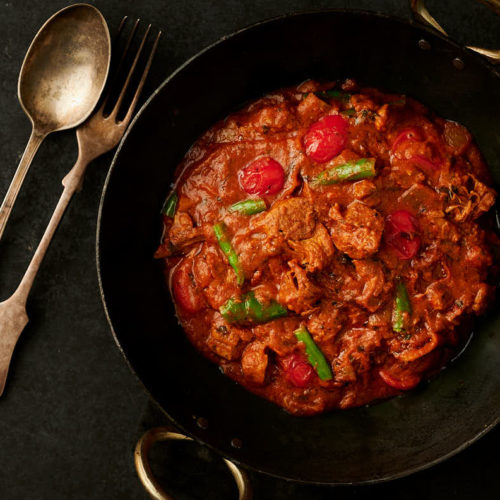
Lamb bhuna curry. Thick. Rich. Lush. Hotel style. There is a lot of flavour going on here.
This is a classic restaurant curry. But one that’s getting upscaled. In a big way.
Hotel gravy. Tomato masala. And lamb. It’s hard to go wrong with lamb when it comes to making curries.
Bhuna is no exception. Lamb just adds some wow. It always adds some wow. If you want a chicken version check out the notes. Poultry does work as well.
What is lamb bhuna?
That’s a question I don’t actually have the answer to. As far as I can tell there’s no such thing as lamb bhuna.
Google it. It’s a thick curry. With tomato. And spices. See what I mean? That description fits a lot of curries. Not particularly helpful.
Technically I think it’s supposed to be a dry curry. Fried spices and meat left to stew in their own juices. That sounds amazing to me. But doesn’t line up with what you get in restaurants.
So I have my own definition. Onion. Tomato. A spice flavour profile that’s bold but not way out there. Deep flavours.
Green chilies and onions. A little bit sweet. A little bit tart. And lamb for the richness that only lamb can bring.
That’s my lamb bhuna. Done hotel style. Call the curry police if you have to. But I’m going with it.
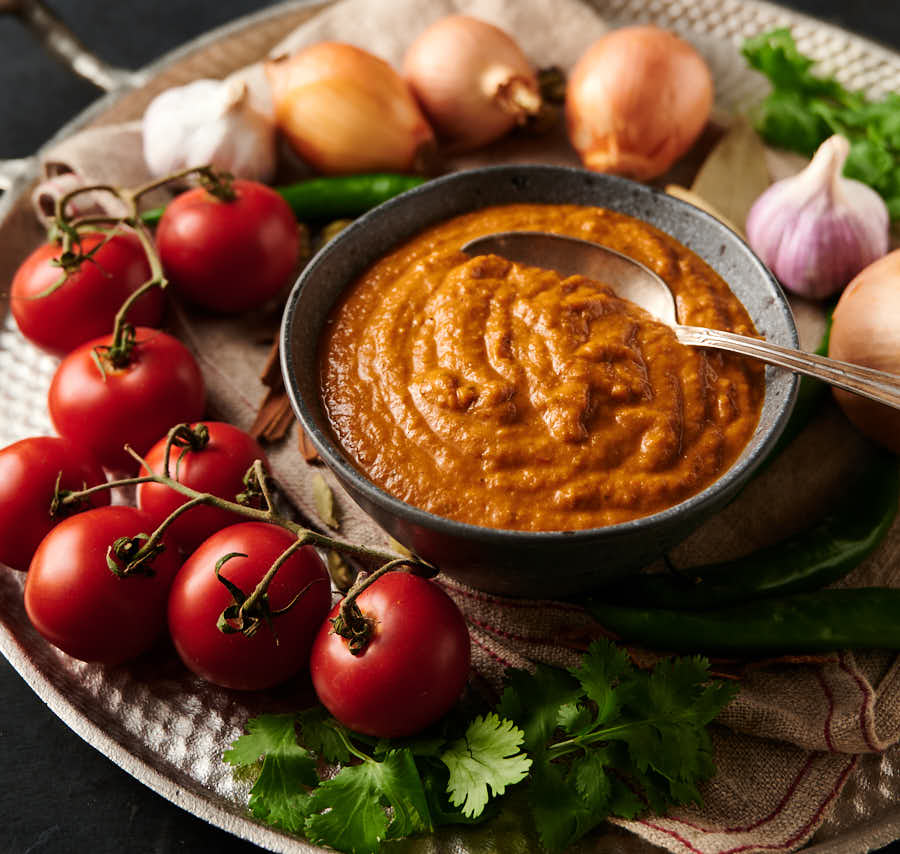
A tale of two gravies
This is the first of the dual gravy recipes. Told you it was coming. The right tool for the job. And more than one tool when needed.
The backbone is hotel gravy . That’s where the deep flavour comes from. If you haven’t checked out hotel gravy it’s definitely worth a look. Game changer I think.
And for the tomato I’m using makhani gravy . Sort of. It’s makhani gravy without the butter and cream. Cashews optional. So technically not makhani gravy. More of a tomato masala.
Same recipe though. Just don’t add the cream and butter at the end when you make the gravy.
That’s what I do when I make “makhani” gravy. Take it to the point right before the dairy goes in. Add the butter and cream when I need it. That way it’s two gravies in one.
See what I mean? The right tool for the job.
Cashews are optional because I’m allergic. So I can’t use them. Well, I guess I can but it’s really, really unpleasant. So I don’t.
The hotel butter chicken rocks without cashews. And so does this lamb bhuna.
You could use passata instead I suppose. Wouldn’t be quite as good though. And the makhani gravy is really easy to make. And fast. So I always go for it.
The secret is in the prep
This is high end restaurant cooking. And it takes real prep. Don’t think you can start this recipe an hour before dinnertime.
Four hours before maybe. If you’re organized. And you’re comfortable running things in parallel.
Hotel gravy is probably at least an hour. And you have to pay attention. This isn’t like regular curry base. You need to brown the onions to get the flavour. No walking away while that’s going on.
Makhani gravy is easier. Toss some stuff in a pot and simmer. Puree. Done. But it takes time.
Pre-cooking the lamb is easy. But lamb is tender when it’s tender. There’s no rushing it.
So that’s three pots going at once. If you are super organized maybe you could pull it off in around 2 1/2 hours. Plus clean up.
Think like a restaurant – it will save your sanity
You could try to kill yourself and do it in one day. It is doable if you are determined.
Or you could take a more restaurant approach. Restaurants do their prep during the day. So everything is ready at service. And then cook to order.
That’s sort of how I do it. Except I don’t do it all in one day. Make the hotel gravy one day. The recipe makes enough for 8 curries. Freeze it in one cup portions. So it’s ready when you need it.
Make the makhani gravy another day. Or even the day you make this lamb bhuna. Freeze it in half cup portions.
Batch cook lamb. Portion it out and freeze it too. If you want to do this you really need a vacuum packer. Freezer burn awaits those that don’t remove all the air. Or you can cook it the day you serve. Up to you.
Do your prep. That way you can make lamb bhuna on a Tuesday night. For real.
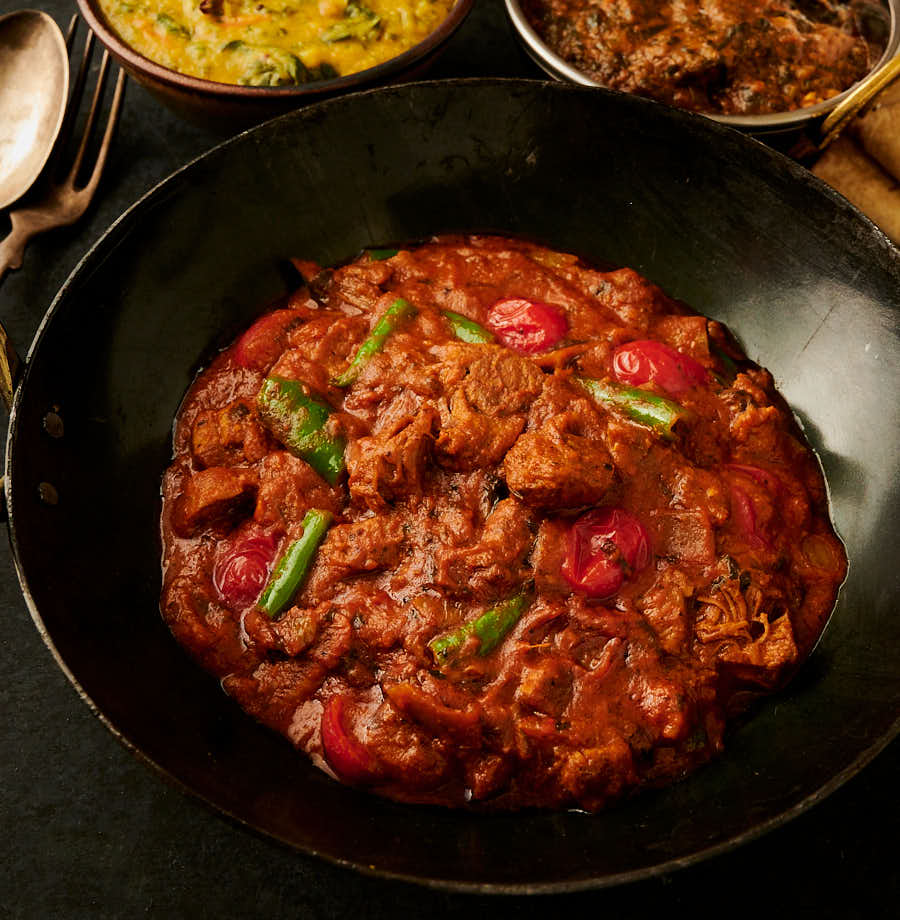
Lamb bhuna hotel style
This is serious cooking. But you get a serious lamb bhuna at the end. It’s real work. And it’s totally worth it.
Hotel style. For when you want what they are serving at the best Indian restaurants.
Lamb bhuna – Indian hotel style
Ingredients
Pre-cook your lamb
- 12 oz lamb I like shoulder best. Cut into 1 to 1 1/2 inch pieces.
- 1 tsp curry powder or mix powder if you prefer
- 1 tsp kosher salt – you want fairly salty to season the lamb. You will be discarding the cooking liquid. Most of it anyway.
- 1 cup chicken stock – enough to cover
The spice mix
- 2 tsp coriander powder
- 1 tsp cumin powder – you can get this at your Indian grocer
- 1/2 tsp turmeric powder
- 1 tsp kashmiri chili powder
- 1 tsp kasoor methi – dried fenugreek leaves
- 1/2 tsp kosher salt
lamb bhuna
- 4 tbsp vegetable oil – any neutral oil is fine.
- 1/2 onion – coarsely chopped
- 2 green chilies – jwala chilies, seeded and diced.
- 2 tbsp cilantro stems and leaves – finely diced
- 1 tbsp garlic ginger paste – recipe link below
- the spice mix from above
- 1 cup Indian hotel curry gravy – recipe link below
- 1/2 cup makhani gravy – recipe link below. Without the butter or cream. I use the cashew free version.
- the pre-cooked lamb
- 1/2 tsp tamarind paste – or tamarind pulp if you make it yourself.
- 1/2 tsp jaggery or brown sugar
- 3-4 cherry tomatoes halved
Instructions
Do your prep
- Pre-cook the lamb.
- Make your spice mix. Chop your green chilies and onion. Mince the cilantro.
Pre-cook the lamb
- Add the lamb, curry powder, salt and chicken stock to a saucepan. You want enough stock to fully cover the lamb. 1 cup is a guess. I don’t know how big your sauce pan is. Try to pick one that isn’t way too big.
- Bring to a simmer. Cover. Cook until the lamb is tender. Keep an eye on the liquid level. You want the lamb submerged the whole time. This should take somewhere around an hour for lamb shoulder. Depends on how big your lamb chunks are. Also depends on the lamb. You are making stew. It’s done when it’s done I’m afraid.
- Drain. Set the lamb aside. You can do this the day before if you’d like. You can also use this stock to dilute your final curry if you like. No sense wasting flavour. It’s pretty salty though so you need to roll back on the salt in the spice mix and season to taste at the end. Maybe drop the salt to 1/3 tsp and tweak if needed.
Make the lamb bhuna
- Heat the oil in a medium sized frying pan until the oil just starts to shimmer.
- Add the chopped onion. Cook until it just starts to colour up.
- Mix in the cilantro and green chilies. Cook for another 30 seconds or so.
- Stir in the garlic ginger paste. Gently fry until the garlic ginger paste stops sputtering. This is the only messy step.
- Turn your heat down to medium low and add your spice mix. You want to fry the spices in the oil. This is why it’s important not to skimp on the oil. The oil helps keep the spices from sticking and burning (really bad). You are also making spiced oil here and that spiced oil will carry flavour into every bite (really good).
- Add the Indian hotel and makhani curry gravy. Stir it really well to get the oil to combine with the curry gravy. You want everything mixed together at this point. Bring to a simmer.
- Add the tamarind paste, the sugar and the lamb.
- Cover loosely and cook for about 5 minutes.
- If the sauce looks a little too thick for your taste at this point (technically this is supposed to be a thick curry) add enough water or some of the leftover lamb stock. If you use the lamb stock remember to watch your salt levels. Bring back to a gentle simmer. Cook for another two or three minutes. You want that lamb flavour to infuse the sauce.
- Add the cherry tomatoes and cook until they are just warmed through.
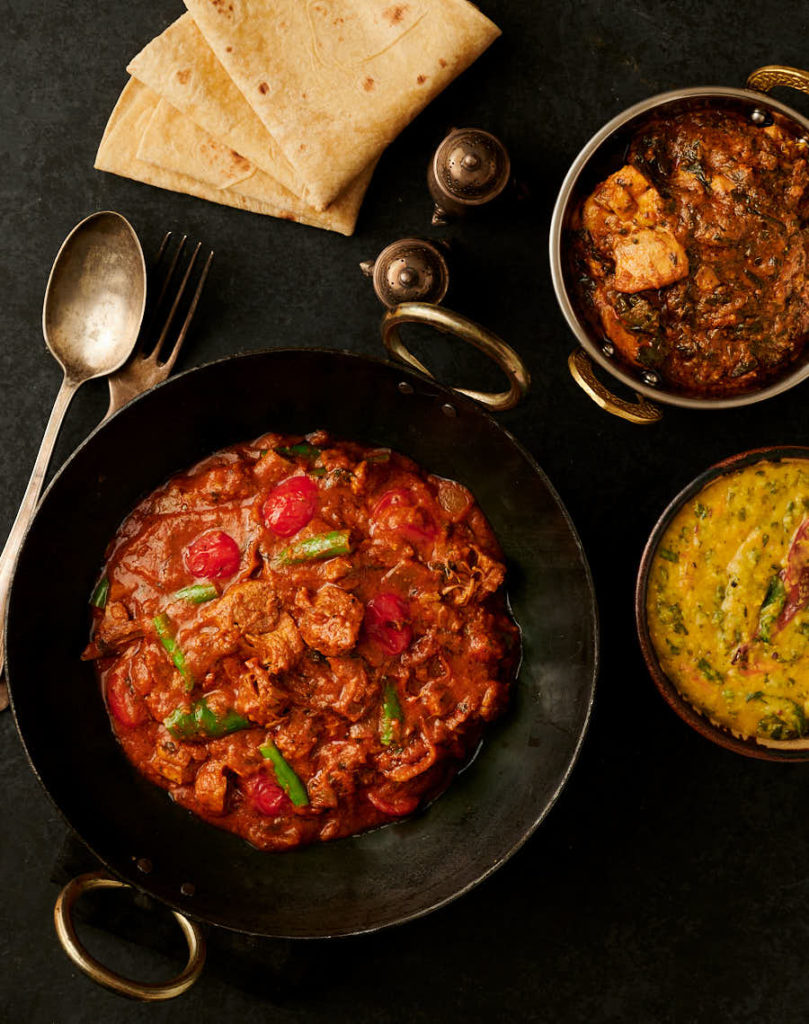
- Serve with rice or Indian flatbread. I like a tarka dal or chana masala on the side. But I always like a tarka dal or a chana masala on the side so I am hopelessly biased here.
Notes
Nutrition
Lamb bhuna - Indian hotel style
Ingredients
Pre-cook your lamb
- 12 oz lamb I like shoulder best. Cut into 1 to 1 1/2 inch pieces.
- 1 tsp curry powder or mix powder if you prefer
- 1 tsp kosher salt - you want fairly salty to season the lamb. You will be discarding the cooking liquid. Most of it anyway.
- 1 cup chicken stock - enough to cover
The spice mix
- 2 tsp coriander powder
- 1 tsp cumin powder - you can get this at your Indian grocer
- 1/2 tsp turmeric powder
- 1 tsp kashmiri chili powder
- 1 tsp kasoor methi - dried fenugreek leaves
- 1/2 tsp kosher salt
lamb bhuna
- 4 tbsp vegetable oil - any neutral oil is fine.
- 1/2 onion - coarsely chopped
- 2 green chilies - jwala chilies, seeded and diced.
- 2 tbsp cilantro stems and leaves - finely diced
- 1 tbsp garlic ginger paste - recipe link below
- the spice mix from above
- 1 cup Indian hotel curry gravy - recipe link below
- 1/2 cup makhani gravy - recipe link below. Without the butter or cream. I use the cashew free version.
- the pre-cooked lamb
- 1/2 tsp tamarind paste - or tamarind pulp if you make it yourself.
- 1/2 tsp jaggery or brown sugar
- 3-4 cherry tomatoes halved
Instructions
Do your prep
- Pre-cook the lamb.
- Make your spice mix. Chop your green chilies and onion. Mince the cilantro.
Pre-cook the lamb
- Add the lamb, curry powder, salt and chicken stock to a saucepan. You want enough stock to fully cover the lamb. 1 cup is a guess. I don’t know how big your sauce pan is. Try to pick one that isn’t way too big.
- Bring to a simmer. Cover. Cook until the lamb is tender. Keep an eye on the liquid level. You want the lamb submerged the whole time. This should take somewhere around an hour for lamb shoulder. Depends on how big your lamb chunks are. Also depends on the lamb. You are making stew. It’s done when it’s done I’m afraid.
- Drain. Set the lamb aside. You can do this the day before if you’d like. You can also use this stock to dilute your final curry if you like. No sense wasting flavour. It’s pretty salty though so you need to roll back on the salt in the spice mix and season to taste at the end. Maybe drop the salt to 1/3 tsp and tweak if needed.
Make the lamb bhuna
- Heat the oil in a medium sized frying pan until the oil just starts to shimmer.
- Add the chopped onion. Cook until it just starts to colour up.
- Mix in the cilantro and green chilies. Cook for another 30 seconds or so.
- Stir in the garlic ginger paste. Gently fry until the garlic ginger paste stops sputtering. This is the only messy step.
- Turn your heat down to medium low and add your spice mix. You want to fry the spices in the oil. This is why it’s important not to skimp on the oil. The oil helps keep the spices from sticking and burning (really bad). You are also making spiced oil here and that spiced oil will carry flavour into every bite (really good).
- Add the Indian hotel and makhani curry gravy. Stir it really well to get the oil to combine with the curry gravy. You want everything mixed together at this point. Bring to a simmer.
- Add the tamarind paste, the sugar and the lamb.
- Cover loosely and cook for about 5 minutes.
- If the sauce looks a little too thick for your taste at this point (technically this is supposed to be a thick curry) add enough water or some of the leftover lamb stock. If you use the lamb stock remember to watch your salt levels. Bring back to a gentle simmer. Cook for another two or three minutes. You want that lamb flavour to infuse the sauce.
- Add the cherry tomatoes and cook until they are just warmed through.
- Serve with rice or Indian flatbread. I like a tarka dal or chana masala on the side. But I always like a tarka dal or a chana masala on the side so I am hopelessly biased here.
Notes
Nutrition
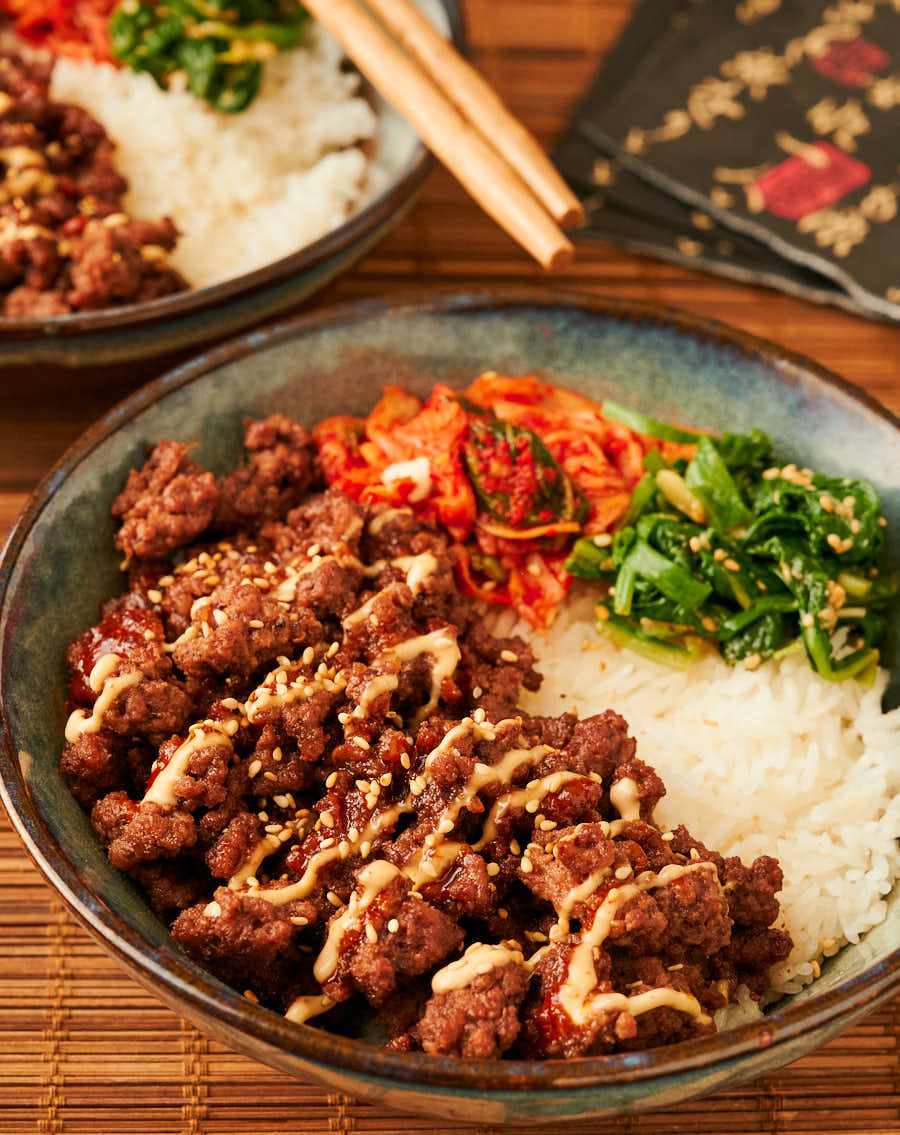
Weeknights don’t need to be boring. You can whip up a Korean beef bowl in around 40 minutes.
Dinner on the table in less time than it takes to order in. A whole lot less expensive too I bet.
And it scales. Feed a crowd if you need to. No problem. Just up the quantities.
Might need to cook the beef in batches. So it browns instead of steams. But everything else scales perfectly.
Korean beef bowl is like super simple bibimbap
That’s kind of how I think of Korean beef bowl. A simple way to make bibimbap. Really easy. Speed fix. Not quite authentic. But close enough for Tuesdays.
You could even just make the beef and serve it on rice. A little kimchi on the side. Pretty tasty. I’d eat that. And smile.
But I like it better with a couple banchan. And a couple different drizzles. A little extra flash. For not a lot more work.
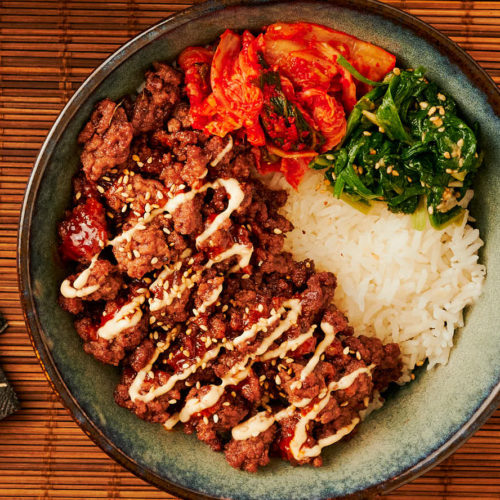
Use whatever banchan you want
Banchan is the name for all those funky condiments served with rice. The army of little side dishes they put out at Korean restaurants
Kimchi is probably the most famous. And for me it’s essential to Korean beef bowl. But there’s no reason you can’t add others.
Kimchi is easy where I live. They sell it at the regular grocery stores now. It’s arrived. It’s a thing.
For other flavours you might have to do a little more work.
There are all sorts of goodies in the coolers at your local Korean grocer. Have a look. Assuming you have a local Korean grocer I guess. I’m lucky that way.
If buying banchan isn’t an option you can make your own. Banchan don’t tend to be a lot of work. But they will push you past the 40 minute mark.
If you have no idea what I’m talking about go to a Korean restaurant. Order something that comes with banchan.
15 little bowls of delicious. A bowl of rice and an army of banchan is good living. Nothing else required.
I bought the kimchi. But I made the marinated spinach. It probably took me as long as making everything else in this dish.
You’ll have a pretty big mess on your hands if you try to get this done too and still hit the 40 minute mark.
Better to do it the day before. Or just buy it. The spinach recipe is from Serious Eats if you’re wondering.

It has to be sticky rice
If you want to eat Korean beef bowl with chopsticks you are going to need sticky rice. Straight jasmine isn’t going to cut it.
It’s a double whammy. Rice and ground beef is tough. Not easy unless you are a chopstick grand master.
But a big part of the flavour is in the sauce. And that sauce has the juices from browning the beef.
And those juices coat the rice. So they separate into individual grains. About impossible to pick up with chopsticks.
See what I did there? I called the rendered beef fat “juices”. To soften the blow. Because the beef fat is a huge part of the flavour.
Embrace it. Live a little. It tastes good. Fat tastes good. Thank you Julia Child for showing us the way.
Use lean ground beef though. Medium is pushing it. Even I think that’s too much.
So you have a choice. Give up on chopsticks. Or make sticky rice.

An easy way to make sticky rice
There’s the real way to make sticky rice. Soaking. Steaming. Special gear.
It’s magical stuff. But it’s not weeknight cooking. Not for me anyway. If it is for you go for it.
There’s an easier way. Might not quite have all the magic. But at least you’ll be able to get the rice to your mouth. With chopsticks. And eat your dinner in less than an hour.
I didn’t invent this. It’s an undocumented trick. I heard from a friend. Not sure why it’s not a thing.
Or maybe it is a thing. And I just can’t come up with the right search terms. Don’t know. But I do know it’s easy.
There’s this stuff called glutinous rice. Or sweet rice. You can get it at Korean groceries.
Straight up it’s like making a rice hockey puck. Or whatever sport uses a puck where you live. Not great.
But if you use a little bit. Mixed in with the jasmine rice. Then you have something that works in a Korean beef bowl.
And it’s no more work than making the rice you were going to make anyway. I call that a win.
Food truck style Korean beef bowl
If I had a food truck I’d serve this. And I’d want it to stand out. A little wow. To keep them coming back.
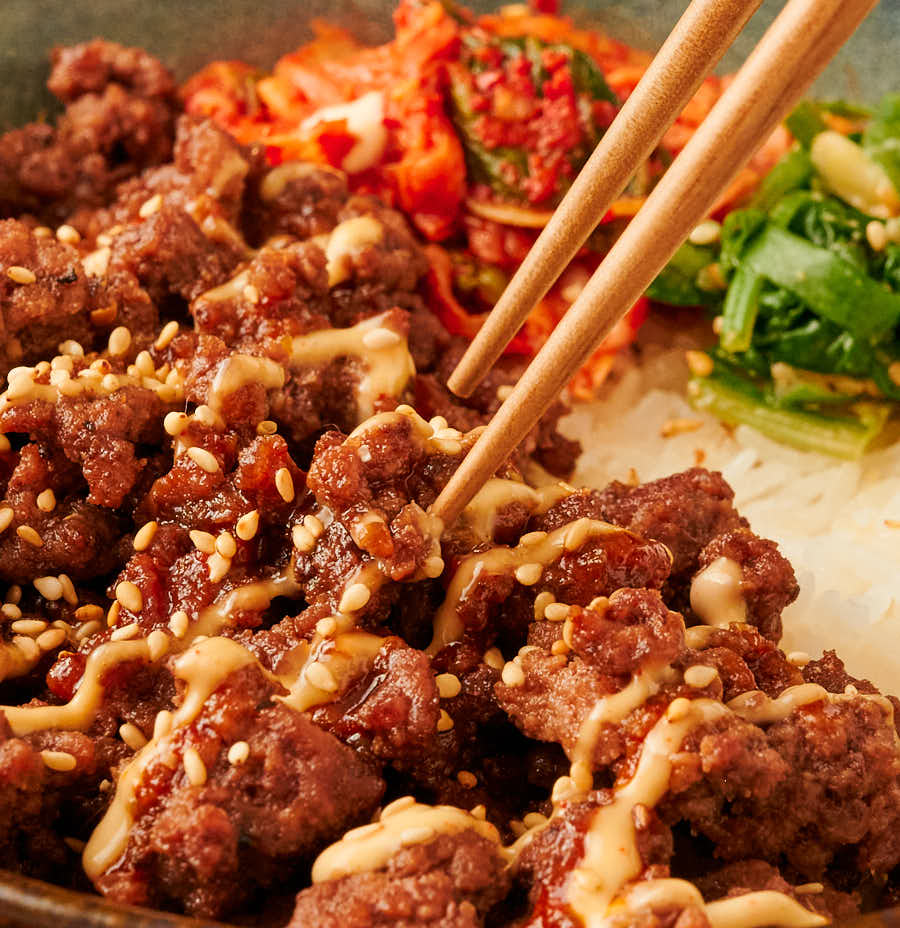
So there’s two drizzles. But one is a variation of the other. So it’s not a big deal. Like they do in restaurants. Or food trucks I guess.
The first is the gochujang drizzle. It’s a red sauce. Big flavours. Wake your mouth up type flavours.
You don’t need the second drizzle. But it’s fun. And it adds a little creaminess.
You ready? It’s just a bit of the gochujang drizzle with some mayonnaise and a bit of sour cream to lighten it.
Not even homemade mayonnaise. Hellmans. Or Duke’s I guess. If you’re lucky enough to live where they sell that.
Just not that sandwich spread stuff that calls itself a miracle though. That stuff is not mayonnaise.

Weekend flash for weeknight cooking
This isn’t as complicated as you think. Mix up a sauce. 3 minutes. Fry some hamburger. Under 10 minutes. Make a drizzle or two. 5 more minutes. Cook some rice. Well – that takes as long as it takes.
It is totally doable during the week. Korean beef bowl. For when you want better than takeout. On a Tuesday. Seriously.
Korean beef bowl with gochujang drizzle
Ingredients
simple bulgogi style sauce
- 1/4 cup soy sauce
- 1/4 cup brown sugar
- 2 cloves garlic crushed
- 1/2 inch piece of fresh ginger grated on a microplane
- 1 tsp sesame oil
- pinch black pepper
easy sticky rice
- 3 tbsp glutinous rice also called sweet rice.
- 13 tbsp jasmine rice 1 cup less three tablespoons. Put the three tablespoons of glutinous rice in your measuring cup and top it up with jasmine rice. Easy.
- 1 tsp kosher salt – a little less if you are using regular table salt
- 1 1/2 cups water
gochujang drizzle
- 2 tbsp gochujang
- 1 tbsp sesame oil
- 1 tbsp water
- 2 tsp rice wine vinegar
- 2 tsp brown sugar
- 2 tsp soy sauce I like Thai thin soy for this recipe but a good Japanese soy works well too.
Creamy gochujang drizzle
- 1 tbsp mayonnaise
- 1 tsp sour cream
- gochujang drizzle to taste. Maybe a teaspoon or so.
korean beef bowl
- 12 oz lean ground beef
- 2 tbsp vegetable oil
- banchan of your choice to serve – I think kimchi is a must
- white sesame seeds to garnish
Instructions
Make the simple bulgogi style sauce
- Mix the soy and brown sugar in a small saucepan. Warm until the sugar fully dissolves.
- Let cool and add garlic, ginger, sesame oil and black pepper.
Red gochujang drizzle
- Combine all the ingredients. Mix completely. Set aside.
Creamy gochujang drizzle
- Combine the mayonnaise and sour cream.
- Add a bit of the red gochujang drizzle. Taste. Decide if you want more. A teaspoon or so should get you to where you need to be. You want a lighter counterpoint to the beef and red drizzle so don’t go crazy here.
Easy sticky rice
- Combine the glutinous rice with the jasmine rice. The easiest way to do this is to put 3 Tbsp glutinous rice in the measuring cup and add enough jasmine to make up one cup total rice.
- I use a rice cooker for this. Shame on me. Toss everything in a rice cooker. Hit a button. Wait. Perfect rice every time.
- If you don’t have a rice cooker it’s a little trickier because jasmine cooks faster than glutinous rice. Combine the rice, salt and water in a saucepan that has a lid. Bring to a lively simmer. Reduce the heat to low, cover and cook for the time specified for the jasmine rice (around 12 minutes). Let stand 5 minutes. Try this once with whatever rice you get to make sure everything works for you before going for it at dinner.
Korean beef bowl
- Add the oil to a frying pan that is large enough to hold the beef and sauce.
- Add the beef, breaking it up into small pieces, and brown. You need to make sure you cook the beef through. Underdone ground beef is not to be trifled with.
- When the beef is done add the simple bulgogi sauce and stir. Simmer for a couple minutes.
- To assemble your Korean beef bowls put a layer of rice in each bowl. You might not need all the rice – unless you are really hungry. Beef goes on the rice, then the drizzles. Spinkle the beef with sesame seeds and garnish with the banchan of your choice.
