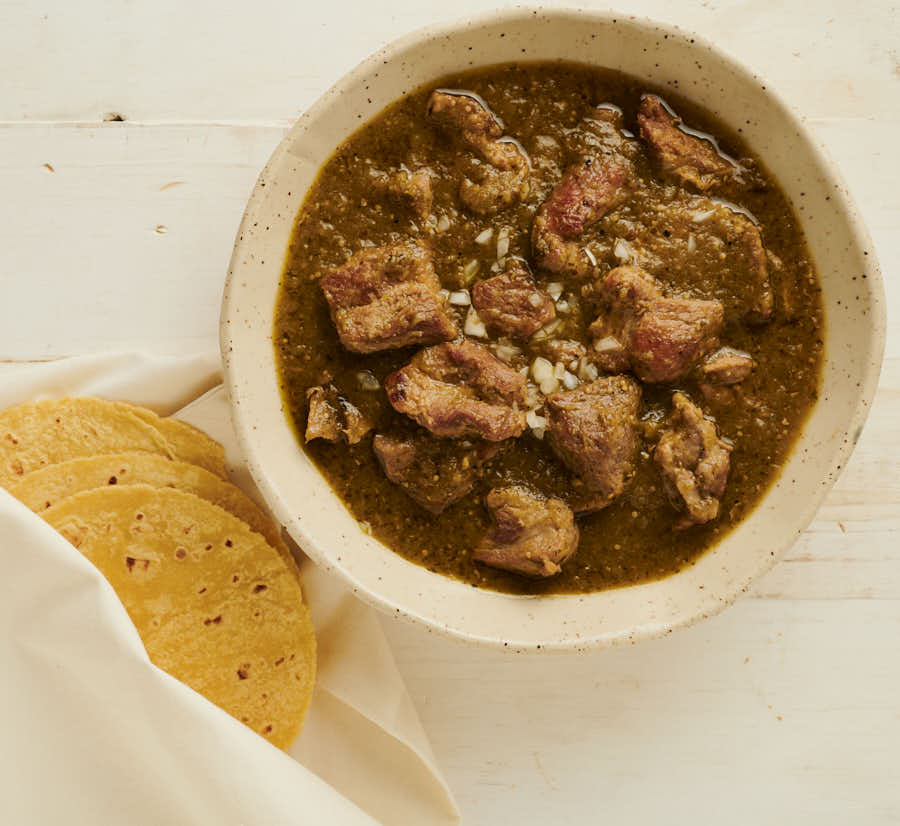
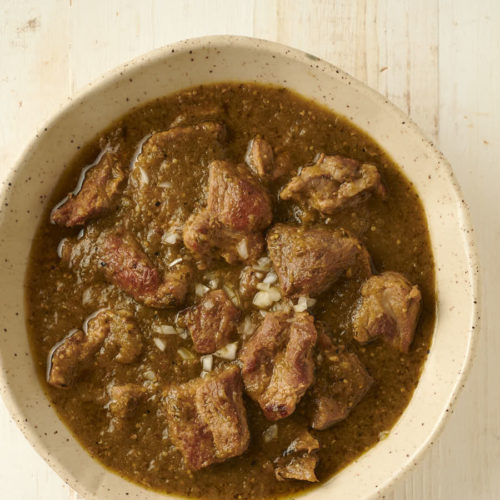
I like pork. No. That’s not right. I love pork. And chile verde is one of my favourite things.
There’s just something about green chilies, tomatillos and deeply browned, braised pork that works. Really, really well.
If you like pork. And you like green chilis and tomatillos. Then there’s no doubt in my mind you will love chile verde. You really have to taste it to understand.
You really, really need to try it for yourself.
Chile verde is about layered flavours
There isn’t a whole lot to chile verde. It’s a simple dish. Not a ton of ingredients. That means each ingredient counts.
And they come together in a way that you wouldn’t really expect. I love this kind of cooking. The whole is greater than the sum of the parts. So much better.
Step one is dry roasting the peppers and onions. Garlic too. I like the Rick Bayless approach to this.
A lot of recipes will have you throw everything in the oven. And roast. That’s one way. But not my way.
I like to dry roast on a comal or in a cast iron frying pan. Toss them in the pan over medium heat. No oil.
Dry means dry. I find you get a better char. Even. And no burning. And no fried flavour. That’s important.
You also don’t get the sweet flavours you get when roasting in the oven. That’s important too.
Sweet works in some dishes. But not this one. This is all about the savoury. Thank you Mr. Bayless.
Brown your pork for depth
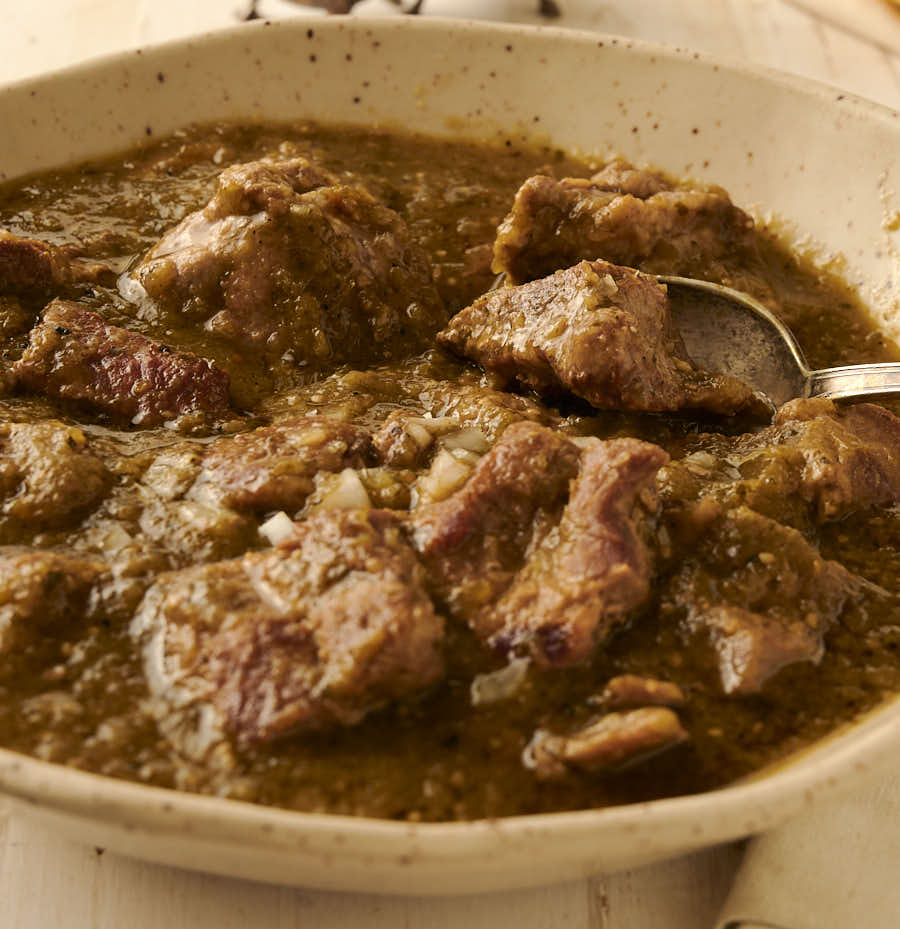
I can’t overstate this. A lot of the magic that is chile verde comes from the fond. Those brown bits in the bottom of the pot? That is the flavour glue that brings this dish together.
So you need to take the time. Brown your pork well. It isn’t hard. If you aren’t willing to do it you should probably stop reading. Right now.
Pick a big pot. One with a lot of surface area on the bottom. This will cut down on the number of batches. And you will need to cook your pork in batches.
Toss all the pork in a pot. That’s a good way to make poached pork. Pork throws liquid as it cooks. And that liquid with boil your pork.
Not a lot of fond that way. I give that 1 out of 10. But only because I’m in a good mood.
Leave room around each piece. You don’t want steam. The pork needs to fry. To do its Maillard reaction thing.
You are making flavour. The brown stuff in the bottom of the pot when you are done. That is just pure gold.
Fry the salsa for the win
This is the step that brings it all together. So simple. Trivial almost. But so important. Critical even.
Fry your salsa. The roasted chilies and tomatillos. They get pureed into a salsa. A pretty good salsa.
When that salsa hits hot oil though. When that fond gets deglazed into the sauce. That is the point where it goes from being pork in salsa to Chile verde.
From something mildly amusing to “I’m opening a food truck and serving chile verde tacos”.
You’re reading this. And saying “This guy is totally over-stating this”. I’m writing this. And I’m thinking I am under-selling it. If you get one thing from this recipe this step needs to be it.
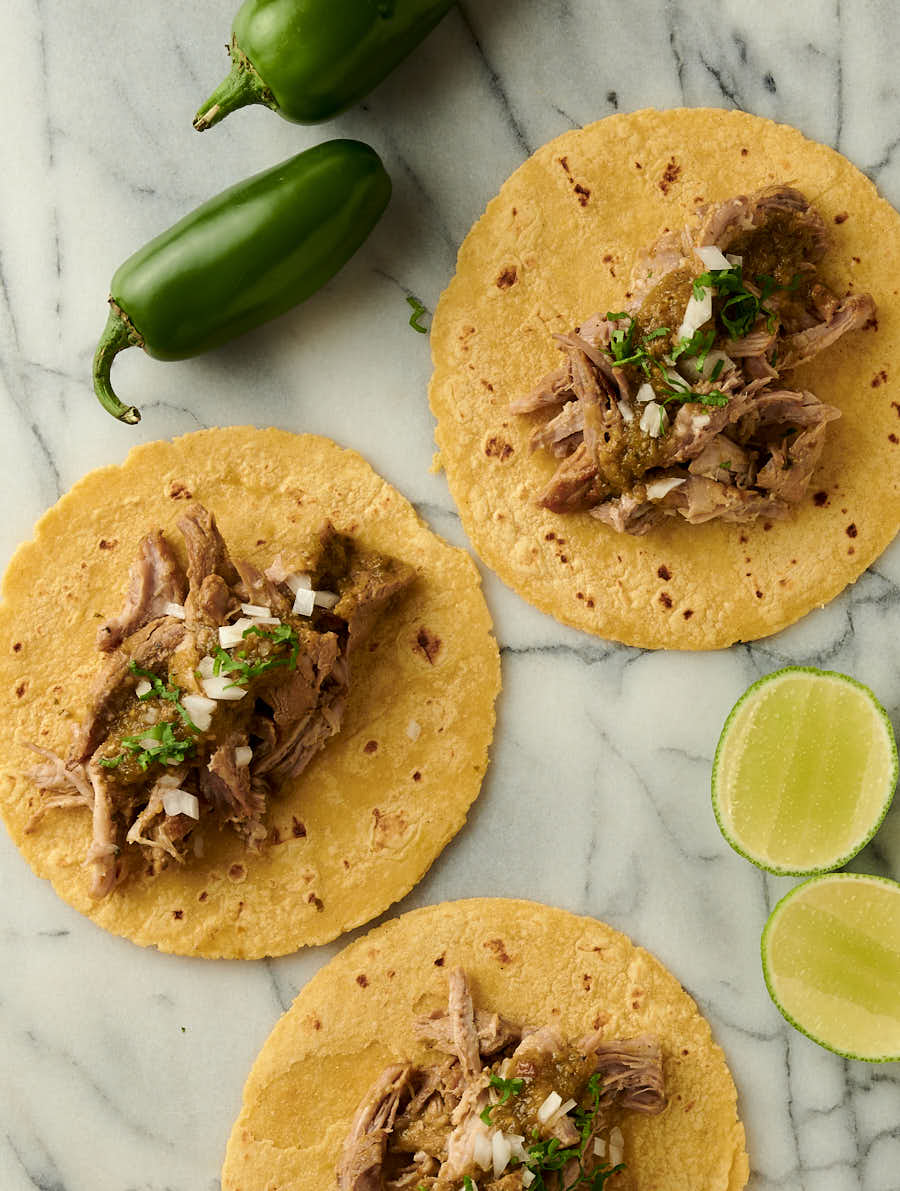
Chile verde makes amazing tacos
Add this to your taco Tuesdays. Seriously delicious tacos. Or burritos. I felt like tacos so that’s the picture I took. But both are great.
Super easy once you have your chile verde done. Have it for dinner one night. And tacos the next night. That is just good living.
Warm corn tortillas. Chile verde. A little chopped onion. Maybe a bit of habanero salsa. Or not. Up to you. And a squeeze of lime. Simple. Easy. Delicious.
Or stuff a burrito with shredded pork. Some pinto beans. Pico. Rice if you must. A big smear of guacamole. That is already a serious burrito. But there’s more.
Plate it. Drown it with more sauce. Flip that under the broiler for about a minute. Burritos meets enchiladas. Magic happens. The wet burrito.
Never had a wet burrito ? It’s an amazing thing. Truly special. I still remember my first.
San Diego. Many years ago. Little hole in the wall taqueria.
“chile verde burrito. Hold the rice.” I say.
“You want it wet?” the guy asks.
“What’s that?” I say.
“With sauce on top”.
“The green sauce???”.
Cut to scene. Me standing at the counter. Eyes wide. Huge grin on my face.
“Bring it!!!”
Chile verde wet burrito. Some things stay with you for life.
The quick and dirty way
I shouldn’t do this. I’m working against myself. But I know once you try this recipe you’ll be addicted. I know. I am.
There’s a cheat. An easy way. Not quite as good. But close enough. To get your fix. When it’s Tuesday and you are jonesing. When there isn’t a poblano for miles.
You can use jarred salsa verde to make this. There. I said it. Jarred salsa. I’ve lost all credibility. Wouldn’t blame you if you left and never came back.
A Mexican brand like Herdes works well. No product endorsement here. I’m not getting paid to say this. I just like it.
I do this sometimes. Poblanos and tomatillos aren’t the easiest thing to find where I live. Seasonal.
My addiction? Year round. I’m not proud of it. But I do it anyway. And I’m unrepentant. Addiction is like that.
Skip making the salsa verde bit in the recipe. Substitute the jarred sauce in the chile verde part of the recipe. Go from there. You won’t likely need to add salt though.
That’s it. Easy. Not quite the same. But still tasty. My dirty little secret.
Make chile verde – just do it
I have a few lifelong favourites. This is one of them. Has been for many years.
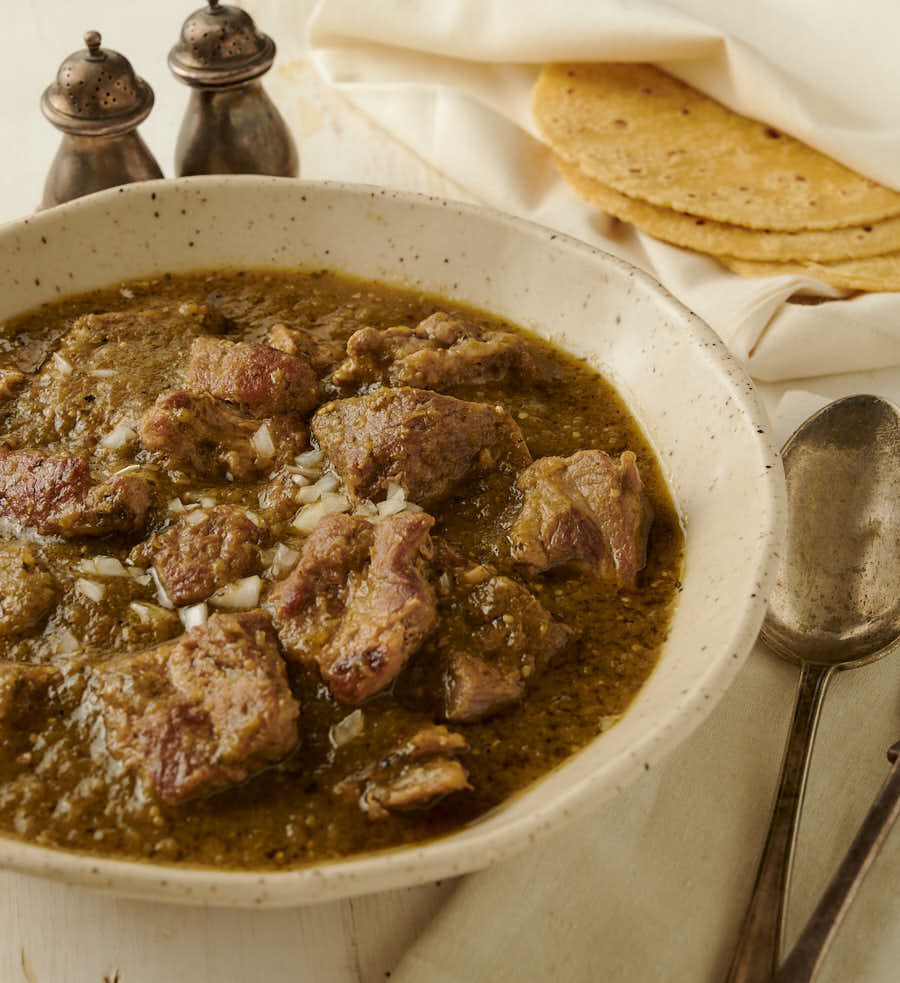
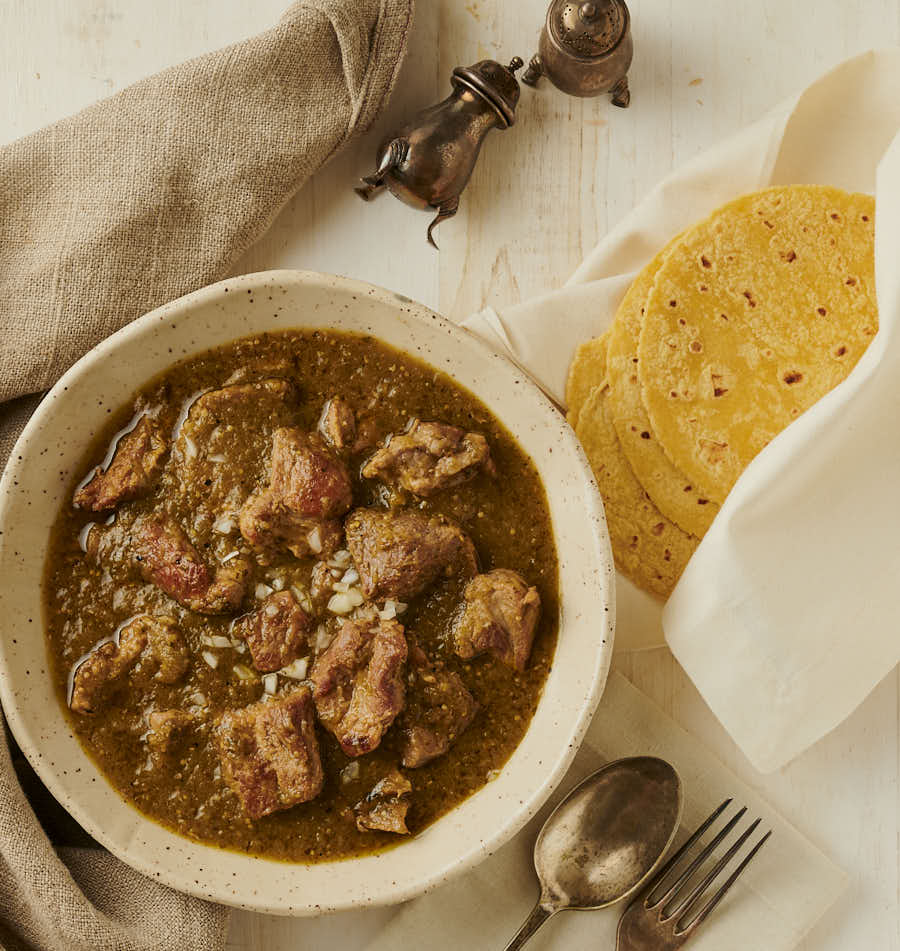
The earthiness of the deeply browned pork, onions and garlic. The acid from the tomatillos. The complexity of the poblanos. A few simple ingredients come together to make something incredible.
Make a big batch. Have it for dinner. Tacos or burritos the next day. And the day after that. It’s a dish that just keeps on giving.
Try it. It’s easy. And it’s so worth it…
Chile verde – braised tomatillo poblano pork
Ingredients
Salsa verde
1 lb tomatillos
3-4 poblano chilies
1 jalapeno left intact
1 white onion sliced into 3 one inch slices
2 cloves garlic
1/2 cup cilantro chopped
1 cup chicken stock low or no sodium
1 tsp salt
3 lbs pork shoulder or pork ribs
3 Tbsp vegetable oil or pork lard if you can get it
1 cup chicken stock low or no sodium – this is not an accidental repeat of the stock in the salsa verde. 2 cups total.
salt to taste
fresh tortillas to serve
Instructions
Make the salsa verde
- Roast and peel your poblanos. This is easiest using a BBQ but you can do it with your broiler as well. I would not recommend doing it over a gas burner as it makes one unholy mess.
- You want to blast your poblanos with direct heat until the skin blisters and starts to char. This will make it way easier to peel them.
- Once they are blistered and a wonderful golden black all over transfer them to a bowl and cover with plastic film wrap. Let them steam in their own heat for about 15 minutes.
- Once they are cool enough to handle, remove the skin, stem and seeds. Set aside.
- Pre-heat a comal or cast iron frying pan over medium heat.
- Slice your onion into 3 one inch thick slices (parallel to the equator of the onion so you see big rings). Peel your garlic cloves.
- Place the onions, jalapeño and garlic on the dry, pre-heated pan. You want to cook them until the onions are soft and have a bit of char on both sides. Flip your garlic and jalapeño around. The garlic will cooked quickest, followed by the jalapeño and finally the onion slices.
- Remove from heat and allow to cool.
- Bring a pot holding enough well-salted water to cover the tomatillos completely to a boil. Simmer the tomatillos for about 4 minutes – they will turn pale when they are ready to come out. Allow to cool. You can also roast the tomatillos under the broiler. That is messy and I find there’s enough char flavour coming from the onion and peppers so I usually don’t bother. Up to you.
- Combine the poblanos, onion, garlic, tomatillos, cilantro, and salt in a blender and puree until smooth. You will likely need to add some or all of the first cup of chicken stock to get it go.
Make the chile verde
- Cut pork into individual ribs or 1 inch by 1 inch cubes. Season with salt and pepper.
- Heat the vegetable oil in a pot large enough to hold all the pork.
- Work in batches. Brown the pork. Each batch should be no more than one layer deep with room around individual pieces. One pound per batch is a reasonable starting point. The maillard reaction that comes from browning the pork adds tons of flavour to this dish so take the time here. It’s worth it.
- Remove each batch as it finishes browning and place in a bowl. You want to catch all the juices. Juices are flavour.
- Remove all but 2 Tbsp fat from the pot. Heat over medium heat. Fry the pureed tomatillo pepper mixture for 3 minutes. Stir constantly to scrape up the brown bits on the bottom of the pot. That stuff is pure cooking gold. The sauce will darken.
- Return the pork and the accumulated juices to the pot. Add the second cup of stock.
- Cover and simmer for 1 hour. Check for tenderness. This will probably take around 90 minutes for pork shoulder but it is done when it is done. And that is when it is tender.
- Taste and adjust for salt. You will need more so creep up on it carefully.
- Garnish with a little cilantro or white onions if you like. Serve with warm corn tortillas. Or make killer tacos. Or the best wet burrito you have ever had.
Notes
Nutrition
Chile verde - braised tomatillo poblano pork
Ingredients
Salsa verde
1 lb tomatillos
3-4 poblano chilies
1 jalapeno left intact
1 white onion sliced into 3 one inch slices
2 cloves garlic
1/2 cup cilantro chopped
1 cup chicken stock low or no sodium
1 tsp salt
3 lbs pork shoulder or pork ribs
3 Tbsp vegetable oil or pork lard if you can get it
1 cup chicken stock low or no sodium - this is not an accidental repeat of the stock in the salsa verde. 2 cups total.
salt to taste
fresh tortillas to serve
Instructions
Make the salsa verde
- Roast and peel your poblanos. This is easiest using a BBQ but you can do it with your broiler as well. I would not recommend doing it over a gas burner as it makes one unholy mess.
- You want to blast your poblanos with direct heat until the skin blisters and starts to char. This will make it way easier to peel them.
- Once they are blistered and a wonderful golden black all over transfer them to a bowl and cover with plastic film wrap. Let them steam in their own heat for about 15 minutes.
- Once they are cool enough to handle, remove the skin, stem and seeds. Set aside.
- Pre-heat a comal or cast iron frying pan over medium heat.
- Slice your onion into 3 one inch thick slices (parallel to the equator of the onion so you see big rings). Peel your garlic cloves.
- Place the onions, jalapeño and garlic on the dry, pre-heated pan. You want to cook them until the onions are soft and have a bit of char on both sides. Flip your garlic and jalapeño around. The garlic will cooked quickest, followed by the jalapeño and finally the onion slices.
- Remove from heat and allow to cool.
- Bring a pot holding enough well-salted water to cover the tomatillos completely to a boil. Simmer the tomatillos for about 4 minutes - they will turn pale when they are ready to come out. Allow to cool. You can also roast the tomatillos under the broiler. That is messy and I find there’s enough char flavour coming from the onion and peppers so I usually don’t bother. Up to you.
- Combine the poblanos, onion, garlic, tomatillos, cilantro, and salt in a blender and puree until smooth. You will likely need to add some or all of the first cup of chicken stock to get it go.
Make the chile verde
- Cut pork into individual ribs or 1 inch by 1 inch cubes. Season with salt and pepper.
- Heat the vegetable oil in a pot large enough to hold all the pork.
- Work in batches. Brown the pork. Each batch should be no more than one layer deep with room around individual pieces. One pound per batch is a reasonable starting point. The maillard reaction that comes from browning the pork adds tons of flavour to this dish so take the time here. It’s worth it.
- Remove each batch as it finishes browning and place in a bowl. You want to catch all the juices. Juices are flavour.
- Remove all but 2 Tbsp fat from the pot. Heat over medium heat. Fry the pureed tomatillo pepper mixture for 3 minutes. Stir constantly to scrape up the brown bits on the bottom of the pot. That stuff is pure cooking gold. The sauce will darken.
- Return the pork and the accumulated juices to the pot. Add the second cup of stock.
- Cover and simmer for 1 hour. Check for tenderness. This will probably take around 90 minutes for pork shoulder but it is done when it is done. And that is when it is tender.
- Taste and adjust for salt. You will need more so creep up on it carefully.
- Garnish with a little cilantro or white onions if you like. Serve with warm corn tortillas. Or make killer tacos. Or the best wet burrito you have ever had.
Notes
Nutrition
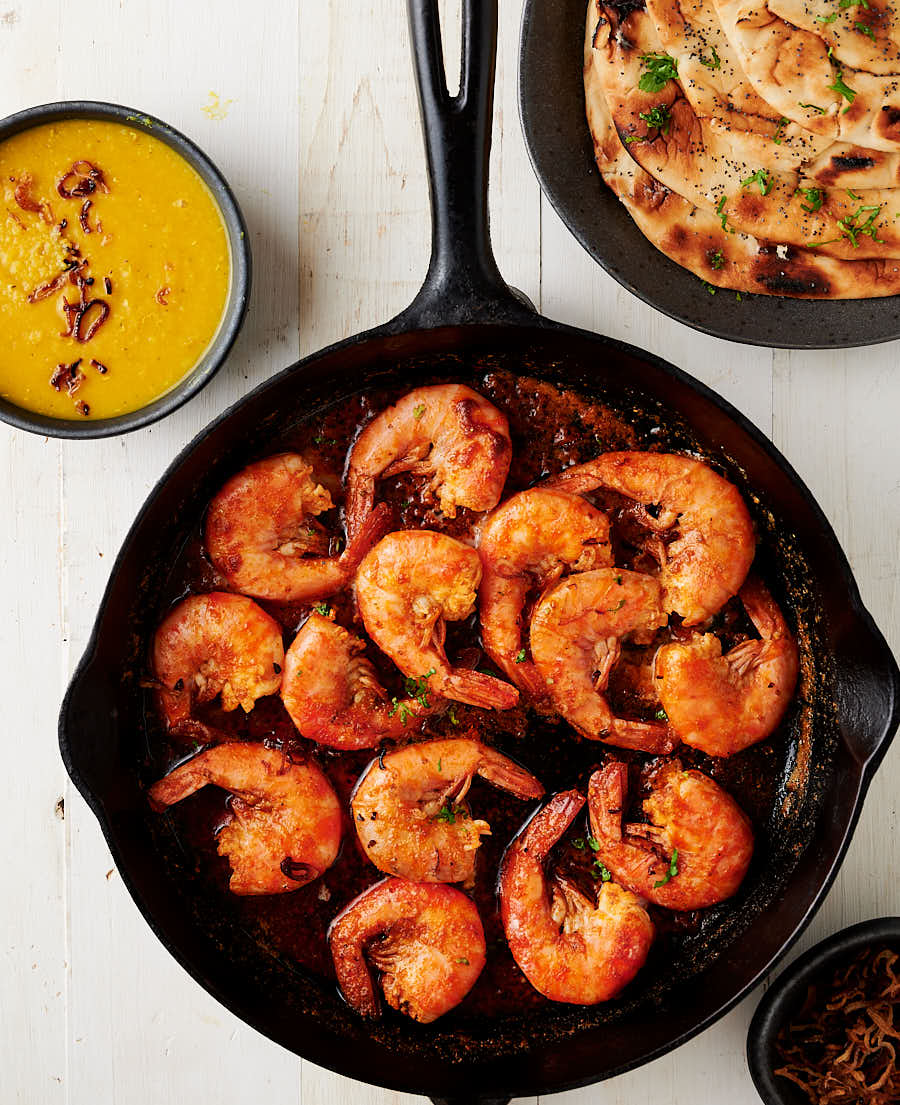
Tandoori prawns. Indian barbecue shrimp. Spice infused butter. Garlic. Ginger. Lemon. And perfectly cooked prawns. If that doesn’t sound amazing I don’t know what does.
I cannot believe this one has taken so long. It’s been staring me in the face for years. And I’ve just finally seen it. Bit embarrassing actually.
No barbecue required for tandoori prawns
This isn’t fusion. More inspiration than fusion. Indian-ish. A classic cajun dish. Re-imagined. Through an Indian lens.
I love cajun BBQ shrimp. I have been making it for years. It’s all about butter and shrimp stock and cajun spices. It’s a stovetop dish. No grill required. It was invented in New Orleans. Back in the 1950s. It was spiced red. So they decided to call it BBQ shrimp. No clue why. I wasn’t there. I just go with it.
What they did was come up with a dish that is a mess of buttery, spicy shrimp goodness. Crazy tasty. Stupid delicious even.
That’s what these tandoori prawns are about. Cajun BBQ shrimp. With Indian spicing. Diabolical. If I say so myself.
Might be a first. Hard to say. I can’t find it on the internet. But the world is a big place.
I’m thinking this one is mine. Doesn’t really matter though. What matters is that you try these tandoori prawns. Soon. Very soon.
Shells add flavour
Shrimp shells are loaded with flavour. If you ever make shrimp cocktail you know. Shrimp stock makes things way better. Those shells are pure gold.
Same idea here. The shells are poached in butter for around 6 minutes. About a quarter of the time.
That’s long enough to extract some flavour. And you should always take flavour wherever you can get it. Words to live by I think.
You could shell your prawns ahead of time. Makes things less messy. You won’t have to peel those buttery little flavour bombs when it’s time to eat. A little more elegant.
But messy is part of the fun. Tandoori prawns in that wonderful spicy butter. Slurp the sauce off the shells. Peel them. Dip them. Eat them. Lick your fingers. Mop the sauce up with some naan. Let the butter dribble down your chin. Smile. Repeat.
Have fun with this recipe
I love these straight up. Just a whole lot of delicious mopped up with naan.
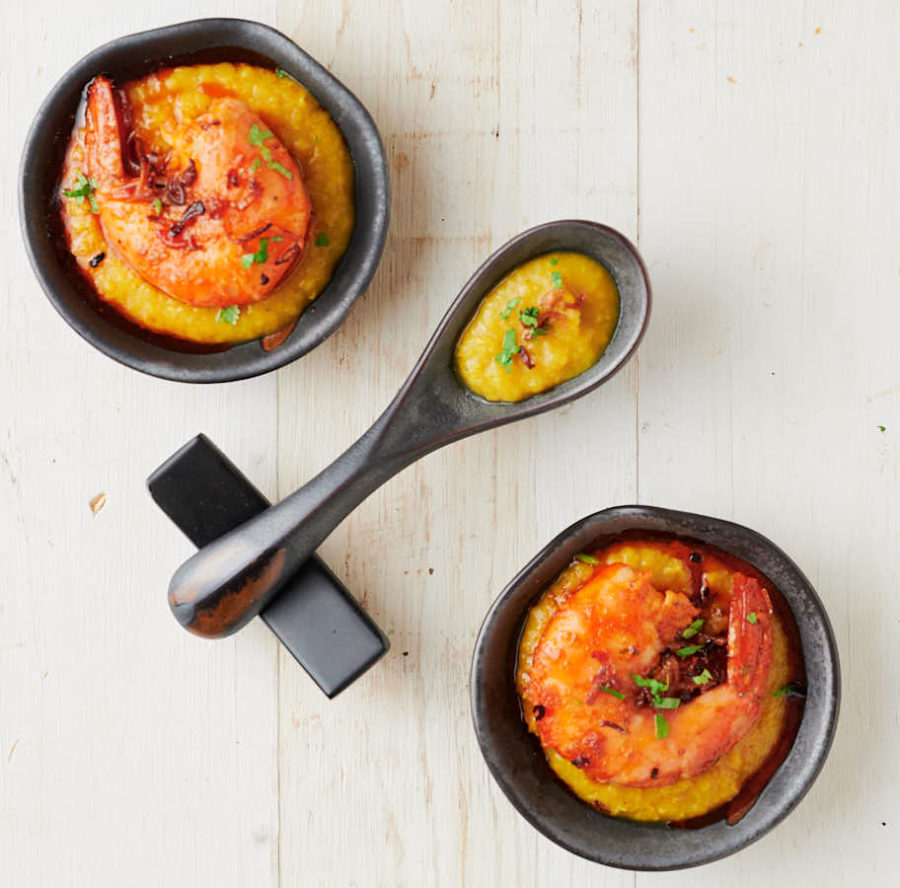
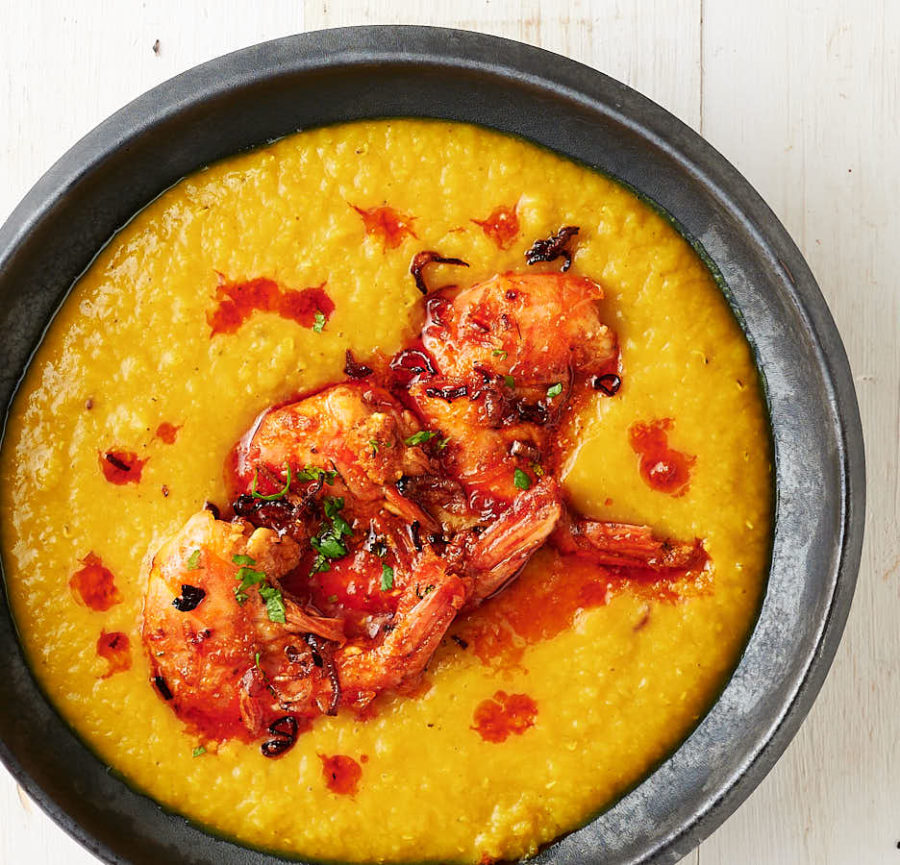
Serve them up in individual portions. A piece of naan. A few shrimp. Some of that magic sauce. And a napkin.
You have to have a napkin. Paper preferably. Did I mention it was messy?
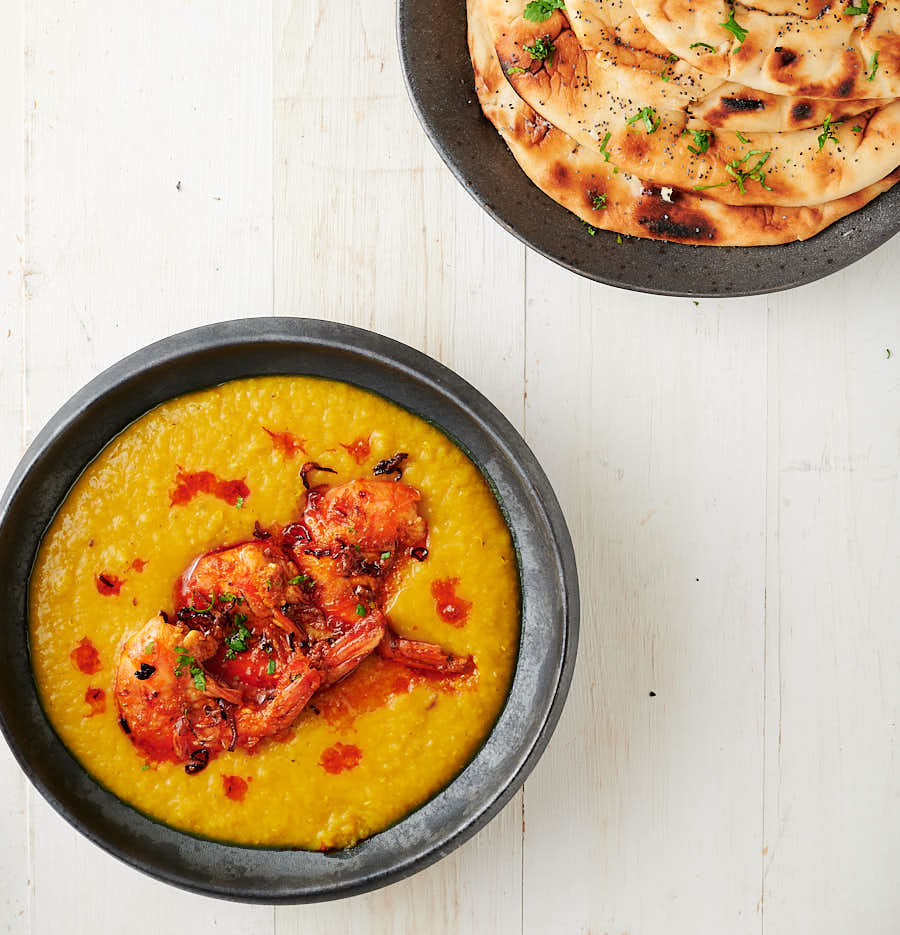
That’s my favourite way. But I’m a dal addict. So I like tandoori prawns as a tarka. Not what immediately springs to mind. I’ll give you that. But it’s works.
Do it as as an appetizer. A dab of dal. A shrimp or two. A little cilantro. A drizzle of that magical sauce. Maybe a few crispy, fried shallots for garnish.
Or as an entree. Goes pretty much the same way. Like a buttery prawn dhansak. Just a bigger portion.
Fun. Tasty, tasty fun. Peel the shrimp if you are doing the dal version. It’s too messy otherwise. Even for me. Maybe. I like mess.
Tandoori prawns are the easiest appetizer ever
Sometimes effort is not directly proportional to result. Sometimes it’s just easy. This is one of those times. I love these times.
If you can melt butter you can make tandoori prawns. It’s about that easy. Heat up a pan. Gentle heat. Melt some butter.
Toss in some garlic ginger paste. Let it sizzle. Add some spice. Let the spices sizzle a bit. Get all those fat soluble flavours into the butter.
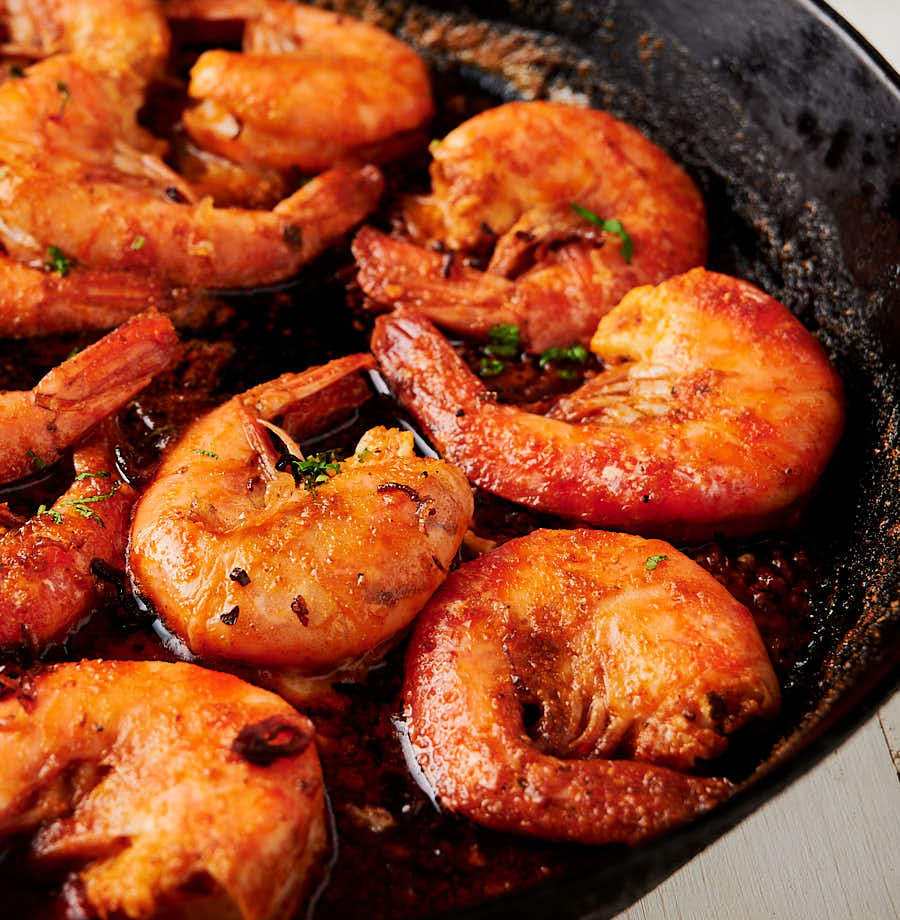
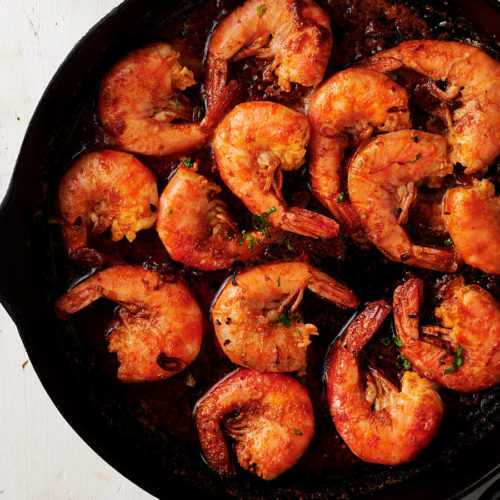
A squeeze of lemon. Stir. Toss in the shrimp. Gently poach them for 3 minutes. Flip them. Another 3 minutes. That’s it. You’ve arrived. Welcome to flavourtown.
Don’t fear the butter
There’s a half cup of butter in this recipe. But it serves 4. So that’s 2 tablespoons of butter per serving.
If that sounds like a lot consider this. 1 Tbsp of butter is 100 calories. Roughly speaking. Shrimp are pretty much zero calorie food. So just over a couple hundred calories per serving.
It’s an appetizer. Like onion bhajies. Or pakoras. Or samosas. It’s in the ball park. Probably less calories. Not health food. Not diet food. But not outrageous either.
Not suggesting you should eat this every day. But I’m not suggesting you should eat samosas every day either. As much as I want to eat samosas every day.
Once in a while, though… Tandoori prawns. That’s a nice treat.
All tandoori masalas are not created equal
A lot of commercial tandoori masalas contain a lot of salt. That’s not necessarily a bad thing in itself. But it adds salt to the final recipe. So you have to be careful.
They also contain red food colouring. Again, not necessarily a bad thing but it makes everything really red.
I don’t like paying for salt. And I don’t always want my dinner looking unnaturally red.
So I came up with my own tandoori masala recipe . I like it better. And I control the salt. So it makes me happy. Do what makes you happy. Always.
Make tandoori prawns for friends
This is flashy cooking. I wouldn’t be surprised to see it on a menu at a funky Indian restaurant. One that’s pushing the envelope. And that’s hip enough to go with the mess. Don’t wait for the restaurants to catch up. Make this at home. And serve it to friends. Good friends. Foodie friends.
Or cook up a batch and eat them all yourself. That doesn’t sound like a bad idea to me. Not bad at all.
tandoori prawns
Ingredients
- 12 prawns 16-20 count (per pound) in the shell (see notes)
- 1/2 cup butter
- 2 tsp garlic ginger paste
- 2 tsp tandoori masala see notes. If you use a commercial blend with food colouring in it be prepared to have it come out a lot redder than the pictures.
- 2 tsp kashmiri chili powder you can use less but the butter really does tone down the fire
- pinch kasoori methi – maybe 1/8 of a tsp if you really feel like measuring
- 1/4 tsp kosher salt – if you are using commercial tandoori seasoning you probably will not this salt.
- 1/4 lemon juiced
- cilantro to garnish
Instructions
Do your prep
- Make your spice mix. Combine the tandoori masala , kashmiri chili powder, salt and kasoor methi. Note that if you are using commercial tandoori masala it likely already has lots of salt so you won’t likely need more.
- Prep your cilantro garnish. Have your lemon ready. Have some naan standing by for dipping into the buttery goodness. This is a really easy recipe but it does go fast.
Make the tandoori prawns
- Pick a frying pan just big enough to hold all the shrimp in a single layer. That’s important. Big enough for a single layer. But not so big that the butter just films the bottom of the pan. A 9 to 10 inch pan is about right.
- Melt the butter over medium low heat. You don’t want things to get too hot.
- When the butter starts to foam add the garlic ginger paste. Cook for about a minute. You want gentle bubbles. You aren’t frying things hard.
- Add the spice mix (tandoori masala, kashmiri chili powder, salt and kasoori methi). Cook the spices in the butter for about 1 minute. Still want gentle bubbles. This is called blooming spices. Oil soluble compounds dissolve in the butter and flavour magic happens.
- Add the lemon juice. Squeeze the lemon with one hand and through your fingers on your other hand to catch the seeds. That’s a handy trick whenever you need fresh lemon juice. Life skill. No extra dishes. Cook for another minute.
- Add the shrimp in a single layer. Cook for 3 minutes. Still want gentle bubbles.
- After 3 minutes, flip the shrimp. If they are uniformly pink cook them another three minutes. If there is a little grey when you flip them go 4 minutes total on the second side. Overdone shrimp suck. Err slightly on the side of caution. You will be happier for it. I will be happier for you.
- Garnish with a little minced cilantro. Serve with naan for dipping into the sauce. You will cry if you don’t have something to mop up the sauce.
