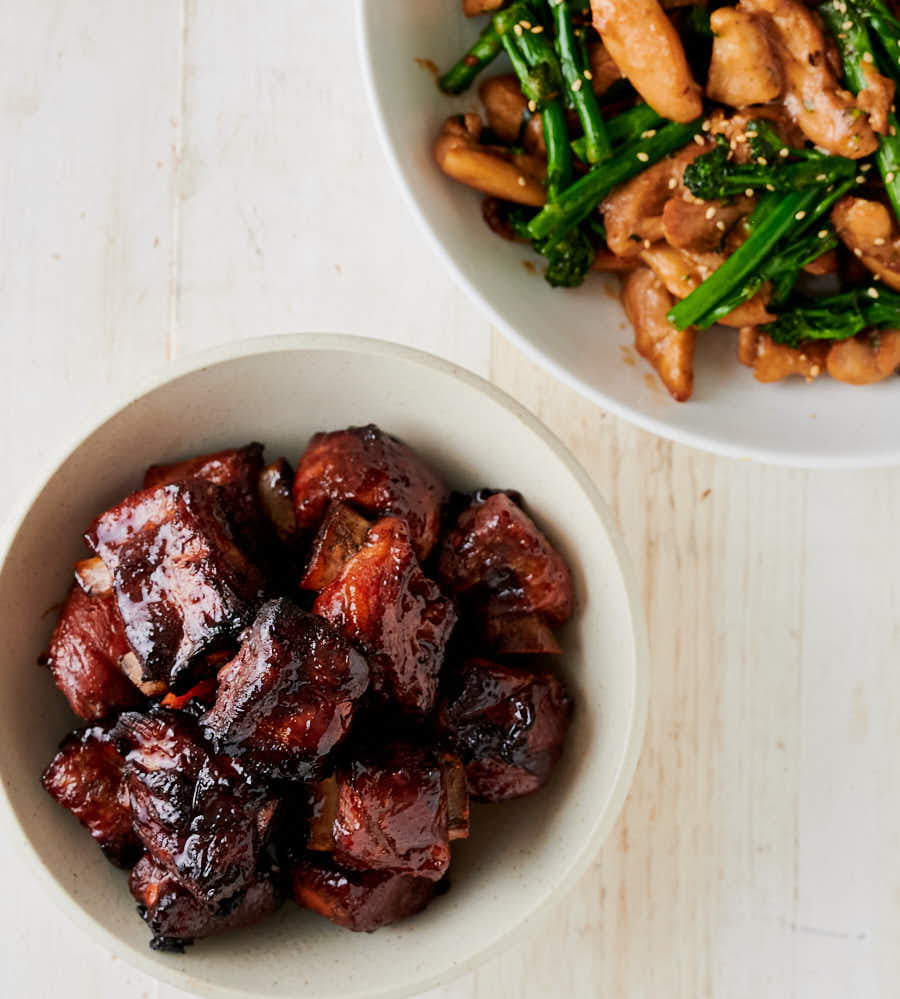
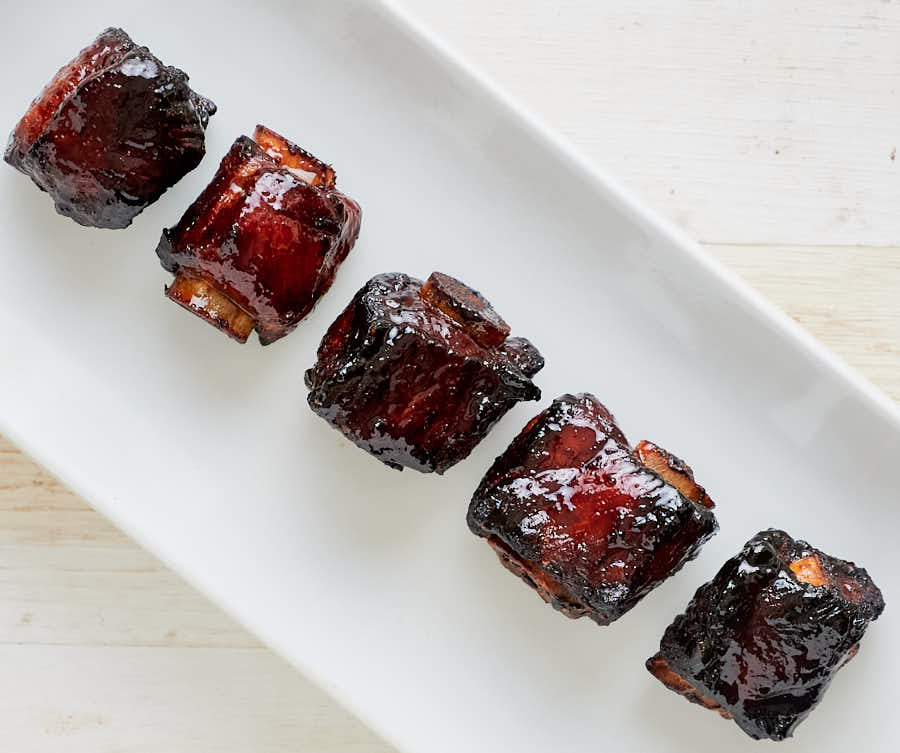
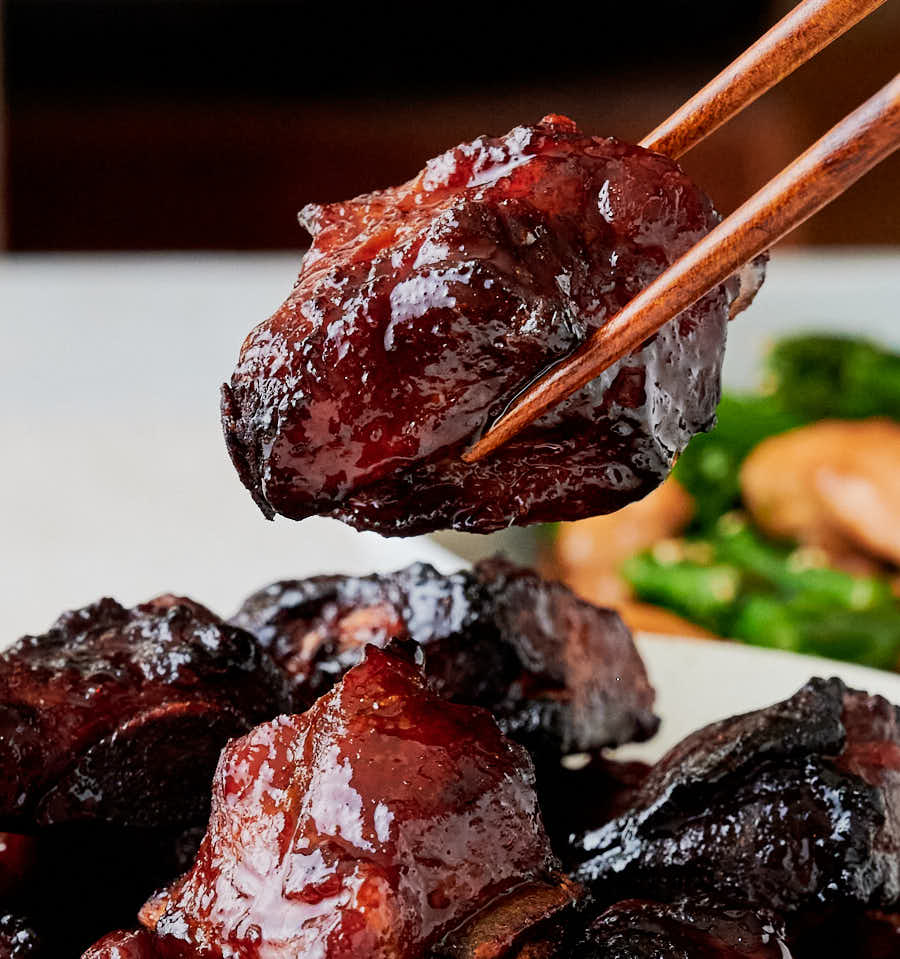
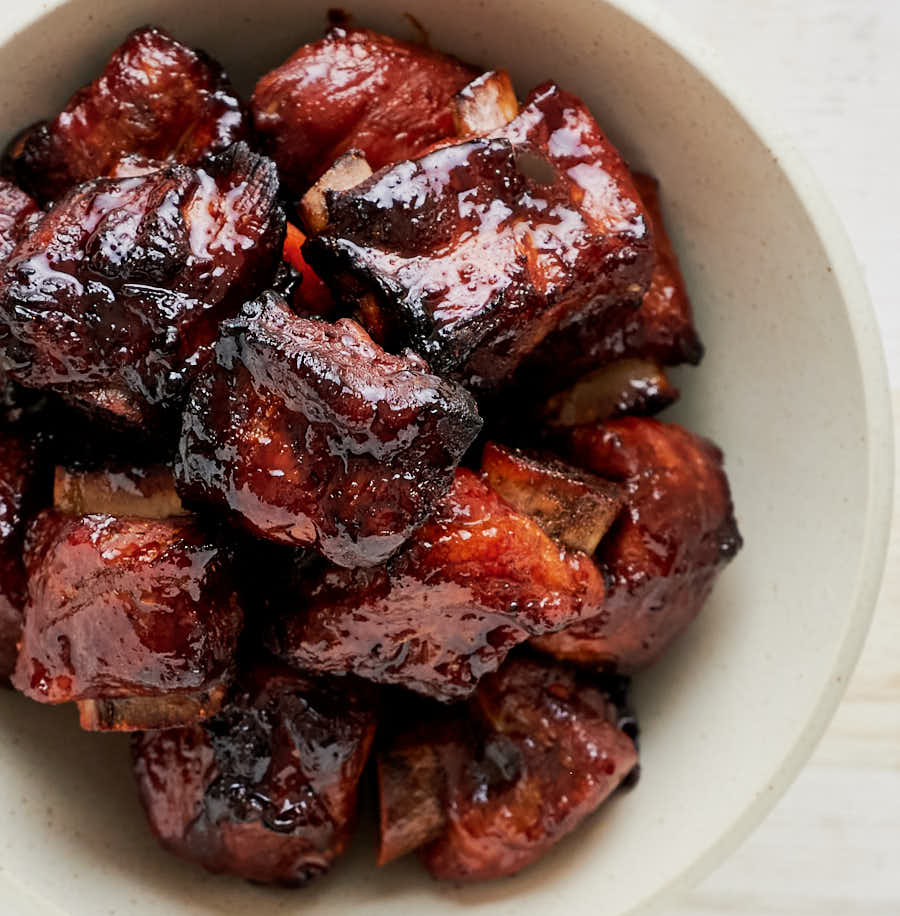
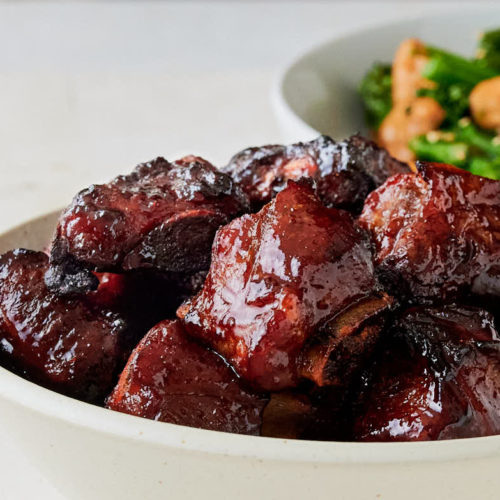
Char siu ribs. Chinese sticky ribs. I don’t know which name is better. What I do know these ribs are seriously delicious.
A little bit salty. A little bit sweet. Sticky. Loaded with umami. And porky rib goodness. There is just nothing here not to love.
Chinese takeout flavour at home
I like ribs. Correction. I love ribs. I’m always looking for ways to feed my rib addiction. Char siu ribs deliver.
This isn’t anything you’ll get if you visit China. Not that I’ve seen anyway. This is something you might get at your local Chinese restaurant.
Except it isn’t really that either. They serve ribs in a bunch of different ways at Chinese restaurants where I am.
But they don’t do char siu ribs. I’m not sure why. I think maybe because it doesn’t fit the formula.
But it should. It hits all the notes. Char siu flavour. Spare ribs. Addictive flavour. Fun to eat.
And in absolutely no way authentic. Just like pretty much everything else on a Chinese takeout menu. I think it’s perfect.
A different approach
Char siu recipes are all pretty similar. Hoisin. Soy. Shaoxing. Honey. Fermented red bean curd. Or food colouring.
That’s the easy version. Straight forward. Only slightly more difficult than buying a jar of char siu sauce. Gets you similar results.
At the other end of the spectrum there are incomprehensibly complicated recipes. For the hardcore char siu purist.
This is somewhere in the middle. I am not a hardcore char siu purist. If you’re looking for absolute char siu nirvana I am not your guy.
But I’m also not interested in run of the mill. So I will try harder than most.
Deep in the back of the internet I found a hardcore purist that was using red miso. I love miso. So I tried it. Now I’ll never make char siu ribs without it.
Red miso adds saltiness. Like the fermented red bean curd. But it adds that major miso umami power too. That’s the gee whiz. It’s like char siu magic paste.
It doesn’t add the deep red though. For that you have to cheat.

Char siu is supposed to be red
I used food colouring in this recipe. I’m not particularly proud of that. I generally try to stay away from dyeing my food. It’s just weird.
But I’m a food blogger. And people expect that reddish brown tint to their char siu. So I had a choice.
I could send you hunting for fermented bean curd. And you could have that in your fridge for the next 20 years looking for another reason to use it.
Or I could suggest a little red food colouring. It’s cheaper. It takes up way less room.
And you can use it to make unnecessarily red tandoori chicken. So it is not completely useless.
Your call. You know your audience. If they won’t miss the colour just leave it out. Or get some fermented red bean curd. Keep it real.
I know. This isn’t real. I did it on purpose. I’m not making the most perfect char siu ever here.
I’m making ribs. In the style of char siu.
That’s a subtle difference. But you’ll understand why I’ve done it when you taste these ribs.
This is slow food
You can’t rush ribs. That’s just a fact. So you can’t rush char siu ribs. Tough cuts need slow, gentle cooking to bring out their best.
It’s like Texas BBQ. You want tender ribs? Falling off the bone but juicy? Low and slow is the way to go.
When I make BBQ I like to run between 225F and 275F. I don’t agonize too much. As long as I’m in this range I know I’ll be OK. Takes a long time to cook ribs at 225F. A long time.
So I push it a bit. As high as I can. But there is a limit. Push things to 325F and you get tough ribs. I don’t recommend it.
Back things off to around 290F and things start to work. Ribs are about taste. And texture.
A little bit of tug as the tender rib meat comes off the bone. That’s the golden rule for ribs.
That’s what I’m after here.

When char siu meets ribs
Char siu ribs are ribs. Not pork shoulder. Not pork neck fillet. Ribs. So I want them to eat like ribs. The way ribs should be. With a char siu twist.
So I took a little inspiration from an old BBQ rib recipe I’ve been making for years. That recipe is about hoisin and sesame oil and chili paste and apricot jam.
Don’t worry. There’s no apricot jam here. But it is something you should consider for your next BBQ.
I went a little sweeter. A little heavy on the hoisin. Light on the five spice. Honey at the end. To make things sticky.
And soy in the glaze. To give it that salty sweet goodness that is perfect with ribs.
Char siu ribs smackdown – you be the judge
The day I took the pictures for this post I bought a nice chunk of char siu from one of the better Chinese groceries in town.
That was my “scientific” control. Taste the ribs. Taste the char siu. I wasn’t going for exactly the same. But I wanted a similar flavour profile.
And I surprised myself. I liked the ribs better. It wasn’t a dramatic difference. But there was no doubt in my mind.
You’ll have to decide for yourself of course. Don’t take my word for it. Only you know what you like best.
I’m willing to bet you’ll like char siu ribs though. Deep umami char siu flavour. And pork ribs. I don’t think you can go wrong.
This one probably isn’t on your local takeaway menu. But I think it should be. I’m betting you will too.
char siu ribs
Ingredients
The marinade and the ribs
- 3 lbs pork spare ribs – Asian cut or not, separated.
- 2 tbsp hoisin
- 1 tbsp shaoxing wine
- 1 tbsp red miso – also called aka miso
- 2 tbsp light soy
- 2 tbsp brown sugar
- 1/2 tsp Chinese five spice – available from your local Asian grocery
- 1/2 tsp monosodium glutamate – there’s a lot of umami coming from the miso so this isn’t super critical but it’s tasty
- 1/4 tsp white pepper
- 1/4 tsp granulated garlic
- 1/4 tsp red food colouring – the powder. This is optional of course. Purely cosmetic.
The glaze
- 1 tbsp light soy
- 1 tbsp dark soy
- 1 tbsp hoisin
- 2 tbsp honey
- 1 tsp sesame oil
Instructions
Marinate the ribs
- Combine all the ingredients listed in the marinade section above except the ribs. Stir to combine.
- Transfer the ribs to a large ziplock bag or Tupperware with tight fitting lid. Add the marinade. Coat the ribs with the marinade. In the bag that means sealing the bag and gently shaking/massaging. In a Tupperware that means using tongs or a large spoon to mix things up. Either way there’s food colouring in the marinade so be careful. You do not want to touch anything raw with food colouring in it. That’s an embarrassing lesson I’ve learned the hard way.
- Refrigerate overnight. Flip the bag in the morning. Or give the Tupperware a shake.
Make the glaze
- Combine all the ingredients in a small bowl. Honey is a pain to get mixed in so microwave everything until warm and stir. It works way better if you warm it up a bit.
- Set aside.
Cook the ribs
- There’s a little setup for this one.
- Preheat your oven to 290F. Full disclosure. I use a convection oven. Always.
- Grab a big baking sheet pan and a rack. Cover the sheet pan with aluminium foil. Put the rack onto the foil.
- Place the ribs on the rack so there is space between the ribs. Leave a little corner open.
- Place the baking sheet pan in the preheated oven. Pour about a cup of water into the sheet pan through that little corner you left open. You don’t want much more than a cup because it becomes awkward getting the sheet pan in and out of the oven. You’ll understand when you do it.
- Roast the ribs for about 40 minutes. Remove from the oven and flip each rib using tongs. Return the ribs to the oven and cook another 20 minutes or so.
- Check the internal temperature of the ribs. You are going for about 195F in a thick one. It’s going to take a while yet but better to start checking too soon rather than too late.
- Your ribs should be done in about 2 hours. Could be more. Could be less. I don’t know how meaty your ribs are. I don’t know how accurate your oven is. It could be less than 2 hours. It could be as much as three hours. It’s like BBQ. It’s ready when it’s ready. Super annoying. I know. But it’s an unfortunate reality.
- When you hit 195F remove the ribs from the oven. Turn your oven up to 375. When your oven has hit the new temperature baste each rib using a basting brush. Don’t go crazy. There isn’t that much glaze.
- Return to the oven and roast for about 3-5 minutes. You are looking for things to colour up.
- Remove the ribs from the oven, flip each rib and baste with the remaining glaze.
- Return the glazed ribs to the oven and cook for another 3-5 minutes. If they don’t look like the pictures hit them with just a little bit of broiler action. Be careful though. There’s lots of sugar here. Sugar burns fast.
- Remove the ribs from the oven, let cool slightly and serve.
char siu ribs
Ingredients
The marinade and the ribs
- 3 lbs pork spare ribs - Asian cut or not, separated.
- 2 tbsp hoisin
- 1 tbsp shaoxing wine
- 1 tbsp red miso - also called aka miso
- 2 tbsp light soy
- 2 tbsp brown sugar
- 1/2 tsp Chinese five spice - available from your local Asian grocery
- 1/2 tsp monosodium glutamate - there’s a lot of umami coming from the miso so this isn’t super critical but it’s tasty
- 1/4 tsp white pepper
- 1/4 tsp granulated garlic
- 1/4 tsp red food colouring - the powder. This is optional of course. Purely cosmetic.
The glaze
- 1 tbsp light soy
- 1 tbsp dark soy
- 1 tbsp hoisin
- 2 tbsp honey
- 1 tsp sesame oil
Instructions
Marinate the ribs
- Combine all the ingredients listed in the marinade section above except the ribs. Stir to combine.
- Transfer the ribs to a large ziplock bag or Tupperware with tight fitting lid. Add the marinade. Coat the ribs with the marinade. In the bag that means sealing the bag and gently shaking/massaging. In a Tupperware that means using tongs or a large spoon to mix things up. Either way there’s food colouring in the marinade so be careful. You do not want to touch anything raw with food colouring in it. That’s an embarrassing lesson I’ve learned the hard way.
- Refrigerate overnight. Flip the bag in the morning. Or give the Tupperware a shake.
Make the glaze
- Combine all the ingredients in a small bowl. Honey is a pain to get mixed in so microwave everything until warm and stir. It works way better if you warm it up a bit.
- Set aside.
Cook the ribs
- There’s a little setup for this one.
- Preheat your oven to 290F. Full disclosure. I use a convection oven. Always.
- Grab a big baking sheet pan and a rack. Cover the sheet pan with aluminium foil. Put the rack onto the foil.
- Place the ribs on the rack so there is space between the ribs. Leave a little corner open.
- Place the baking sheet pan in the preheated oven. Pour about a cup of water into the sheet pan through that little corner you left open. You don’t want much more than a cup because it becomes awkward getting the sheet pan in and out of the oven. You’ll understand when you do it.
- Roast the ribs for about 40 minutes. Remove from the oven and flip each rib using tongs. Return the ribs to the oven and cook another 20 minutes or so.
- Check the internal temperature of the ribs. You are going for about 195F in a thick one. It’s going to take a while yet but better to start checking too soon rather than too late.
- Your ribs should be done in about 2 hours. Could be more. Could be less. I don’t know how meaty your ribs are. I don’t know how accurate your oven is. It could be less than 2 hours. It could be as much as three hours. It’s like BBQ. It’s ready when it’s ready. Super annoying. I know. But it’s an unfortunate reality.
- When you hit 195F remove the ribs from the oven. Turn your oven up to 375. When your oven has hit the new temperature baste each rib using a basting brush. Don’t go crazy. There isn’t that much glaze.
- Return to the oven and roast for about 3-5 minutes. You are looking for things to colour up.
- Remove the ribs from the oven, flip each rib and baste with the remaining glaze.
- Return the glazed ribs to the oven and cook for another 3-5 minutes. If they don’t look like the pictures hit them with just a little bit of broiler action. Be careful though. There’s lots of sugar here. Sugar burns fast.
- Remove the ribs from the oven, let cool slightly and serve.
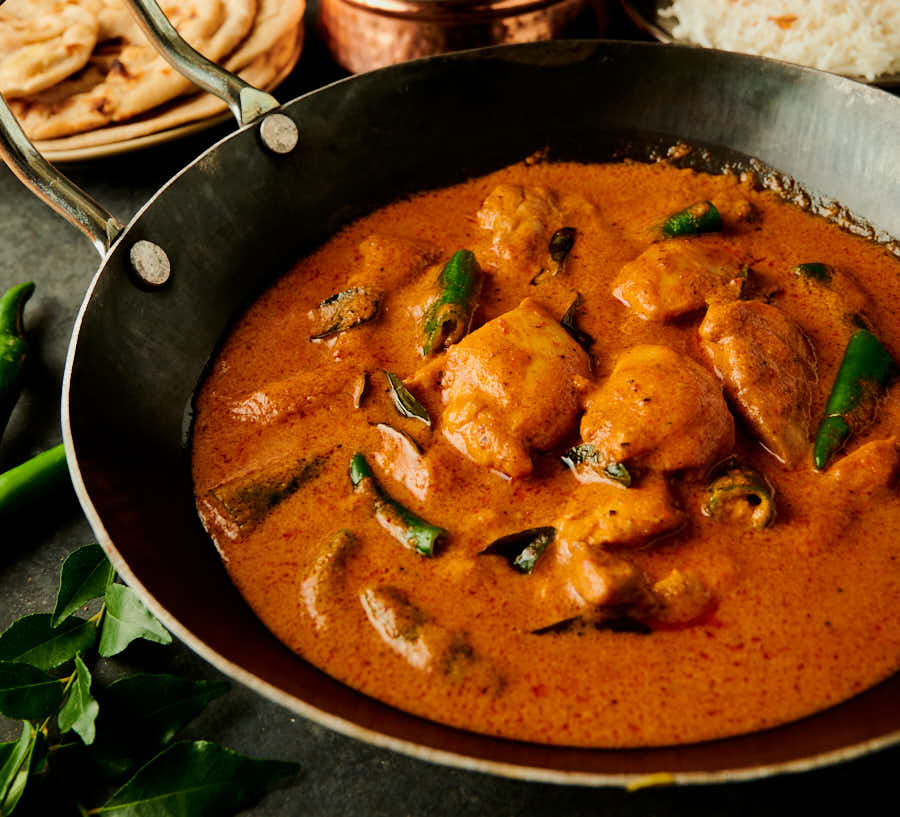
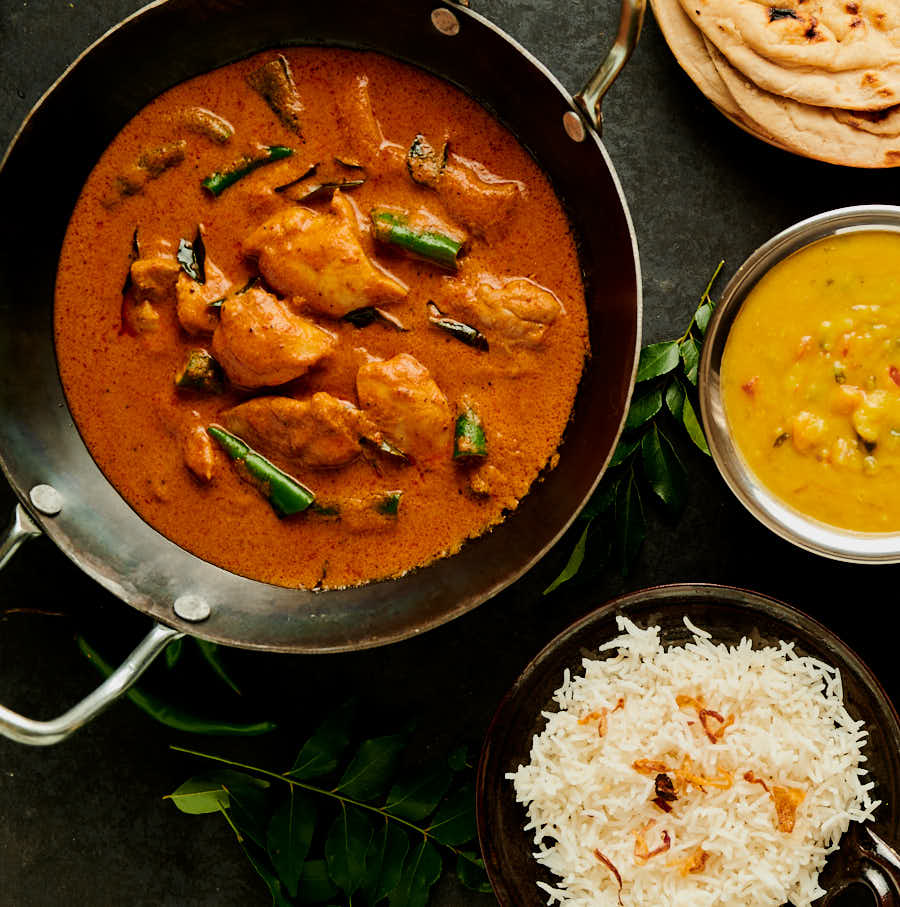
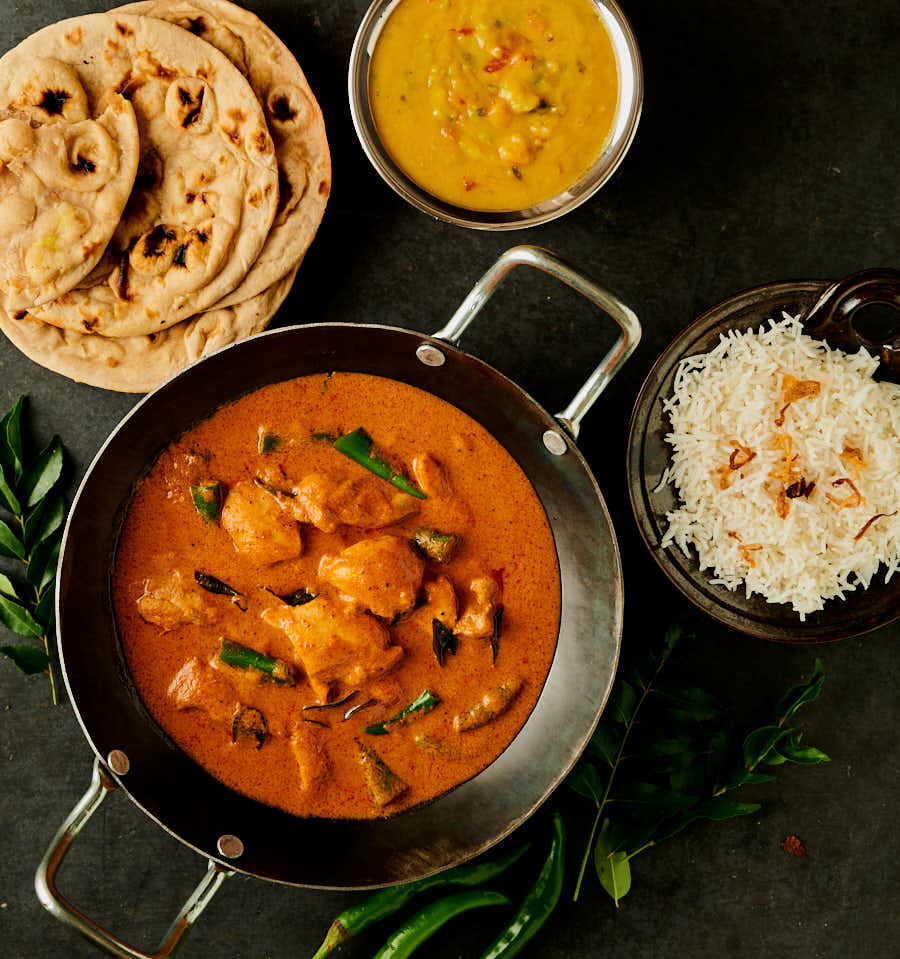
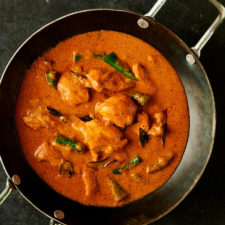
South Indian chicken curry. Ready in 30 minutes. Yes. You read that right. Delicious chicken curry wrapped up in that lush restaurant sauce you crave in half an hour.
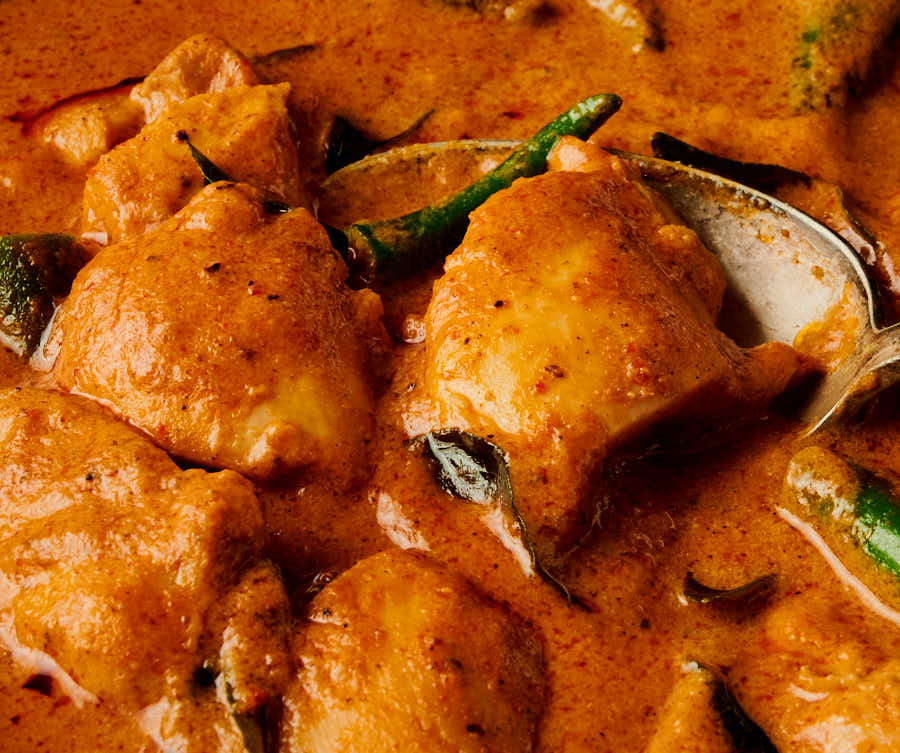
All the big south Indian flavours. Bold spicing. Green chilies. Coconut milk. Tamarind. And the bite of black pepper.
No idea what I’m talking about? It’s time to fix that. Seriously. You need to put this in your mouth.
You need to make the south Indian spice mix ahead of time
I’m putting this up front. So there are no surprises. You can make this recipe in 30 minutes. It’s not that hard.
Except you need to make the spice mix before you start. Twenty minutes before. The day before. The week before.
Doesn’t matter when. But it has to be done first. There’s no getting around it. Because the toasted spices have to cool.
You can’t grind them while they are hot. It doesn’t work. I actually tried it. Just to see if I could do this whole recipe in 30 minutes.
The spices clumped up. And things smelled a little odd. I will not be doing that again. And I suggest you don’t either.
Fight the status quo
It’s a funny thing. India has incredibly culinary diversity. Sits at the forefront of the global foodie scene.
Yet somehow it has been diminished. Reduced to the same 15 dishes you see on every Indian restaurant menu around the world.
Fifteen great dishes. No doubt about that. But a small box. A very small box. And you are being squeezed into that box. You should not be happy about that.
Imagine if all Italian restaurants served the same 15 dishes. Fettuccine alfredo. Chicken marsala. Veal parm. All day. Every day. How much would that suck?
That is exactly what is going on in Indian restaurants. It’s a formula. Why is the whole world putting up with a formula?
Do me a favour. Ask your local Indian restaurant for a chettinad chicken curry. Or a nadan kozhi. Any south Indian chicken curry. See what they say.
Maybe they’ll have something new on the menu when next you visit. And everyone will be a little better for it. We can make them change. If we stick together.
The secret to south Indian chicken curry in 30 minutes
Indian restaurants aren’t all bad. They do some good stuff too. Like that lush sauce they serve. The one you love.
They have a trick for that. One you might not know. They use something called curry base. Or curry gravy.
It’s how they get around the time needed to cook the onions. Indian is often all about the onions.
It’s also how they make curries to order in 10 minutes flat. If you want to go down that rabbit hole there’s a whole restaurant curry section here on glebekitchen.
Takes time to prep though. A couple hours. Restaurants are all about prep. But there’s an easier way. This is that way.
Not exactly the same. But close. Really close. Close enough that I bet your guests won’t know. Tell them it’s takeaway night. See if they figure it out.
Those wonderful chicken juices
I love cooking full blown Indian restaurant style. But there is one little detail that has always bugged me.
Restaurants pre-cook their proteins. For speed of service. And for food safety.
So the line cook doesn’t need to worry about underdone chicken. And you don’t have to wait an hour for your lamb dhansak.
That speed comes at a price. Cooking chicken releases juices. And those juices taste incredible.
30 minute curry technique solves that problem. The whole process is built around it in fact. The chicken goes in raw. Cooks in the gravy.
Those tasty juices go from the chicken. Into the sauce. And then into your mouth. Which is exactly where they belong.
Spicing is the thing
South Indian chicken curry starts and finishes with the spicing.
That’s a bit of a stupid statement. Most Indian recipes start and finish with the spicing. But this one is a little little special.
This isn’t is toss in a little coriander, cumin, turmeric and chili powder and call it a day. That’s just boring.
It’s definitely not toss in a bunch of garam masala and pretend you are cooking Indian. That’s just crazy.
South Indian chicken curry is about bold spices. Freshly ground. Flavours coming from everywhere. You will not believe how much of a difference that makes.
Full disclosure. There are a few ingredients in the spice mix you can’t get at your local grocery store. That’s a good thing. Because it means a trip to an Indian grocer.
Indian grocery stores can be a bit daunting at first. But once you get your head around them they are a lot of fun. Talk to your grocer. You might just get a tour.
Curry leaves are optional for this south Indian chicken curry
Curry leaves are an ingredient you may not know. Time to fix that too. They figure pretty highly in South Indian cooking. And they are well worth hunting down.
They have a distinct flavour. Unlike anything I’ve ever tasted. I don’t think there is a substitute. No matter what the internet says.
They have to be fresh. Dried curry leaves taste like dust. There is absolutely no reason they should even exist. Think dried cilantro. Absolutely pointless.
Frozen is a not bad compromise. Not quite as good as fresh. They do lose something when frozen. But the core flavour is still there. It’s just a little muted.
If you can’t get them don’t worry. There is enough punch in the spice mix to make up for a dropped ingredient.
I don’t often say that. I’m usually pushing everyone to go the extra mile. But in this case I think dish works either way.
The spice mix is the backbone. Curry leaves are icing on the cake. Icing is good. But you don’t always have to have icing.
I actually can’t decide which version of this dish I like better. So I bounce back and forth. It’s a tough life. Somehow I manage.
But do try to get them if you can. They are a little bit of magic.
You need to make south Indian chicken curry
This one is a little different. Might even be out of your comfort zone. But it is something you need to experience for yourself.
I think of South Indian chicken curry as as a gateway curry. The first step to something beyond the same old same old.
You have the keys to the candy store in your hands. Open the door. There’s a whole world of incredibly Indian food waiting for you.
See you on the other side.
South Indian chicken curry
Ingredients
South Indian spice mix
- 1 tbsp coriander seeds
- 1 inch cinnamon bark – aka cassia bark
- 1/4 tsp black pepper corns – pepper is key in this blend
- 1 clove
- 2 green cardamom – the whole pod
- 2 arms star anise – snap off a couple arms from a single star anise
- 1/2 tsp cumin seed
- 1/2 tsp poppy seed
- pinch ajwain – aka carom seed
- 3 whole dried red chilies – I like Kashmiri chilies for this
The onion paste
- 2 cups onions – coarsely chopped
- 2 tbsp vegetable oil
- 1 cup water
south Indian chicken curry
- 6 boneless skinless chicken thighs cut into 3 pieces per thigh or 2-3 boneless skinless chicken breasts. About a pound and a half or 680 grams.
- 4 tbsp vegetable oil
- 1 tbsp garlic ginger paste
- 15-20 fresh curry leaves optional but worth seeking out if you can
- 2-3 green chilies coarsely chopped
- 5 tsp South Indian spice mix – from above. The magical stuff you toasted and ground.
- 1/2 tsp black pepper – butcher’s grind is great for this recipe
- 1 tsp kashmiri chili powder
- 1 tsp kosher salt – about half if using regular table salt
- 2 tbsp tomato paste diluted with enough water to get it to the consistency of tomato sauce or passata
- 1 tsp tamarind paste – not tamarind concentrate. Look for something that is 100 percent tamarind
- 1/2 cup coconut milk
Instructions
The south Indian spice mix needs to be made before you start
- You can’t make this and keep to the 30 minute window. You have to make it up front. Because the toasted spices need to cool. You can’t rush this. Sorry.
- Grab two small bowls.
- In one bowl measure out the coriander seed, cinnamon bark, black pepper corns, star anise, clove and green cardamom. These are your big spices.
- In the other bowl measure out your cumin seed, poppy seeds and ajwain. These are your small spices.
- Pre-heat a small skillet over medium low heat. You want to be a little gentle with the heat.
- Add the big spices. Toast the spices, shaking the pan continuously until a wonderful smell starts hitting your nose. This should take under 2 minutes.
- Add the little spices and toast around 30 seconds. Add the kashmiri chilies and toast another 30 seconds or so. Flip the chilies about half way through the final 30 seconds.
- Remove the skillet from the heat and let cool. Don’t rush this. Let them cool. If you want to speed things up transfer the spices from the pan to a bowl. Even still – let the spices cool.
- Grind the spices. I use an old coffee grinder from the days before I knew about burr grinders. One with a spinning blade. Great for spices. Absolutely terrible for coffee. You now have more South Indian spice mix than you need but that’s OK. You will find uses for it. It’s magic fairy dust.
The onion paste
- Place the onions in a microwave safe dish and cover loosely. Microwave at 70 percent until the onions are soft and translucent. This takes 10 minutes in my 1100 watt microwave. I can’t predict how long it will take in yours…
- Remove the onions from the microwave. Be careful. They will be hot. Let them cool slightly. Place the onions, 2 tbsp vegetable oil and 1 cup of warm water in a blender and puree until smooth. Set aside.
South Indian chicken curry
- In a small bowl, combine the South Indian spice mix, the black pepper, the kashmiri chili powder and the kosher salt.
- Heat 4 tbsp vegetable oil in a pot over medium heat until it shimmers. Add the green chilies and curry leaves if using. Cook for about 30 seconds.
- Add the garlic ginger paste and cook until it stops spluttering.
- Turn the heat to medium low. Add the powdered spices (5 tsp south Indian spice mix, 1 tsp kashmiri chili powder, 1/2 tsp of coarse black pepper and the salt) and stir continuously until it starts to smell really good – around 30-40 seconds. Pay attention. If you burn the spices at this point you have to start over.
- Add the diluted tomato paste and stir to combine. Turn the heat up to medium. Cook for about 1 minute.
- Add the onion paste and turn the heat up to medium high. Cook, stirring occasionally for about 4-5 minutes. Cover it loosely. It will splatter. If it doesn’t your heat is too low. The curry will darken a bit as it cooks. Don’t worry if it starts to look a little dry. The chicken in the next step will release those tasty, tasty juices and thin everything out so you get a lush sauce at the end.
- Turn the heat down to medium low. Add the chicken and stir. Cover and simmer for about 5 minutes. Flip each piece of chicken and continue cooking until the chicken is done. You know it’s done when it reaches an internal temperature of around 170F. I can’t tell you exactly how long this will take. I don’t know how big your chicken pieces are. Shouldn’t take more than 10-12 minutes. Don’t rush this step. You want a nice gentle braise.
- Add the coconut milk and the tamarind paste and cook for about a minute.
- Garnish with additional diced green chilies if desired.
- Serve with rice and parathas. Parathas are amazing with this dish.
